crolfe1984
New member
- 43
- 0
- 0
- Location
- Baltimore, MD
So about two weeks ago I took the plunge and got my very first Steel Soldier! I'm proud to call this particular 1990 BMY M923A2 my own. When it comes to modification & working on the truck I am a bit limited as I only have basic hand/power tools available, and my "workshop" is the quiet end of a city street where I keep it parked. Indeed that is correct - I live in the middle of a major metropolitan area and I got this monster!
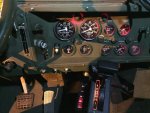
So I wanted to try my hand at adding some rear LED flood lights. This begged the question... How am I going to turn these things on and off? I know a lot people add a switch directly to the side of the battery box, but I wanted a more "dashboard oriented" solution. In the pics below you'll see the switch panel I came up with. I figured if I was going to do one switch why not add two more. That would make adding future accessories/lights that much easier!
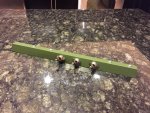
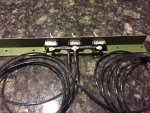
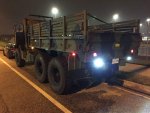
The power comes directly from the battery box up into the engine bay. It enters the cab through the firewall by the PCB. I have a 3 AMP in-line fuse for good measure (right off of the battery for easy replacement if needed). 24V gets routed to each of the heavy-duty switches, and the load-out cable goes right back through the firewall and along the frame to the rear. I wound up using 12GA stranded gas & oil resistant wire for the entire application. The switch bracket itself is 1" angle aluminum drilled for the switches and #8-32 1/2" bolts. The rear lights I picked up from a local FleetPride. They are Prima 3x3w LED lamps.
Overall the installation took a lot of time! Routing that cable was a chore when you're under the truck and well over 6' tall. I already have done some other light modifications such as locking door handles, headlamp guards, and keyed ignition. These lights work great and I can't wait to tackle my next M923A2 project! I'm thinking some front LED driving lights and floods.
So I wanted to try my hand at adding some rear LED flood lights. This begged the question... How am I going to turn these things on and off? I know a lot people add a switch directly to the side of the battery box, but I wanted a more "dashboard oriented" solution. In the pics below you'll see the switch panel I came up with. I figured if I was going to do one switch why not add two more. That would make adding future accessories/lights that much easier!


The power comes directly from the battery box up into the engine bay. It enters the cab through the firewall by the PCB. I have a 3 AMP in-line fuse for good measure (right off of the battery for easy replacement if needed). 24V gets routed to each of the heavy-duty switches, and the load-out cable goes right back through the firewall and along the frame to the rear. I wound up using 12GA stranded gas & oil resistant wire for the entire application. The switch bracket itself is 1" angle aluminum drilled for the switches and #8-32 1/2" bolts. The rear lights I picked up from a local FleetPride. They are Prima 3x3w LED lamps.
Overall the installation took a lot of time! Routing that cable was a chore when you're under the truck and well over 6' tall. I already have done some other light modifications such as locking door handles, headlamp guards, and keyed ignition. These lights work great and I can't wait to tackle my next M923A2 project! I'm thinking some front LED driving lights and floods.


