• Steel Soldiers now has a few new forums, read more about it at: New Munitions Forums!

  • Microsoft MSN, Live, Hotmail, Outlook email users may not be receiving emails. We are working to resolve this issue. Please add support@steelsoldiers.com to your trusted contacts.

My M813 gets a turbo!

US6x4

Well-known member
Steel Soldiers Supporter
1,238
2,272
113
Location
Wenatchee, WA
I spent a ridiculous amount of time searching out fittings and hoses that looked factory for the radiator surge tank. I was trying to find that magic fitting that would give me a 90° swivel with an 3/8" NPT male or 1/4" NPT male and fit a 3/16" or 5/16" hose. I couldn't find such a fitting that had a matching 45° SAE inverted flare fitting in the same fitting family/series and also from a manufacturer that made textile braided hose for those fittings. I found a close match for fittings from Goodyear / Continental and after some more searching I was able to track down some textile braided mil-spec hose also made by Continental to match the fittings!

This hose, which is listed as medium pressure hydraulic hose, was hard to get and Deidra (pronounced Dee-dra) is the lady to talk to at Industrial Hose & Hydraulics Inc. out of Pompano Beach, Florida. She had to work all sorts of angles to get me the small qty I needed but she's the best and I got my hose sent from Florida up here to Washington 😁

20210603_194337.jpg

20210704_144549.jpg

20210704_143343.jpg

20210704_143624.jpg

20210704_144708.jpg

20210704_145333.jpg
So far, I've only attached these field-serviceable fittings on the surge tank side and I will trim down the hose to size before attaching the water manifold and radiator ends.

From the surge tank the big hose will consist of Eaton 2252-6-6S 3/8" NPT 90° swivel male to 3/8" NPT female -> straight Goodyear FG-NPM-06-06 3/8" NPT male -> Continental MIL-H-13444-III-6 5/16" mildew resistant, textile braided, medium pressure hydraulic hose -> Goodyear FG-SFFX-0606 SAE 45° inverted flare straight swivel. The smaller 3/16" hose will be the same except with the number 4 in place of 6 in the part numbers.

Update: I now have the surge tank hoses cut to length and the straight swivel SAE 45° inverted flare fittings have been installed.
20210714_165937.jpg
20210714_170025.jpg
20210714_170044.jpg
 
Last edited:

Mullaney

Well-known member
Steel Soldiers Supporter
Supporting Vendor
7,771
19,877
113
Location
Charlotte NC
I spent a ridiculous amount of time searching out fittings and hoses that looked factory for the radiator surge tank. I was trying to find that magic fitting that would give me a 90° swivel with an 3/8" NPT male or 1/4" NPT male and fit a 3/16" or 5/16" hose. I couldn't find such a fitting that had a matching 45° SAE inverted flare fitting in the same fitting family/series and also from a manufacturer that made textile braided hose for those fittings. I found a close match for fittings from Goodyear / Continental and after some more searching I was able to track down some textile braided mil-spec hose also made by Continental to match the fittings!

This hose, which is listed as medium pressure hydraulic hose, was hard to get and Deidra (pronounced Dee-dra) is the lady to talk to at Industrial Hose & Hydraulics Inc. out of Pompano Beach, Florida. She had to work all sorts of angles to get me the small qty I needed but she's the best and I got my hose sent from Florida up here to Washington 😁

View attachment 838941

View attachment 838942

View attachment 838943

View attachment 838944

View attachment 838945

View attachment 838946
So far, I've only attached these field-serviceable fittings on the surge tank side and I will trim down the hose to size before attaching the water manifold and radiator ends.

From the surge tank the big hose will consist of Eaton 2252-6-6S 3/8" NPT 90° swivel male to 3/8" NPT female -> straight Goodyear FG-NPM-06-06 3/8" NPT male -> Continental MIL-H-13444-III-6 5/16" mildew resistant, textile braided, medium pressure hydraulic hose -> Goodyear FG-SFFX-0606 SAE 45° inverted flare straight swivel. The smaller 3/16" hose will be the same except with the number 4 in place of 6 in the part numbers.
.
That type of fitting is really nice to have.

Something goes wrong and with a roll of hose, you can replace that hose with a "bad spot" in it.
Finding the fittings sure are hard to find though. Maybe I just don't know where to look...
 

US6x4

Well-known member
Steel Soldiers Supporter
1,238
2,272
113
Location
Wenatchee, WA
.
That type of fitting is really nice to have.

Something goes wrong and with a roll of hose, you can replace that hose with a "bad spot" in it.
Finding the fittings sure are hard to find though. Maybe I just don't know where to look...
I ended up finding the fittings at PSCpartsstore.com
 

US6x4

Well-known member
Steel Soldiers Supporter
1,238
2,272
113
Location
Wenatchee, WA
I finished assembling the turbo oil supply hose using Fragola -06 PTFE braided stainless hose and matching 90° swivels; 9/16" male straight thread ORB on turbo end and 1/4" NPT male on the other.

20210703_175519.jpg

20210703_193846.jpg

20210707_173849.jpg


I also got a lot of metal massaging finished on the muffler mount. I got the top saddle shaped to match the bottom saddle, then shot blasted, then tumbled, and finally a wash in the zinc phosphate acid washer.
20210707_111023.jpg
Before steel shot blasting
20210707_111946.jpg
After
20210707_112859.jpg

20210708_090328.jpg

20210708_090337_1.gif

20210708_113858.jpg

20210708_195030.jpg

Fits like a glove with just the right amount of gap to put some tension on the strap!
 

US6x4

Well-known member
Steel Soldiers Supporter
1,238
2,272
113
Location
Wenatchee, WA
OK, here's a sneak peek of my surge tank hose and oil feed hose mockup. Here I'm just measuring the hoses to cut to length and most of the parts are still in the white but the intention is there. My engine (manufactured in 4-81) only has the oil sample drain port as a source of supply oil for the turbo whereas other engines I've seen pictures of on this forum have 2 npt ports to choose from. This makes it an easy choice at least.

That mil-spec hose with its yellow lettering sure looks sharp and it will look even better once the surrounding part get painted Cummins dark charcoal gray.

20210713_181011.jpg
20210713_181036.jpg
20210713_181024.jpg
20210713_181032.jpg
 

US6x4

Well-known member
Steel Soldiers Supporter
1,238
2,272
113
Location
Wenatchee, WA
Today i finished the support brackets for the surge / reservoir tank hoses and the jake brake wiring. I looked and couldn't find clam shell type hose clamps that i liked and that had both a 5/8" hole and a 1/2" hole so I made my own out of 3/8" 1018 carbon steel. These started out very messy because of the laser cutting hot rolled steel sheet with mill scale (instead of pickled & oiled steel) and because they used the cutting parameters for 3/8" stainless to cut my parts. The bracket is just a longer version of ones I made for the jake brakes before now with more room for the hoses.

20210617_110209.jpg
20210709_091842.jpg

A tapered head bolt centers the parts together for welding.
20210709_091855.jpg

Got all the slag ground off finally and I kinda burnt all my fingertips trying to hold these little parts to the belt sander.
20210709_130004.jpg

I oversized the male tab so that I could file to fit since I was unsure of how clean the laser would cut these thicker pieces. Glad I did, but it took mucho time to get it filed down.
20210709_131051.jpg
20210709_131544.jpg

10 gauge tab welded to 1/4" round. The TIG work turned out awesome but i can't take credit- not my welds.
20210709_141712.jpg
20210709_141816.jpg

First I drilled the female slot to tap to 1/4" N.F. then I drilled a 9/32" clearance hole in the other half.
20210712_055802.jpg
20210712_111056.jpg
 

US6x4

Well-known member
Steel Soldiers Supporter
1,238
2,272
113
Location
Wenatchee, WA
20210712_113656.jpg

Due to drill bit wander some of the sides were not perfectly flush so they got ground to match and then polished up a bit.
20210713_081746.jpg
20210713_120519.jpg

The holes were intentionally undersized so that I could drill them to the final diameter after the two halves were mated together; 31/64" for the small hose and 5/8" for the large hose.
20210713_130522.jpg
20210713_131008.jpg

Next was an 82° chamfer and a final smoothing of the surfaces and edges.
20210714_093200.jpg

Now these will get some dark gray charcoal paint and some yellow zinc grade 8 bolts.
 

Crf450x

Well-known member
275
350
63
Location
Fall Branch, TN
View attachment 839645

Due to drill bit wander some of the sides were not perfectly flush so they got ground to match and then polished up a bit.
View attachment 839646
View attachment 839647

The holes were intentionally undersized so that I could drill them to the final diameter after the two halves were mated together; 31/64" for the small hose and 5/8" for the large hose.
View attachment 839648
View attachment 839649

Next was an 82° chamfer and a final smoothing of the surfaces and edges.
View attachment 839650

Now these will get some dark gray charcoal paint and some yellow zinc grade 8 bolts.
That is awesome. I have a suggestion though….counterbores and Allen head bolts. They look great already but I think that would make them even better.
 
Last edited:

US6x4

Well-known member
Steel Soldiers Supporter
1,238
2,272
113
Location
Wenatchee, WA
That is awesome. I have a suggestion though….counterbores and Allen head bolts. They look great already but I think that would make them even better.

I like your idea & I think that would look great, but the way they mount under the bracket I would lose the ability to bolt them to the bracket. If I make a pair as a floating intermediate hose separator w/o a bracket I will do that.
20210713_181024.jpg
 

Crf450x

Well-known member
275
350
63
Location
Fall Branch, TN
I like your idea & I think that would look great, but the way they mount under the bracket I would lose the ability to bolt them to the bracket. If I make a pair as a floating intermediate hose separator w/o a bracket I will do that.
View attachment 839654
Oh I see now. I guess I should have thought that through before posting at 3 am half asleep at work. Can’t wait to see the rest!

I noticed the jakes and thought “this has to be the guy that fit them under the stock hood” and sure enough. Top notch work man.
 

US6x4

Well-known member
Steel Soldiers Supporter
1,238
2,272
113
Location
Wenatchee, WA
I noticed the jakes and thought “this has to be the guy that fit them under the stock hood” and sure enough. Top notch work man.
Thank you! It will be fun to have jakes and a turbo on my truck - it will be making all sorts of fun noises 😁
 

US6x4

Well-known member
Steel Soldiers Supporter
1,238
2,272
113
Location
Wenatchee, WA
Nice work. How much torque and horsepower are you aiming to make with it?
Thanks! I don't know what the torque will be, but from what I've read the horsepower will be in the 300 - 315 range? I can only add so much fuel before the EGTs get too hot for the pistons.
 

US6x4

Well-known member
Steel Soldiers Supporter
1,238
2,272
113
Location
Wenatchee, WA
The relocation of the surge/reservoir tank to the firewall has been an ongoing, slow but painful sort of project. Originally it mounted to the exhaust manifold bolts so I wanted to keep its install height close to that in case it affects its function. I clamped a corner square to the manifold bolts and leveled it out to measure the proper offset for the bracket I made for the tank. My goal was to utilize the 3 existing holes in the firewall from the air vent manifold and the air horn wire loom holder. Below is the mockup of the 1st version bracket.
20210620_163623.jpg
20210620_171700.jpg
20210701_072322.jpg
20210701_084353.jpg
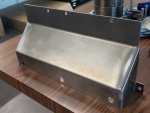
There were two problems with the first bracket. One problem was I didn't compensate for the built in angle of the tank that allowed it to sit horizontal on an engine sloped back at 3.5° and the second problem was that the tank sat too high and the hood wouldn't close. I redesigned it to have just under a 1° slope and to sit 3/8" lower than before.

20210715_092754.jpg
New bracket with top holes pre cut and side seams welded up & ground flush.

20210715_115447.jpg
20210715_153411.jpg
After the tumbler the metal looks mottled almost like it's galvanized.

20210713_184835.jpg
I had to notch the under-hood support to clear the tank with the first bracket and now I have just enough room.

20210713_190258.jpg
Once the bottom two holes for the bracket are drilled in the firewall and the bracket is actually bolted down tight the tank will barely have an air gap between itself and the turbo inlet elbow.
 
Last edited:
Top
AdBlock Detected

We get it, advertisements are annoying!

Sure, ad-blocking software does a great job at blocking ads, but it also blocks useful features of our website like our supporting vendors. Their ads help keep Steel Soldiers going. Please consider disabling your ad blockers for the site. Thanks!

I've Disabled AdBlock
No Thanks