• Steel Soldiers now has a few new forums, read more about it at: New Munitions Forums!

  • Microsoft MSN, Live, Hotmail, Outlook email users may not be receiving emails. We are working to resolve this issue. Please add support@steelsoldiers.com to your trusted contacts.

Mystery wire near heater switch on m1009 ???

cucvegas

Member
59
12
8
Location
NW Arkansas
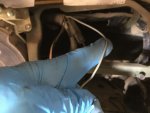
Could someone tell me where this gray wire is supposed to be connected (pictured with blue glove holding it)? It looks like it goes to the heater switch or volt meter?
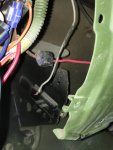
The second picture shows the red power wire it was spliced in to (I think???) by the previous owner. Any ideas what it was powering?

Does it have to do with the voltage drop resistors when selecting the blower speed?

The reason I’m asking is the previous owner also ran a manual switch that would send power directly to the blower motor. This switch did not work when I got it, so I disconnected it and re-connected the original wire from the resistors to the blower motor just to try it.

strangely enough, the blower now works with the original blower switch on high but not mid 1 or mid 2. I don’t know why the previous owner ran the wire on a manual switch in the first place.

Could someone also kindly direct me to the page number and which TM shows the wiring diagram and how to trouble shoot with a volt meter if it is the switch or resistors? I couldn’t find it in -20 TM.

Thanks!
 

Attachments

porkysplace

Well-known member
Steel Soldiers Supporter
9,604
1,493
113
Location
mid- michigan
Could someone tell me where this gray wire is supposed to be connected (pictured with blue glove holding it)? It looks like it goes to the heater switch or volt meter?
The second picture shows the red power wire it was spliced in to (I think???) by the previous owner. Any ideas what it was powering?

Does it have to do with the voltage drop resistors when selecting the blower speed?

The reason I’m asking is the previous owner also ran a manual switch that would send power directly to the blower motor. This switch did not work when I got it, so I disconnected it and re-connected the original wire from the resistors to the blower motor just to try it.

strangely enough, the blower now works with the original blower switch on high but not mid 1 or mid 2. I don’t know why the previous owner ran the wire on a manual switch in the first place.

Could someone also kindly direct me to the page number and which TM shows the wiring diagram and how to trouble shoot with a volt meter if it is the switch or resistors? I couldn’t find it in -20 TM.

Thanks!

CUCV Helpful Threads

CUCV Color Wiring Diagrams
http://www.steelsoldiers.com/showthread.php?75505-CUCV-Wiring-Diagram-color-(except-M1010)
 
Last edited:

cucvrus

Well-known member
11,473
10,433
113
Location
Jonestown Pennsylvania
More detailed pictures would be helpful. But from the picture posted you do have some issues going on. The switch on the fuel pedal is the electric passing gear kick down switch. Get a few more pictures up in that area and I can post a few pictures of the stock set up. Trace that spliced wire and see where it starts and end. Show me that. So many have hacked these poor vehicles with poorly thought out modifications. Happy Holidays. Good Luck. Be Safe.
 

scottladdy

Member
538
8
18
Location
CT
More detailed pictures would be helpful. But from the picture posted you do have some issues going on. The switch on the fuel pedal is the electric passing gear kick down switch. Get a few more pictures up in that area and I can post a few pictures of the stock set up. Trace that spliced wire and see where it starts and end. Show me that. So many have hacked these poor vehicles with poorly thought out modifications. Happy Holidays. Good Luck. Be Safe.
As Rick stated, more detailed images would be helpful, and the previous owner(s) did not do you any favors with the wiring. :eek:

A quick guess based on apparent wire diameter, color (gray) and location would be the 24V voltmeter light positive feed. GM used a button type brass connector which often is not crimped on well and the bare end of the wire is left exposed when the instrument cluster cowl is removed less than carefully. If accurate, this would have +12V when the lights are on (parking or headlight positions). There should be a black ground wire close by.

A replacement socket/pigtail for this light is the "American Autowire 500128"
 

cucvegas

Member
59
12
8
Location
NW Arkansas
As Rick stated, more detailed images would be helpful, and the previous owner(s) did not do you any favors with the wiring. :eek:

A quick guess based on apparent wire diameter, color (gray) and location would be the 24V voltmeter light positive feed. GM used a button type brass connector which often is not crimped on well and the bare end of the wire is left exposed when the instrument cluster cowl is removed less than carefully. If accurate, this would have +12V when the lights are on (parking or headlight positions). There should be a black ground wire close by.

A replacement socket/pigtail for this light is the "American Autowire 500128"

You got it!!! Thank you! It does power the bulb on the volt meter. Mystery solved.

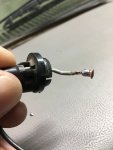
I disassembled the socket and soldered the brass lead back into the gray power wire.

Do you recall which bulb the volt meter socket takes?

Also, I have replaced all the 168 bulbs (heater selector, WAIT, WATER IN FUEL, 4WD, and Oil) with LED that are supposed to go to 168 and 194 sockets.

I also replace the three Bulbs behind the speedometer and fuel gauge with the LED’s. (I got a 10 pack).

What do the top left and top right bulbs light up? Only the center-bottom bulb between the gauges turns on with the headlights.

I plan on leaving the original Gen 1 and 2 bulbs alone.

Thank you again!
 

DeadParrot

Active member
213
47
28
Location
oklahoma city, ok
IIRC - the gauge cluster for my M1008 has three bulbs that provide light for the speedo and fuel gauges. All should light and dim from the headlight switch. Corrosion is a common problem. Can be either on the plastic circuit board, the outside contacts on the holders or internal to the holders. Also check the bulbs themselves. Sometimes the little wires will be off to the side instead of where they are supposed to be.

Gentle use of a pencil eraser works on the circuit board. Fine sandpaper on the outside contacts. Cleaning the internal contacts can be difficult. Fingernail file or other small file. Sometimes inserting and removing a bulb(dead ones are good for this) several times will do the trick.
 

scottladdy

Member
538
8
18
Location
CT
IIRC - the gauge cluster for my M1008 has three bulbs that provide light for the speedo and fuel gauges. All should light and dim from the headlight switch. Corrosion is a common problem. Can be either on the plastic circuit board, the outside contacts on the holders or internal to the holders. Also check the bulbs themselves. Sometimes the little wires will be off to the side instead of where they are supposed to be.
Yes, those 3 bulbs are the "dash lights".

If the printed circuit is too far gone you can buy a new replacement. Search for part number 25053623. One of mine had too many broken traces and was too delicate after 30+ years sitting in the sun. Installed a new one and have not looked back.
 
Top