• Steel Soldiers now has a few new forums, read more about it at: New Munitions Forums!

  • Microsoft MSN, Live, Hotmail, Outlook email users may not be receiving emails. We are working to resolve this issue. Please add support@steelsoldiers.com to your trusted contacts.

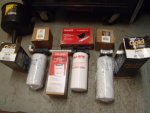
NAPA part numbers for WMO filter set up.

Kaiserjeeps

Active member
459
7
28
Location
North Idaho in the woods
Ace hardware has several different 120VAC water heater elements. I did not know they made them. I am back in business and this simplifies things.
Most good hardware stores should have them.
 

Kaiserjeeps

Active member
459
7
28
Location
North Idaho in the woods
I have updated the first post.

For a spin on filter set up these numbers are the result of lots of searching with the Napa website and a filter reference book.

I wanted big filters with a cheap replacement costs.

First stage Racor 5GPM funnel at 149 micron #RFF8C

Poured into a 25-30 gallon tank I was going to put under the duece. Heated with a 120VAC water heater element from Ace 1500 watt. Controlled by a snap switch which will shut off power at 200, or 180 I am not decided.

Through a water drain to the first filter in the second stage.

Second stage Base #4034 1x12 thread with 3/4 in-out #4001 for 1" in-out
1X12 filter #1818 at 23 micron. A #7251 is longer and the replacement that should have been ordered.

The third stage is a Fill-rite hydrosorb kit #1200KTG9075 10 micron includes a 1X12 base, 1 filter and a 7" 3/4 pipe nipple. Filter refill is #F1810HMO

I could not find a 1x12 filter better than 10 micron.

Fourth stage is a 4770 base at 1x14 threads with 1/2 dual in-outs. One set needs to be blocked.
The filter is #3674 at 2 micron at nearly 11 inches long.
Filter is #3692 at 5 micron if you want to up it some.

These were the best priced bases and filters I found.

I will put a slow hand pump driven by a reduced motor if it needs a little help. I will pull the fluid instead of pushing. It will never make a bypass that way.

Hydraulic and transmission filters have the tightest micron ratings. Hydraulic filters are very pricey and usually come with a 1.5x16 thread. The most expensive was 104.00 The 1.5x16 base were also expensive. Some HYD filters had other thread sizes.

For now a spin on set up is best for me with a centrifuge hopefully in my future. . There might be some better choices in filters. I am sure they are out there. Cost and size were my criteria. This should get some started in the right direction who choose spin on's over bags and centrifuges. I tried to keep the filters under 20 bucks. YMMV.
 

Attachments

Last edited:

Kaiserjeeps

Active member
459
7
28
Location
North Idaho in the woods
You could as gimp says. One on the things I was hoping to retain was portability. I had planned on putting this gizmo contraption on a stand with casters. With a pigtail to plug in I could store it out of the way. I'm short on covered room till a real shop gets done. Then I may go for a more permanant type of set up. I have a feeling this project might morph into something else later. REV1?
 

gimpyrobb

dumpsterlandingfromorbit!
27,786
755
113
Location
Cincy Ohio
The problem I see with the water heater is, its not open to let the water vapor out. I am going to be building a tank to boil the water out of the "fuel".
 

Kaiserjeeps

Active member
459
7
28
Location
North Idaho in the woods
I have searched till my eyes bled. All I gleemed from it was that I ended up confused, tired and hungry. One thing I am not clear on is the process for removing water with heat. I was going to leave my heating tank mostly closed with an opening up top for the funnel. Assuming that water separation happens from the cooling process. With the boiling off post Chris made I am now wondering if I need an open top tank. I know someone has done this before. If I am going to sacrifice my military tank for this project, I would like build that part of it once. Should the tank be cut down it's length and built horizontal for a LOT of surface area? This part is holding me up.
I have searched and now I am asking. Is it cooking off the water with heat and time, or seperating and draining off the bottom, or both?
 

gimpyrobb

dumpsterlandingfromorbit!
27,786
755
113
Location
Cincy Ohio
That is what I am still looking at too Al. I know a guy that has the answer, just haven't called him yet. Maybe I'll send a link to your question and see if he'll add some input.
 

'48Chevy6

Member
86
0
6
Location
Western Maryland
I used to heat oil in an open top barrell to get the water out. It scared me.

I now blend with rug, settle, drain sludge and water off of bottom and the pull through filter rack.

If you must use heat to dewater, consider a 50 gallon water heater that is attached to another tank pulling a slight vacuum. It stands to reason that the vacuum would pull the water vapor after the heat thinned the oil some.

The other benefit to blend, settle, filter is the sludge that falls out of suspension before it gets to your filter rack.

YMMV but I do have almost 18,000 miles on W85. In my powerstroke. Just sayin'.

Tim
 

russ132

Member
149
2
18
Location
Kelleys Island OH
Water seperator

Hi there gentleman,
Gimpy brought this thread to my attention and I would like to throw my setup into the mix. My setup is configured to work with a centrifuge but could easily work with a filter setup. I will do a posting for each component in order of the process. Most of the components should be available at the local scrap yard and some welding is required.

First of all is the Pre-filter and water separator. I picked up a large water pressurization tank for a well water system and a party sized helium tank from the scrap yard. I cut a round hole in the top sized to slide the helium tank down inside. I used helium tanks for these projects because they are plentiful and contain no explosive gases (like propane). I then cut out the rubber bladder inside the pressurization tank and thoroughly cleaned the inside. Then the helium tank had it's top off. A one inch hole was cut into the bottom and a length of pipe was welded to the bottom of the helium tank. The length of the pipe was sized to be just short of the bottom of the pressurization tank. Then the helium tank was welded into the top of the pressurization tank. A one inch hole was cut into the upper side portion of the pressurization tank and a 3/4 inch pipe coupler was welded onto the side of the pressurization tank. there is already a pipe fitting in the bottom of the pressurization tank.
Construction is now complete.

I then purchased a filter basket designed to fit in the top of a 5 gallon bucket from Dudadiesel.com. (great website for filtering supplies and one of the cheapest). They sell these baskets in many different micron sizes. They are cheap so I bought a couple and experimented with which one worked best for me. Keep in mind that this is just the pre-filtering step, meant for large chunks.

This basket will fit very nicely inside the helium tank. The helium tank is now designed to work as a huge funnel with a coarse filter inside. When the oil is poured into the funnel it flows through the pipe welded onto the bottom and is fed
into the bottom of the pressurization tank. Water is heavier than oil so it stays at the bottom of the tank and oil naturally rises to the top. Once your tank is full the oil flows out the pipe coupler welded onto the upper side of the pressurization tank.

The beauty of this setup is the water can be drained out of the bottom without any pumping. I simply put a valve on the pipe fitting on the bottom of the tank and use that to drain water from the bottom of the tank. Because the tank has a rounded bottom the water settles down to the drain quite nicely. I imagine that the bigger the tank you use the more time the water has to settle out. I use no heat in this stage. Just plain old gravity. Remember, Gravity is your friend. My entire setup is constructed to use the most out of gravity.

I found an old canning pot that works great as a lid for the helium tank. Looks kinda funny but it was free and it works. The only cost at this stage was the scrap metal and a few plumbing pieces. Also the filter baskets. These can be washed with whatever you choose to use. I have used water, gas, diesel. All worked great.

I have the outflow of this separator plumbed into a 300 gallon holding tank. Once this tank is full I pump it up to a high tank for the next stage. It could just as easily be plumbed into a heater for canister filtering. gravity could be used for that as well.
 

Attachments

russ132

Member
149
2
18
Location
Kelleys Island OH
Heator

You will have to forgive the maze of hoses in the background of those pictures. When taken I was filling the spare tank that I have in the back of my truck.

On to the heater. In my last post I discussed how I pump from my 300 gallon holding tank into my High tank. Once the high tank is full I move onto the next step of the process. The high tank gives me the power of gravity. The high tank is plumbed into my heater which is inside my garage.

For the heater you will need another helium tank, a 110 water heater element and a 110 water heater thermostat from lowes. Also whatever plumbing fittings you choose.

I cut the handles and valve off of the helium tank and then welded four pieces of angle iron onto the tank to act as legs. I then cut a 3/4 inch hole in the top, lower side and opposite upper side of the tank. I then welded 3/4 inch pipe couplers to those holes. The lower 3/4 fitting is the input. The opposite side upper fitting is output and the top fitting is for the vent.

This next part is important... On the lower side of the tank BELOW the output I cut if I remember the size correctly a 1 1/2 hole and welded in a 1 1/2 coupler. The heater screws into this. When you pick up the parts just make sure you get a coupler that fits the heating element. The reason I say that this is important is because the element MUST be below the output. This naturally always keeps the element submerged in oil. If an element is exposed to air at all it will burn up.

I then cut a half inch hole in the bottom and welded a half inch coupler in place there. I use this as a drain ONLY when the element is cold. This heater acts as a secondary water separator. It does not work as well as the first but it does work. Because it is much smaller and there is convection currents in the oil from the heater it does not settle as well but does still work to a degree.

The thermostat I just used a wire to hold it tightly to the side of the tank. It is adjustable but I always keep it turned up. 150 to 160 degrees no problem at a flow of ten gallons per hour.

On the top 3/4 fitting I used a barbed brass fitting and clear hose for the vent. I ran the hose above the level of the top of the high tank. It serves three purposes. First it acts as a vent allowing any water vapor to escape. Even after all of the settling that I do there is still some. I believe that it is from water that is emulsified in the oil. Second it acts as a sight glass showing me how much oil is in the high tank. And last it prevents and siphon effect from happening.

I have seen inline heaters for sale on some of the centrifuge websites but have heard that the oil doesn't get hot enough and that the elements burn up often. Most believe that these problems are a result of lack of oil volume in contact with the element. These units are usually a length of 2 or 3 inch pipe that the heater sits in and the oil flows through. This is why I went with the helium tank. The volume is much greater than a piece of pipe. Once the oil is up to temp I never have a problem maintaining heat at a flow rate of 10 GPH.

For using canister filter I believe that you could have the the primary water separator inline with the heater flowing into the filters. Or Primary separator into a holding tank and then flowing into the heater. You could not pressurize this setup due to the vent which I have found to be necessary. You could however pump FROM the heater as long as you had a pump with a slow enough flow rate.

I personally have the heater plumbed directly into the centrifuge. All flow is gravity fed. The centrifuge was purchased from Wolverine Technologies. The owner is a member of this site and a really cool guy. His product is top of the line. I have filtered thousands of gallons with this set up. With this style of heater I am still on the original heating element.
 

Attachments

russ132

Member
149
2
18
Location
Kelleys Island OH
The rest

Please do not mock my wiring on the heater. I know it is ugly but it works. Just don't poke your fingers around there. Anyway on to the rest of my setup.

Once the oil flows through the centrifuge it gravity feeds back out of my garage into a 100 gallon storage tank. I use this tank as a "safety, just in case" tank. If any problems occur I can just re-filter this tank instead of my bulk storage tank. Once my safety tank is full I pump the fuel over to my bulk storage tank for use.

This setup worked great for me. However I have a friend with a diesel box truck that is setup to run WVO. With my deuce I could throw anything through my system and my truck would eat it up. His truck does not like old 10W30. So I built another water separator inside of my garage solely for WVO. This one I built on legs about six feet high. Same design same principle. This tank is plumbed straight into the heater though. Much like I was thinking would be good for a Canister filter setup. I just use a ladder and fill it one five gallon bucket at a time. There are multiple control valve throughout the system so I can filter either WVO, WMO, or a combination of the two. During the spring and Fall I run a combination. Through winter I run only WMO. And during the summer I run straight WVO. Never had a problem as long as I don't try to run WVO when it is below 50 or 60 degrees.

Once again, you could upsize or downsize the water separator to fit your needs. Just remember that the larger it is the more time the oil has in the tank and the better it will separate. Remember that gravity is your friend!

Hopefully this all made sense. If you have any questions please ask. Thank you all for your patience on this horribly long post.
 

Attachments

Kaiserjeeps

Active member
459
7
28
Location
North Idaho in the woods
What a beautiful set up. Your information and experience will help others a lot. I can't thank you enough for taking the time to post. Shared knowledge rocks. I also want to thank Chris (Gimp). All the years on here and the Zone and he always steps up. Not just for me but others. That is what it is all about. So a great big thank you also goes to Gimp. This gives me a lot to think on today. I had some thoughts on using a timer for say a sauna or a hot tub for the heater. Just a thought for now. I want to build some safety into it.
One good solid wink from Liz and I can lose my focus and forget what I was doing.
Again russ132, that is a great looking set up. I'm going to go back and look again.:jumpin:

Thank you!!!
 

russ132

Member
149
2
18
Location
Kelleys Island OH
The heater as designed is inherently pretty safe. With the thermostat attached it will only reach the temperature that you have set it at. With the heating element mounted below the output level it should never be exposed to air. It will remain submerged. So if it is plugged in for two hours or two days it stay at the set temperature. Just the same as your water heater in the house. The vent prevents any pressure build up as well.

Gimpy has Seriously helped me out in the past as well. That dude will always have my respect.
 

joediveguy

Member
239
2
18
Location
Front Royal, Northern VA
Wow, that is impressive! I applauded your use of the scrap pile for your setup, I am a firm believer in the KISS principal. Gravity is not just a good idea, it is the law! Thanks for sharing and thanks to Gimp for bringing this thread to your attention. This will help immensely, if, and when I decide to go the WMO route. [thumbzup]
 

gimpyrobb

dumpsterlandingfromorbit!
27,786
755
113
Location
Cincy Ohio
Thanks guys, I just wanted some known good setups posted so we have a reference. I will be making a heater tank for my process and now I have a thread I can go back when building it. Lots of others have helped me, so I try to pass it on.
 

Kaiserjeeps

Active member
459
7
28
Location
North Idaho in the woods
I found 12 and 24 volt water heater elements from a great link on the bug out thread. They are half way down the page. Great if you are wanting to heat on the go or no power nearby. Some good remote 12 volt security components for who knows what you may build in there also.

DC Accessories


Still collecting WMO filter parts. I found 330 gallon totes for a hundred in the PDX area. If any locals want one PM me.

Good luck on the home owner front Scott.
 
Top