• Steel Soldiers now has a few new forums, read more about it at: New Munitions Forums!

  • Microsoft MSN, Live, Hotmail, Outlook email users may not be receiving emails. We are working to resolve this issue. Please add support@steelsoldiers.com to your trusted contacts.

Need 803 parts, crankshaft bolt.

jamawieb

Well-known member
1,437
555
113
Location
Ripley/TN
That's very common with no load. The engine doesn't get hot enough to burn all the fuel off so then the fuel sticks to all the carbon. Then it had all that carbon mixing with water that was getting in through the exhaust. I would get a few cans of carburetor cleaner and soak the cylinders down, then wipe it out. Then use the rust remover you have, a really good rust eater is evaporust. It doesn't have a lot of harsh chemicals in it so it won't damage gaskets or other sensitive material. Finally soak it again and wait. I would personally buy a flex hone and run it up and down the cylinder after you get it free ( just run it up and down each cylinder about 5-8 seconds to really clean them) They have them on the big auction site, you need a 3 1/2 inch and I use a 180 grit series cylinder flex hone. And that engine looks like it hasn't ran in years. Good Luck!
 

Guyfang

Moderator
Staff member
Moderator
16,662
23,800
113
Location
Burgkunstadt, Germany
I have seen worse. You can fix this.

And evaporust is great stuff! I get it sent here, to use on old motorcycles. The guy who sends it, wanted me to be his partner here in Germany, distributing the stuff. Just what I need, more work. The one thing you do NOT want to soak in evaporust, is a blued weapon. Or if you want to re-blue a weapon, then soak it. Found out the hard way.
 

CapePrep

Active member
266
195
43
Location
MA
Not yet, I am able to concentrate the rust dissolver around piston perimeter now. Am going to allow it to soak and keep working it. I have no movement at all at the moment. Trying to not completely take engine apart.Going to just wait and try to keep it moving. Glad I took the head off though. It really needed to be cleaned out.
So, now that you pulled the head, does the crankshaft rotate?
 

CapePrep

Active member
266
195
43
Location
MA
Going into it's heart

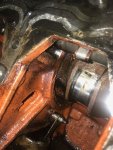
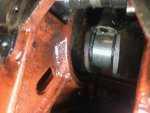
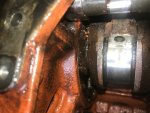
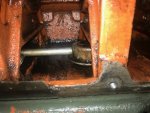
IMG_7909.jpgIMG_7911.JPGIMG_7914.jpgIMG_7916.jpgDigging in deeper-I poured evaporust on top of pistons this morning. #1 drained by the time I got home tonight. 2,3,4 are holding steady. Still no movement at all. Decided to pull the side cover and see what I could see. Lots of crud in the sump. Some rusting visible on the main bearing area. I am frustrated that I can't get any movement out of this thing. I don't know where else to try manually turning it besides what I am doing on the flywheel. I have sprayed and soaked the areas I can get to on the main bearings and also removed #2,3 bearing caps. Can not get to 1 and 4 due to the position they are in. This thing is really stuck and so am I!!!!
 

Farmitall

Well-known member
Steel Soldiers Supporter
544
276
63
Location
Eubank, KY
View attachment 718589View attachment 718590View attachment 718591View attachment 718592Digging in deeper-I poured evaporust on top of pistons this morning. #1 drained by the time I got home tonight. 2,3,4 are holding steady. Still no movement at all. Decided to pull the side cover and see what I could see. Lots of crud in the sump. Some rusting visible on the main bearing area. I am frustrated that I can't get any movement out of this thing. I don't know where else to try manually turning it besides what I am doing on the flywheel. I have sprayed and soaked the areas I can get to on the main bearings and also removed #2,3 bearing caps. Can not get to 1 and 4 due to the position they are in. This thing is really stuck and so am I!!!!
What about using a block of wood to "gently" tap the top of the pistons and see if it breaks the rust weld? By all things seen, the engine is going to have to be completely torn down, cleaned and parts replaced. Hopefully the cylinder walls are salvageable. Keep us updated. Good pics!!
 
Last edited:

jamawieb

Well-known member
1,437
555
113
Location
Ripley/TN
If you want a long life out of the unit, you really need to rebuild. I'm so afraid when you break the pistons loose, you're going to have severe rust pitting. You can get the rust off and put it back together but you may only get a 1000 hours out of it before you burn up the crank bearings. If the rust did not pit the crank I wouldn't be worried. I'm really interested to see how the cylinder walls look.
 

CapePrep

Active member
266
195
43
Location
MA
Happy than Sad!

IMG_7927.jpgIMG_7928.jpg
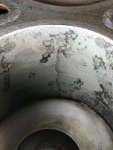
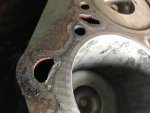
Short lived elation-I figured out a way to free up the motor. I was very excited and happy. Basically scoured old tractor forums. A suggestion of fabricating a flat plate and bolt it to the block with head bolts. I have a hydraulic mini ram, maybe an inch of travel. Rigged this up, put a little strain on #4 piston and it slowly gave way! Worked it back and forth slowly. Finally got 1 and 4 to bottom of stroke. Cleaning up bores I found an odd thing in #1.....See above. Cracked cylinder in #1.....so pissed. I know learn how to completely break down the enclosure, remove the generator head, Remove the engine and try to find a salvageable block....Anyone have any leads on one in the northeast??? Or, are these sleeved??? I have a great machinist who does some amazing things with engines. A $900 gamble, I lost! This is why I don't play cards, lottery or bets with my kids!! **** it
 

Haoleb

Member
197
7
18
Location
Raymond, Maine
Bum deal but for $900 dollars I don't think you did too bad. Plenty of good parts on that set you could easily get your $$ back and then some.

When I needed some parts for my set I found a guy on that auction place who I dealt with and he got me the parts I needed at a very good price.. He might have a good block.. Located in PA

Search for...
[h=1]Lister Petter 4 cyl. Onan DN4M-1 diesel Diesel parts runners LPW4 cores parts[/h]
 
Last edited:

Guyfang

Moderator
Staff member
Moderator
16,662
23,800
113
Location
Burgkunstadt, Germany
Since you could not find the procedure for main gen removal, here is a copy of the first page. Its page 185, (PDF reader) Its listed in the Index, under: ENGINE AND GENERATOR ASSEMBLY.


3-6 ENGINE AND GENERATOR ASSEMBLY.
3-6.1 Removal.
a. Shut down generator set.
b. Remove batteries, paragraph 2-12.2.
c. Remove screws (2, FIGURE 2-20), washers (3), and fan guards (4) from both sides of generator set.
NOTE
If removing the generator only, proceed to step f.
d. Drain engine oil into suitable container.

e.
f.
g.
h.
i.

j.
k.

l.

m.
n.

o.

If engine has been operating and coolant is hot, allow the engine to cool before
you slowly loosen radiator filler cap and relieve pressure from the cooling sys-
tem. Failure to observe this warning could result in severe personal injury.
Drain coolant into a suitable container.
Remove control box top panel, paragraph 2-16.1.
Remove top housing panel, paragraph 2-17.1.
Tag and disconnect wires at terminal board TB3 (16, FIGURE 4-11) leading from generator.
Remove nuts (1, FIGURE 2-26), Iockwashers (2), washers (3), and bolts (4) securing load output terminal
board assembly (13) to skid base.
Remove nut (5, FIGURE 2-9) and bolt (4) securing center door post (6) to skid base.
Remove bolts (7), nuts (8), Iockwashers (9), and washers (10) securing lower door sill (11) to skid base.
NOTE
If removing the generator only, proceed to step n.
Remove bolts (18, FIGURE 2-8), Iockwashers (19), washers (20), bolts (21), and nuts (22) securing air deflec-
tor panels (23), (24), and (25) to front housing (49).
NOTE
Fan shroud is in two pieces.
Remove bolts (13, FIGURE 2-20) and nuts (14) securing fan shroud (15).
Loosen two clamps (2, FIGURE 2-19) and remove hose (3) from air cleaner (7) and air intake manifold.
NOTE
If removing the generator only, proceed to step p.
Remove muffler, paragraph 2-65.1.
 

CapePrep

Active member
266
195
43
Location
MA
Guy, I will look for that part and move forward. Thanks for taking the time to copy and paste. Hopefully pulling it apart this weekend.
Since you could not find the procedure for main gen removal, here is a copy of the first page. Its page 185, (PDF reader) Its listed in the Index, under: ENGINE AND GENERATOR ASSEMBLY.


3-6 ENGINE AND GENERATOR ASSEMBLY.
3-6.1 Removal.
a. Shut down generator set.
b. Remove batteries, paragraph 2-12.2.
c. Remove screws (2, FIGURE 2-20), washers (3), and fan guards (4) from both sides of generator set.
NOTE
If removing the generator only, proceed to step f.
d. Drain engine oil into suitable container.

e.
f.
g.
h.
i.

j.
k.

l.

m.
n.

o.

If engine has been operating and coolant is hot, allow the engine to cool before
you slowly loosen radiator filler cap and relieve pressure from the cooling sys-
tem. Failure to observe this warning could result in severe personal injury.
Drain coolant into a suitable container.
Remove control box top panel, paragraph 2-16.1.
Remove top housing panel, paragraph 2-17.1.
Tag and disconnect wires at terminal board TB3 (16, FIGURE 4-11) leading from generator.
Remove nuts (1, FIGURE 2-26), Iockwashers (2), washers (3), and bolts (4) securing load output terminal
board assembly (13) to skid base.
Remove nut (5, FIGURE 2-9) and bolt (4) securing center door post (6) to skid base.
Remove bolts (7), nuts (8), Iockwashers (9), and washers (10) securing lower door sill (11) to skid base.
NOTE
If removing the generator only, proceed to step n.
Remove bolts (18, FIGURE 2-8), Iockwashers (19), washers (20), bolts (21), and nuts (22) securing air deflec-
tor panels (23), (24), and (25) to front housing (49).
NOTE
Fan shroud is in two pieces.
Remove bolts (13, FIGURE 2-20) and nuts (14) securing fan shroud (15).
Loosen two clamps (2, FIGURE 2-19) and remove hose (3) from air cleaner (7) and air intake manifold.
NOTE
If removing the generator only, proceed to step p.
Remove muffler, paragraph 2-65.1.
 

Guyfang

Moderator
Staff member
Moderator
16,662
23,800
113
Location
Burgkunstadt, Germany
Its not hard. I always took off the skin first, doors and Tops. Then unhooked all the wires to the engine. AND DOUBLE CHECK. There is always one you forget. Then unhook the main gen wires at the TB. Thread them through the CT's, and for heavens sake, count how many time the wires go through the CT's!! Then, following the a fore mentioned procedure, drain the radiator, remove the guards, and pull the front end off the set. Then you need to remove the 4 vibration shock mounts, and lift out both engine and main gen. Set them on the floor, remove the cover to the main gen and start to disassemble it. After you have done one, it goes fast. But the first one takes a bit more time. Not to worry. Read the procedure, then adjust as you see fit. If I had a good helper, and over head lift capability, I could start in the morning and have it out before lunch, no problem. Lots of this stuff should already be done already, so its easy street.
 

CapePrep

Active member
266
195
43
Location
MA
Guy, can you please help me find that TM or whatever it is? I have spent the last hour looking at everything I could find and I don't speak military abbreviations. I have saved many docs relating to these units and I can't find anything close to either referencing what you posted or with that many pages! Frustrating to say the least. Any guidance would be greatly appreciated. Thanks
Since you could not find the procedure for main gen removal, here is a copy of the first page. Its page 185, (PDF reader) Its listed in the Index, under: ENGINE AND GENERATOR ASSEMBLY.


3-6 ENGINE AND GENERATOR ASSEMBLY.
3-6.1 Removal.
a. Shut down generator set.
b. Remove batteries, paragraph 2-12.2.
c. Remove screws (2, FIGURE 2-20), washers (3), and fan guards (4) from both sides of generator set.
NOTE
If removing the generator only, proceed to step f.
d. Drain engine oil into suitable container.

e.
f.
g.
h.
i.

j.
k.

l.

m.
n.

o.

If engine has been operating and coolant is hot, allow the engine to cool before
you slowly loosen radiator filler cap and relieve pressure from the cooling sys-
tem. Failure to observe this warning could result in severe personal injury.
Drain coolant into a suitable container.
Remove control box top panel, paragraph 2-16.1.
Remove top housing panel, paragraph 2-17.1.
Tag and disconnect wires at terminal board TB3 (16, FIGURE 4-11) leading from generator.
Remove nuts (1, FIGURE 2-26), Iockwashers (2), washers (3), and bolts (4) securing load output terminal
board assembly (13) to skid base.
Remove nut (5, FIGURE 2-9) and bolt (4) securing center door post (6) to skid base.
Remove bolts (7), nuts (8), Iockwashers (9), and washers (10) securing lower door sill (11) to skid base.
NOTE
If removing the generator only, proceed to step n.
Remove bolts (18, FIGURE 2-8), Iockwashers (19), washers (20), bolts (21), and nuts (22) securing air deflec-
tor panels (23), (24), and (25) to front housing (49).
NOTE
Fan shroud is in two pieces.
Remove bolts (13, FIGURE 2-20) and nuts (14) securing fan shroud (15).
Loosen two clamps (2, FIGURE 2-19) and remove hose (3) from air cleaner (7) and air intake manifold.
NOTE
If removing the generator only, proceed to step p.
Remove muffler, paragraph 2-65.1.
 

jamawieb

Well-known member
1,437
555
113
Location
Ripley/TN
The TM's (technical manuals) are subdivided and identified mostly by the last 2 digits of the manuals identification. Example: If someone says look at -24 they mean 9-6115-641-24. Each manual is for a specific purpose and if you see a manual with a P at the end, your looking at a manual that is showing the pictures and NSN numbers of everything.

The manual you need to look at is 9-6115-641-24 and it doesn't matter if its for the 5kw or 10kw unit, everything will be the same. The only time a specific manual is needed, is when your working on the specific engine (either 2 cylinder or 4 cylinder)
 

Guyfang

Moderator
Staff member
Moderator
16,662
23,800
113
Location
Burgkunstadt, Germany
Go to the top of the page. Click on Technical Manuals. Scroll down to power generation manuals. Click there. Scroll through till you see the thread with the TM's you want. Open it up. Download everything there. put it in a file in you computer and go through it.

As Jamawieb said, 802A or 803A, its all the same. The only difference is in the engine itself. The removal is the same. Its in the TM 9-6115-641-24 or 642-24. Every TM you need for these sets is here in the forum TM forum.

Copy this link. paste it in your browser. Its still in the TM upload section, because the moderators haven't had time to move it.
https://www.steelsoldiers.com/showthread.php?175591-MEP-803A-All-the-TM-s-you-need
 

CapePrep

Active member
266
195
43
Location
MA
Thank you Gentlemen, I did find it with your help. I have printed the applicable pages out, have read it 232 times:roll:, and will take it out tomorrow with me to the set. I would like to just leave the gen head on the skid and pull the engine out. Not sure if that is possible. The TM mentions some "screwdriver slots" to aid in separating the engine from head. I don't see anything obvious. I have the front of the set stripped and ready to pull the motor. Just need to get some separation. Fingers crossed.
 
Top
AdBlock Detected

We get it, advertisements are annoying!

Sure, ad-blocking software does a great job at blocking ads, but it also blocks useful features of our website like our supporting vendors. Their ads help keep Steel Soldiers going. Please consider disabling your ad blockers for the site. Thanks!

I've Disabled AdBlock
No Thanks