

Bryanbdp
New member
- 7
- 18
- 3
- Location
- Simsbury ct
So I've been busy welding up my tubing support brackets. I bought a bunch of 1.33 OD galvanized pipes used for green houses.
1.5" OD .083 wall DOM steel tubing fits over the 1.33 pipe nicely.
I bought a cheap Harbor Freight tubing notcher and a good 1.5" carbide tooth hole saw and proceeded to make a ton of notches in my tubing.

For a $50 tool it worked pretty well. Cut all the notches with one hole saw! Used a little oil to lubricate.
I cut the pieces off the tube after notching, otherwise the pieces would be too short to hold in notching tool!

Next I created some angle jigs from 2x10 material to help fixture the notched pieces. I drilled a 1.5" hole to accommodate the center connectors, which have bosses protruding to both sides, so one side goes through the hole when fixturing. These simple fixture worked well. I place a few tacks to hold everything, then fully weld.


jig for side wall to roof support

jig for center top peak connector

rounding ends of pins using drill and grinding wheel

wall end connector welded and pin installed

center roof peak connector with pin, fully welded.

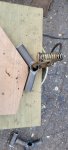
center foot with stake hole, this tube in angled to the flat foot.

end wall foot

end wall center connector with linch pin holes drilled, ready to finish.

These go on peak support pipes and allow attachment of peak support bracket (horizontal)
I bought 50 linch pins to hold everything together from Tool Tuff direct.

Next steps are to check fit of all sockets and use grinding wheel to open up any distorted bores.
Then I plan to use a hot bath to black oxide coat all the brackets to give them a final finish.
1.5" OD .083 wall DOM steel tubing fits over the 1.33 pipe nicely.
I bought a cheap Harbor Freight tubing notcher and a good 1.5" carbide tooth hole saw and proceeded to make a ton of notches in my tubing.
For a $50 tool it worked pretty well. Cut all the notches with one hole saw! Used a little oil to lubricate.
I cut the pieces off the tube after notching, otherwise the pieces would be too short to hold in notching tool!
Next I created some angle jigs from 2x10 material to help fixture the notched pieces. I drilled a 1.5" hole to accommodate the center connectors, which have bosses protruding to both sides, so one side goes through the hole when fixturing. These simple fixture worked well. I place a few tacks to hold everything, then fully weld.
jig for side wall to roof support
jig for center top peak connector
rounding ends of pins using drill and grinding wheel
wall end connector welded and pin installed
center roof peak connector with pin, fully welded.
center foot with stake hole, this tube in angled to the flat foot.
end wall foot
end wall center connector with linch pin holes drilled, ready to finish.
These go on peak support pipes and allow attachment of peak support bracket (horizontal)
I bought 50 linch pins to hold everything together from Tool Tuff direct.
Next steps are to check fit of all sockets and use grinding wheel to open up any distorted bores.
Then I plan to use a hot bath to black oxide coat all the brackets to give them a final finish.
Attachments
-
 55.3 KB Views: 1

