• Steel Soldiers now has a few new forums, read more about it at: New Munitions Forums!

  • Microsoft MSN, Live, Hotmail, Outlook email users may not be receiving emails. We are working to resolve this issue. Please add support@steelsoldiers.com to your trusted contacts.

Picked up 6 MEP-802A gensets and will be documenting making them all runners here

pclausen

Well-known member
Steel Soldiers Supporter
452
281
63
Location
Afton, VA
Thanks for the tip on honing fluid davo!

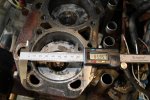
So I took my cheap Ampro "Precision" Digital Caliper and measured the diameter across the upper region of the front bores on each engine twice (2nd measurement 90 degrees apart from the first).

802A-2007-6-26-01.jpg
http://www.cstone.net/~dk/802A-2007-6-26-01.JPG

I swear the 2007 looks like it already has been sleeved (above pic). If it has, can the sleeve be bored?

At any rate, here are the results:

2006 - 85.82 - 85.79
2007 - 85.95 - 85.88
2009 - 85.74 - 85.91

As stated previously, factory spec is 86.000 - 86.025mm in the region of travel by the piston skirt and available over bore pistons are 0.25 and 0.50, so there's hope that these haven't been bored yet! (I think).

Guess I'll know for sure once I get my bore gauge.
 
Last edited:

Munchies

Member
417
3
18
Location
Keesler Air force base/ MS
Whether or not an engine gets bored and rebuilt by the DOD or not depends on the equipment and how new it is mainly. Stuff thats current and servicable and has depot rebuild infrastructure vs having to bid out a contract for rebuilding it (like most recent 002/003 engines).
The BIG depots definitely have engine shops.
ANyone have a link to the parts TM?
 

pclausen

Well-known member
Steel Soldiers Supporter
452
281
63
Location
Afton, VA
Does anyone have any experience with setting the fuel pump rack?

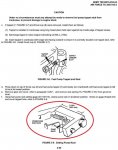
The TM calls for using this gauge:

LPWpumprackgage1.jpg

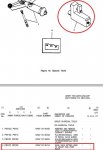
Here's what it looks like by itself and the part number:

LPWpumprackgage2.jpg

Is this tool really necessary or can I manually press in on the rack to ensure that it stays in the shutdown position. If not I guess I can rig something up with a couple of small blocks of wood and a long bolt or something.
 

pclausen

Well-known member
Steel Soldiers Supporter
452
281
63
Location
Afton, VA
I managed to score the gauge tool for the fuel rack on ebay. I figured this is one procedure I want to get right. Would suck to get it all together and have a run-away engine.

fuelracktool.jpg

I checked with Kraft Power on pistons, they have none of the 0.25mm over, but plenty of the 0.50mm over. The bad news is that they are just under $150 each! I guess it was wishful thinking they would cost about the same as a small block chevy 350, which can be had for under $100 for a set of 8 or about $12 a pop.
 

Munchies

Member
417
3
18
Location
Keesler Air force base/ MS
Sounds like Quincy compressor piston prices. Yikes. I did spend $550 on four forged pistons for my saab engine last year so I feel the pain.


I dont see ANY oversize pistons in the DOD systems... Hmm. the 002/003 sure did along with sleeves.
Cummins/onan continued to supply parts until recently, so you can try calling your local distributor with the part number in the .mil manual as well for other things.

Can you find a serial number on the block anywhere? 6-7 digits hopefully. I can get into the cummins system and poke around

I know this is the 4cyl but all the parts are the same. Onan had at one point a 1mm over
http://yakimagenerator.com/generators/pdf/Onan_ DN4M.pdf

My distributor has the .75 oversize piston assembly (wristpin, circlip, rings, and piston) for $186
 
Last edited:

pclausen

Well-known member
Steel Soldiers Supporter
452
281
63
Location
Afton, VA
Thanks for looking into parts for me Munchies!

I do have a local Onan guy that I have been doing business with since the mid 90's. I'll bounce the piston part numbers off him as well.

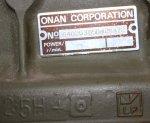
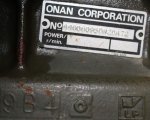
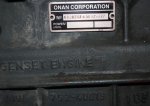
I do have the ID tags for each engine block. They are as follows:

2006:

802A-2006-ID TAG.jpg

2007:

802A-2007- ID TAG.jpg

2009:

802A-2009-ID TAG.jpg

The $120 per piston definitely is definitely better than $150! So I might take you up on that.
 

CDR

New member
325
3
0
Location
new york
I really think you can get away with not replacing the pistons I'm telling u mine look almost worse then your and it runs great makes 6000watts no problem
 

pclausen

Well-known member
Steel Soldiers Supporter
452
281
63
Location
Afton, VA
Good to hear. I finally got both my digital bore gauge and 75-100mm micrometer, so I'll be able to take my measurements now of both the pistons and bores. Hopefully everything will be within spec, even after a light hone. Keeping fingers crossed that the rings are in decent shape as well.

I'm wondering if I can get away with leaving the crank and cam in there while honing? Figured I can turn the crank so that the rod journals are all the way down and then drop a rag over them. But then since I'm this far in, maybe I should just pull the engine from the skid and tear it down all the way.

I went ahead and ordered the one head gasket that Kraft Power still had left in the US. Lister raised their prices big time as of July 1st. Prior to July 1st, the head gasket was just under $50. The new price is just North of $100! He cut me a break since he had quoted me the old price just prior to July and I got it for $76. Btw, the said Lister went away from the 3 different gasket thicknesses a long time ago.
 
Last edited:

rustystud

Well-known member
9,254
2,941
113
Location
Woodinville, Washington
Good to hear. I finally got both my digital bore gauge and 75-100mm micrometer, so I'll be able to take my measurements now of both the pistons and bores. Hopefully everything will be within spec, even after a light hone. Keeping fingers crossed that the rings are in decent shape as well.

I'm wondering if I can get away with leaving the crank and cam in there while honing? Figured I can turn the crank so that the rod journals are all the way down and then drop a rag over them. But then since I'm this far in, maybe I should just pull the engine from the skid and tear it down all the way.

I went ahead and ordered the one head gasket that Kraft Power still had left in the US. Lister raised their prices big time as of July 1st. Prior to July 1st, the head gasket was just under $50. The new price is just North of $100! He cut me a break since he had quoted me the old price just prior to July and I got it for $76. Btw, the said Lister went away from the 3 different gasket thicknesses a long time ago.
WOW !!! A 100.00 dollars for a head gasket ! I think I'll stick with my MEP-002A and MEP-003A units !!!
 

tobyS

Well-known member
4,832
833
113
Location
IN
If there is anything I would replace, it would be rings. Honing... and keeping the honing debris/fluid out of the rest of the engine may be difficult. Is the generator shaft connected to the crank so that it must be removed for you to take the engine(s) out?

Just think, when your done, you will be an expert!
 

tobyS

Well-known member
4,832
833
113
Location
IN
Davo...There are lots of lasers out there. Programming is the harder part and once you find a friend with one, ask to get a copy of his or buy it from the OEM.

Personally I'm using more aircraft form a gasket. It worked great on my transfer case.
 

TurboJoe

New member
68
2
0
Location
Lafayette, NJ
Good to hear. I finally got both my digital bore gauge and 75-100mm micrometer, so I'll be able to take my measurements now of both the pistons and bores. Hopefully everything will be within spec, even after a light hone. Keeping fingers crossed that the rings are in decent shape as well.

I'm wondering if I can get away with leaving the crank and cam in there while honing? Figured I can turn the crank so that the rod journals are all the way down and then drop a rag over them. But then since I'm this far in, maybe I should just pull the engine from the skid and tear it down all the way.

I went ahead and ordered the one head gasket that Kraft Power still had left in the US. Lister raised their prices big time as of July 1st. Prior to July 1st, the head gasket was just under $50. The new price is just North of $100! He cut me a break since he had quoted me the old price just prior to July and I got it for $76. Btw, the said Lister went away from the 3 different gasket thicknesses a long time ago.
I wonder if they saw the spike in demand for these head gaskets after all the military auctions and raised their prices. Insider information, Kraft power is not doing well financially, just fyi.
 

Munchies

Member
417
3
18
Location
Keesler Air force base/ MS
Take some pics of the HG.. Wonder if it can be made out of solid copper. The 002/003 is the folded thin steel with soft lead or maybe asbestos. I used to remember the name for it, but many exhaust pipe connections are the same material.
 

pclausen

Well-known member
Steel Soldiers Supporter
452
281
63
Location
Afton, VA
I'll take a pic of the new head gasket tonight. Haven't had a chance to open the box yet!

Also, I'm picking up missing parts from a guy that is parting out a couple of these. Here's his description of how to separate the gen head from the engine:

1. Prop up the front engine mounts -- these are the mounts that are there but not used. When you remove the stator you remove the front mounts, so this propping will support the engine/rotor once the stator is removed

2. Remove generator stator mounting bolts (4)

3. Remove generator stator. This comes apart fairly easily -- you can use the vent holes in the rear of the stator to pry it loose. be careful not to scuff or abrade the inside of the stator against the rotor. Those four long mounting rods that go from the front to the rear of the generator will make this fairly easy. NOTE you will need a sling and engine hoist fastened to the lifting ring on the stator. It isn't overly heavy, but it is too heavy to manage easily without the hoist/sling

4. Remove the mounting bolts that hold the rotor to the flywheel.

5. Remove the rotor -- it, too will need a sling to hold it steady. I had a little trouble with this and I finally sprayed some penetrating oil on the surface where the rotor disc fastened inside the flywheel. I also used a rubber dead blow hammer to jog it loose.

6. Remove flywheel

Doesn't sound too bad.
 

Keith_J

Well-known member
3,657
1,319
113
Location
Schertz TX
Take some pics of the HG.. Wonder if it can be made out of solid copper. The 002/003 is the folded thin steel with soft lead or maybe asbestos. I used to remember the name for it, but many exhaust pipe connections are the same material.
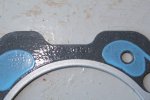
Laminated steel graphite? Most modern head gaskets are multi layer metal, not needed here as it is iron block and head. Multilayer metal are typically used on aluminum heads with iron block.
thickness is most critical, you could probably make a gasket from high temperature composite sheet using copper wire rings for combustion chamber sealing.
 

pclausen

Well-known member
Steel Soldiers Supporter
452
281
63
Location
Afton, VA
Here are some shots of that $100 gasket.

lpw2hg-1.jpg

Closeup showing the 752-40751 part number

lpw2hg-2.jpg

Here it is next to the 3 old head gaskets. Note the small red arrows. Each gasket has 1, 2 or 3 holes, indicating the thickness. So on the originals, 2 had 2 holes and 1 had 3 holes. Of course I didn't take notes as to which gasket went with which engine...

lpw2hg-3.jpg

No wonder Kraft aren't doing so well. Nobody can afford their prices. lol
 

pclausen

Well-known member
Steel Soldiers Supporter
452
281
63
Location
Afton, VA
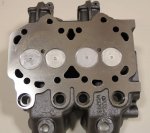
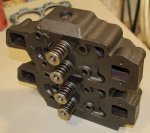
Finally had a chance to work on these some more this weekend. I picked up the one head from the machine shop last week. They had to do quite a bit of work on it. I supplied new valve guides (they were shot) as well as new seals. I paid $48 for the 4 new guides including shipping.

The machine shop did the following:

1. Hot tanked and detected for cracks ($18.75)
2. Resurface head ($44.25)
3. Replaced the valve seats & cut to depth ($19.52 parts $42.00 labor)
4. Replace guides ($78.00 labor)
5. "Valve Job" ($66.01 labor)

So I ended up paying the shop $274.03 to have then do the head, plus the $48 I paid for the guides, for a grand total of $322. Pretty steep, but that head should be good to go now for sure.

LPW2-head1.jpg
http://www.cstone.net/~dk/LPW2-head1.JPG

LPW2-head2.jpg
http://www.cstone.net/~dk/LPW2-head2.JPG

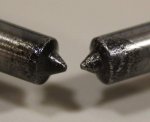
The injectors I think are shot. I can make out like 4 little pin holes on the other heads, but on these I see nothing.

LPW2-inject.jpg
http://www.cstone.net/~dk/LPW2-inject.JPG

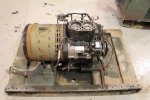
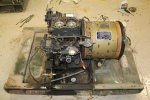
I decided to go ahead and focus on the 2009 unit and got it stripped down to the skid

802A-frame1.jpg
http://www.cstone.net/~dk/802A-frame1.JPG

802A-frame2.jpg
http://www.cstone.net/~dk/802A-frame2.JPG

802A-frame3.jpg
http://www.cstone.net/~dk/802A-frame3.JPG

Looks like somebody was in a hurry putting the starter on last time it was off...

802A-frame6.jpg
http://www.cstone.net/~dk/802A-frame6.JPG

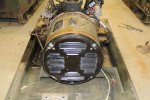
Popped the cover panel and it looks like I might as well tear it the rest of the way down to properly clean out the rusted surfaces

LPW2-cover1.jpg
http://www.cstone.net/~dk/LPW2-cover1.JPG

LPW2-cover2.jpg
http://www.cstone.net/~dk/LPW2-cover2.JPG
 
Last edited:
Top
AdBlock Detected

We get it, advertisements are annoying!

Sure, ad-blocking software does a great job at blocking ads, but it also blocks useful features of our website like our supporting vendors. Their ads help keep Steel Soldiers going. Please consider disabling your ad blockers for the site. Thanks!

I've Disabled AdBlock
No Thanks