• Steel Soldiers now has a few new forums, read more about it at: New Munitions Forums!

  • Microsoft MSN, Live, Hotmail, Outlook email users may not be receiving emails. We are working to resolve this issue. Please add support@steelsoldiers.com to your trusted contacts.

Replacing M35A2 Wheel Bearing Races

ODRotorhead

New member
4
12
3
Location
Maine
Have searched for How-To information pertaining to removing and reinstalling Deuce wheel bearing races, but I'm not having any luck. The -20-3-2 isn't much help either.

This is my first effort in this area and I don't want to screw it up. If you know of any posts or videos showing the steps and tools required, please let me know.

Thanks.

Mark
 
  • Like
Reactions: HDN

gringeltaube

Staff Member
Super Moderator
Moderator
Steel Soldiers Supporter
6,995
2,567
113
Location
Montevideo/Uruguay
Welcome to SteelSoldiers!

If you mean the bearing cups (#3920), each hub has two of them, press-fitted into their respective seats.
For removal of (old) races, seats have notches, to either apply a puller or tap them out with a brass drift. Be careful to not damage the seat's surface!

Before installation of (new) bearing cups, clean; inspect and apply some lube to the bore.
Installation should be done with a shop press, or using a suitable installer tool. In a pinch, you can also take the old cup, cut a slit through it and use that one- plus a brass hammer, to pound-in the replacement cup. Never hit a new- or reusable bearing directly with a punch/ hammer!

Whatever method, take special care that the cup is kept well aligned with the bore and goes in perfectly straight!
This is my first effort in this area and I don't want to screw it up
With some patience and common sense there isn't really that much that can go wrong!
Hub & drum assemblies are heavy, so keep your feet and fingers clear!
 

ODRotorhead

New member
4
12
3
Location
Maine
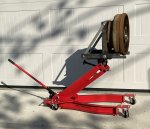
Thanks very much for that helpful information. I'd been warned in advance about the weight of the drums. My back is already wrecked so I came up with a plan to avoid another trip to the hospital:

Brake Drum Bracket 002.jpg

I worked up a bracket to bolt onto my transmission lift. Once I get the drum bolted on the bracket and the table aligned with the spindle, I just pull the whole thing back and the drum slides right off without any effort. I have two M35A2s, so working with twelve drums makes the bracket fabrication a worthwhile effort.

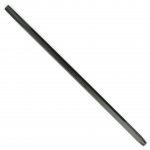
None of my brass punches are big enough, long enough for the current job, so I'm shopping for a suitable drift. I found a 3/4" round brass drift that's 12" long that should do the job.

Mayhew Brass Drift 25075 - 001.jpg

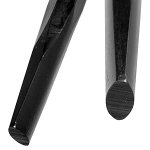
The same company also offers a steel punch that's specifically designed for bearing races. It has a 5/8" oval tip and it's 20" long:

Mayhew 24550 Oval Tip Punch.jpgMayhew 24550 - 002.jpg

Given the size of the 3920 races, I'm leaning toward the specialized steel race punch. I know I'll have to be more careful with a steel punch. Any thoughts on which might be the better choice?

I have a small 12 ton shop press that I can use to seat the new races and, fortunately, a son who can manhandle the drums for me.

Lastly, I'm hoping someone can recommend a source for quality bearing, seal, and brake components at reasonable prices. Quality is more important than price, but within reason.

Thanks again for the feedback. I'm grateful for any advice that can be offered.
 
Last edited:

gringeltaube

Staff Member
Super Moderator
Moderator
Steel Soldiers Supporter
6,995
2,567
113
Location
Montevideo/Uruguay
Given the size of the 3920 races, I'm leaning toward the specialized steel race punch.
That steel punch will work better & faster; a brass drift not so much, but it is safer for your hub, at least....
I know I'll have to be more careful with a steel punch.
As always: practice makes perfect! ;-)
 

G744

Well-known member
Steel Soldiers Supporter
1,725
3,885
113
Location
Hidden Valley, Az
Done many over the years with a punch & hammer.

I use an old race as a drift.

It's not rocket science.
 
  • Like
Reactions: HDN

ODRotorhead

New member
4
12
3
Location
Maine
A quick follow up for others (like me) who haven't done this particular job before . . .

After finally cleaning all the old grease out of the hub, I discovered that there are two cutouts to provide surfaces to seat a punch.
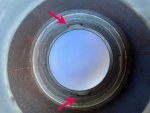
Brake Drum Hub 001 Low.jpg

I used the oval-head punch so I was able to work all the way around and keep the race fairly well aligned. Some races (cups) popped out easier than others, but none were difficult. Lighter "taps" with a 3 Lb. hammer seemed to work better.

Here's one of the old races compared to a new race:
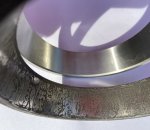
Front Bearing Race 001 Low.jpg

I've read numerous times that the drum assemblies are heavy, but no one ever mentions the actual weights. Fun facts: The front drum assembly is 83 pounds. The rear assembly is 87 pounds.

I'd planned to use a hydraulic press to seat the new races, but discovered that the frame of my press is a little too narrow. There are lots of different ways to seat a new race, but I wanted to use a properly sized installer. I had a difficult time finding one, but eventually came across one made by Torque King:

Torque King QT1807 Cup Driver 001.jpg

From their ad:
Tech Note 3: Custom Fit:
QT1807 Bearing Cup Installer is made to install these Timken Taper Bearing Cup numbers: 3920, 39520.

I paired that installer with their 1116 handle and had excellent results. Note: I have no connection to Torque King other than this one purchase.

On a related topic, I had a difficult time removing the rear, inner axle seals and bearings. When I finally got them off I found that the spindles had been damaged by earlier maintenance (it wasn't me . . . honest):
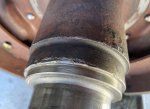
Spindle Damage 001 Low.jpg

I was able to file the surfaces to remove the burrs, but I'd like to avoid that problem in the future. Can anyone recommend a tool or technique for removing the inner (dust) seal?

Thanks
 

HDN

Well-known member
2,127
5,128
113
Location
Finger Lakes Region, NY
I've read numerous times that the drum assemblies are heavy, but no one ever mentions the actual weights. Fun facts: The front drum assembly is 83 pounds. The rear assembly is 87 pounds.
Thanks for weighing them! I did the bearings on my truck a couple years ago and screwed up my lower back for a day due to following poor lifting form getting a hub-drum assembly off the axle on my first-ever try. I figured the assembly had to weigh somewhere around 70-80 lbs. I wasn't too far off!
 

ODRotorhead

New member
4
12
3
Location
Maine
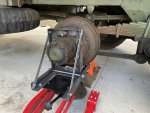
I've had back problems for more than thirty years so I wasn't taking any chances. I fabricated a bracket to fit on my transmission lift. With a few adjustments for the angles, I can roll the drums off and back on without ever having to lift them. I wanted to be able to fold it up for storage so it's more complicated than it needs to be.

M35 Brake Drum Lift 001 Low.jpg
I put a pan on the lift table to catch the oil when I pull the axle out. All four of my rear hubs were flooded with gear oil. Some leaked out the back on the first try (stain on the pavement), so now I use two pans.

Rear Hub 001 Low.jpg

With regard to heating the hubs and freezing the races, I went half way. I bagged the races and left them in the freezer over night. Still a tight fit even with the installer. I didn't have a practical way to heat the hubs, so I didn't do that step. I assume most people use a torch. Can anyone offer a technique for heating the hubs that won't risk hardening/softening the metal? A target temperature, or is "hot" close enough?
Thanks
 

M35A2-AZ

Well-known member
Steel Soldiers Supporter
3,224
398
83
Location
Tonopah, AZ
I've had back problems for more than thirty years so I wasn't taking any chances. I fabricated a bracket to fit on my transmission lift. With a few adjustments for the angles, I can roll the drums off and back on without ever having to lift them. I wanted to be able to fold it up for storage so it's more complicated than it needs to be.

View attachment 936783
I put a pan on the lift table to catch the oil when I pull the axle out. All four of my rear hubs were flooded with gear oil. Some leaked out the back on the first try (stain on the pavement), so now I use two pans.

View attachment 936784

With regard to heating the hubs and freezing the races, I went half way. I bagged the races and left them in the freezer over night. Still a tight fit even with the installer. I didn't have a practical way to heat the hubs, so I didn't do that step. I assume most people use a torch. Can anyone offer a technique for heating the hubs that won't risk hardening/softening the metal? A target temperature, or is "hot" close enough?
Thanks
Just use a propane torch, will not get hot enough to hurt the metal.
 
Top
AdBlock Detected

We get it, advertisements are annoying!

Sure, ad-blocking software does a great job at blocking ads, but it also blocks useful features of our website like our supporting vendors. Their ads help keep Steel Soldiers going. Please consider disabling your ad blockers for the site. Thanks!

I've Disabled AdBlock
No Thanks