After a couple of years of slamming doors to get them to latch completely, I finally replaced the strike bolt, and I am pleased with the result.
I have to say that on a scale of 1-5, this job is a 2.5. It is easier if you don't run into trouble with the floating retainer inside of the jamb that holds the strike in place. Unfortunately, this part seems to break free from its own set of captive brackets and that can be a problem. After going to the -20 TM for service help and finding none, I read a number of different GM forums that address this problem. No real fix was given, but I got the drift and the whole ordeal took about 40 minutes.
Briefly: The strike bolt gets worn after the plastic/nylon sleeve on the shaft wears out. This creates opportunity for the metal parts of the door latch to smack into the strike bolt. Something that doesn't really happens when the sleeve is in good repair. The result is that the door is slamming the latch tangs against the striker but over time this problem get worse as the striker becomes more worn and disfigured. Eventually the latch encounters a FLAT spot where there used to be a cylinder for it to ride upon in order for it to latch properly. Bad juju.
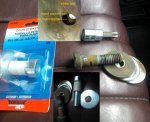
Fix: Straight forward as it should be- unscrew Strike bolt add sleeve (all that is needed if the strike bolt is not worn flat), or replace old strike bolt as a complete assembly (Dorman part pictured). HOWEVER< sometimes when you are unscrewing the old strike bolt, you'll find that for reasons unclear (rust, loosened innards, distemper, act-of-God, etc.) the rectangular retainer inside of the "B" pillar will drop off into the pillar when the strike bolt is removed. The Blazer has no access hole or panel so unless you want to fuss with wire and magnets... its a gonner. And until you find a fix you'll have to cobble a ghetto fix- think bungee.
Here's the safe way to proceed. You'll need a breaker bar, rachet and 50 TORX socket, a long flat screwdriver, spray lube or oil, magnets.
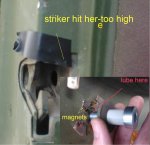
1. loosen the strike bolt a few turns until you can see the bolt retainer through the hole. Spray lube on the threads through the hole. Add magnets around the hole with flat magnets. I used the crescent ones out of an old IDE hard drive I opened (if you have a drive handy, I recommend this. The two magnets are glued in but a little finessing in the jaws of a vise will break them free AND... wait for it... the disk you pull out will make a nice signal mirror).
2. with magnets in place, withdraw the strike bolt. The magnets will keep the retainer in place. But how do you know it was broken in the first place, you ask. YOU DON'T. You can't know unless you hear it drop inside of the pillar- which means you didn't use magnets. ALWAYS USE MAGNETS!
NOTE* if you have the magnets in place, as I know you will, but the strike bolt just continues to spin in the pillar, and the bolt is not unscrewing, then the retainer has indeed broken free. You'll have to go in through the hole that the seat belt plunger passes through.
2a using the 50 TORX unbolt the seat belt retractor assembly. Stick the long flat screwdriver into the hole and jamb it against the back of the retainer to keep it from spinning. S-L-O-W-L-Y remove the strike bolt- use you fingers at the end so you feel when the bolt is about to pop free- at this moment you want the retainer against the back of the hole so the magnets can capture it. Use a pen or some other non-metallic to center the retainer in the hole. Add a dab of oil to the new strike bolt and gingerly thread it in to the retainer. Once there is a firm bite, slide the magnets away- but don't pack up yet.
3. the new strike bolt has to be adjusted to hit the latch precisely for a smooth effortless latching; otherwise you be back where you started too soon. My M1009 had a heavy washer followed by two thinner ones to get the shim distance right. I used the painted original because it is better steel (drill and see). The thinner washers went back on as well. I tightened the lot using the marks the original set left in the paint. When I closed the door to test however, the striker was hitting too high. I used a simple masking of electrical tape to see if the strike bolt was hitting the edge of the latchway, or to low. Place some tape as shown and close the door to get any impression- like the dentist does with the carbon paper. I had to eliminate two thin washers on my drivers door and one of them on the passenger door to get a smooth latching. Adjust as many times as needed to attain a bump-free latch.
Replace the seat belts, if removed. and enjoy.
I have to say that on a scale of 1-5, this job is a 2.5. It is easier if you don't run into trouble with the floating retainer inside of the jamb that holds the strike in place. Unfortunately, this part seems to break free from its own set of captive brackets and that can be a problem. After going to the -20 TM for service help and finding none, I read a number of different GM forums that address this problem. No real fix was given, but I got the drift and the whole ordeal took about 40 minutes.

Briefly: The strike bolt gets worn after the plastic/nylon sleeve on the shaft wears out. This creates opportunity for the metal parts of the door latch to smack into the strike bolt. Something that doesn't really happens when the sleeve is in good repair. The result is that the door is slamming the latch tangs against the striker but over time this problem get worse as the striker becomes more worn and disfigured. Eventually the latch encounters a FLAT spot where there used to be a cylinder for it to ride upon in order for it to latch properly. Bad juju.
Fix: Straight forward as it should be- unscrew Strike bolt add sleeve (all that is needed if the strike bolt is not worn flat), or replace old strike bolt as a complete assembly (Dorman part pictured). HOWEVER< sometimes when you are unscrewing the old strike bolt, you'll find that for reasons unclear (rust, loosened innards, distemper, act-of-God, etc.) the rectangular retainer inside of the "B" pillar will drop off into the pillar when the strike bolt is removed. The Blazer has no access hole or panel so unless you want to fuss with wire and magnets... its a gonner. And until you find a fix you'll have to cobble a ghetto fix- think bungee.
Here's the safe way to proceed. You'll need a breaker bar, rachet and 50 TORX socket, a long flat screwdriver, spray lube or oil, magnets.

1. loosen the strike bolt a few turns until you can see the bolt retainer through the hole. Spray lube on the threads through the hole. Add magnets around the hole with flat magnets. I used the crescent ones out of an old IDE hard drive I opened (if you have a drive handy, I recommend this. The two magnets are glued in but a little finessing in the jaws of a vise will break them free AND... wait for it... the disk you pull out will make a nice signal mirror).
2. with magnets in place, withdraw the strike bolt. The magnets will keep the retainer in place. But how do you know it was broken in the first place, you ask. YOU DON'T. You can't know unless you hear it drop inside of the pillar- which means you didn't use magnets. ALWAYS USE MAGNETS!
NOTE* if you have the magnets in place, as I know you will, but the strike bolt just continues to spin in the pillar, and the bolt is not unscrewing, then the retainer has indeed broken free. You'll have to go in through the hole that the seat belt plunger passes through.
2a using the 50 TORX unbolt the seat belt retractor assembly. Stick the long flat screwdriver into the hole and jamb it against the back of the retainer to keep it from spinning. S-L-O-W-L-Y remove the strike bolt- use you fingers at the end so you feel when the bolt is about to pop free- at this moment you want the retainer against the back of the hole so the magnets can capture it. Use a pen or some other non-metallic to center the retainer in the hole. Add a dab of oil to the new strike bolt and gingerly thread it in to the retainer. Once there is a firm bite, slide the magnets away- but don't pack up yet.
3. the new strike bolt has to be adjusted to hit the latch precisely for a smooth effortless latching; otherwise you be back where you started too soon. My M1009 had a heavy washer followed by two thinner ones to get the shim distance right. I used the painted original because it is better steel (drill and see). The thinner washers went back on as well. I tightened the lot using the marks the original set left in the paint. When I closed the door to test however, the striker was hitting too high. I used a simple masking of electrical tape to see if the strike bolt was hitting the edge of the latchway, or to low. Place some tape as shown and close the door to get any impression- like the dentist does with the carbon paper. I had to eliminate two thin washers on my drivers door and one of them on the passenger door to get a smooth latching. Adjust as many times as needed to attain a bump-free latch.
Replace the seat belts, if removed. and enjoy.


