• Steel Soldiers now has a few new forums, read more about it at: New Munitions Forums!

  • Microsoft MSN, Live, Hotmail, Outlook email users may not be receiving emails. We are working to resolve this issue. Please add support@steelsoldiers.com to your trusted contacts.

Squibbly's M1009 and other Questionable Projects

Squibbly

Well-known member
408
1,039
93
Location
Alabama
I have 4 of those tanks that I bought at local swap meets, there is a holder that bolts to the floor to hold it in place with a small strap going over top. I have seen a few online in some surplus stores online too. They can be very old though so if you want to put fuel in there they better be tight!! They make new ones too that are mostly china thin skin metal.
I’ll probably go with one of these if I can find them cheap.


Sent from my iPhone using Tapatalk
 

WWRD99

Well-known member
Steel Soldiers Supporter
1,113
1,708
113
Location
York Pa
I’ve got a Hobart mig welder, and a stick welder. Had them for years, but used them for very small jobs, like extending the frame on a trailer. Never did body work. I have a body kit with hammers and dollys. Brand new. For the project I “always wanted to do but never got around to”. Now I have a project I can use all this stuff on.

That rocker rust hole is smaller than it looks in the pic. Once I clean it out I’ll know more, but the rear of the rocker seems solid. If I can get away with a butt weld piece of 18 gauge in there so I don’t have to mess with the door line I may do that.

The hole in the cab hopefully won’t be too bad.

I’ll have to lookup how to fix a door edge like that. I’m more of a visual hands on learner. If I do it, or see it once I usually won’t forget. My neighbor does a lot of body work on the cars he buys at auction. I’ve seen him take at least 5 or 6 of these cars that have massive front end damage and bent frames and put them back so you’d never know. I’ve seen him in his backyard with a chain ratchet around a tree pulling things straight, and welding on new stuff. I’m fortunate to have him as a neighbor for this next part of the project.


Sent from my iPhone using Tapatalk
Perfect!! If you already have the 140 you're set!! Is it set up for gas? I learned on one of those, work very well...I am just cheap didn't want to spend the extra money on that...I found the body parts I got were oversized to cut to fit whatever you need to replace so you can practice setting up the welder with the left over steel so it welds nice...I did 2 different weld types with the punch hole through the upper layer and welded into the bottom up to secure the ends and the floor to the sub, buttress style with a piece of extra metal welded in place then weld the finish product over the 2 so it is stronger...I've seen both used at body shops over the decades that they still do today...you could look into the epoxy welds that are used in new cars that would make a great repair as well then it would cut out some of the welding especially in places that like to rust where a joint is made. One thing that really messed me up is the inner rocker you'll get isn't bent right, they don't sell them, as far as I could find, just for the blazer. They have the part to cover the side of the seat hump on the truck not bent so you'll have to bend that to a 90 degree to fit the blazer...I took a good bit of time trying to figure out how to fit that!! Drove me nuts...then the light went on and off to the railroad line to hammer it into place...not a hard fix. I'm not a body guy but have been around it for decades so applying what I've seen has been a fun curve since you never get all the little things they do until you actually do it and figure it out. I did leave 2 open ends on the inner rocker for water to get out where they rot so bad just below the door rubber gasket channel and used square plastic plugs for the 3 screws that hold down the inner lower door trim so they don't rust out either...I just drilled a hole where they go then used a square file to make the size it needed to be and painted them in...I think most do rust where those screws just punch through the floor. Anyhow off to the races and see what I can get done today!!
 

WWRD99

Well-known member
Steel Soldiers Supporter
1,113
1,708
113
Location
York Pa
I’ll probably go with one of these if I can find them cheap.


Sent from my iPhone using Tapatalk
There's a good bit of info on the scepter tanks on here if you search them up!! Some can be very old though and can separate where they come together over time.
 

Squibbly

Well-known member
408
1,039
93
Location
Alabama
Perfect!! If you already have the 140 you're set!! Is it set up for gas?
I've always used the flux core wire, but I will probably grab a bottle of CO2 for this job. I don't feel like cleaning up a bunch of slag. Now that I can pull it into the garage, I don't have to worry about wind.
 

WWRD99

Well-known member
Steel Soldiers Supporter
1,113
1,708
113
Location
York Pa
I've always used the flux core wire, but I will probably grab a bottle of CO2 for this job. I don't feel like cleaning up a bunch of slag. Now that I can pull it into the garage, I don't have to worry about wind.
[/QUOTE
Worth using the solid core, I have the 0.25 and barely turn on the heat and it welds great.
 

cucvrus

Well-known member
11,472
10,421
113
Location
Jonestown Pennsylvania

Check out my little project from back in 2015. I was just going to change the head gaskets and well I went wild. Had fun for a few years and sold it so someone else could enjoy it. It lost its luster in my eyes.
 

Squibbly

Well-known member
408
1,039
93
Location
Alabama
That shifter seal is often over looked. I had the seal remover and the installer but haven't been able to find it. I was successful in using a pick to remove it and a deep socket to install it. Good Luck. I hope you changed the dipstick grommet.
I bought a new puller tool from NAPA for about 7 bucks.

I didn't change the dipstick seal. Looked like brand new actually. I think someone had changed the dipstick on this thing previously.
It's not leaking anyways.

...and I've been through your posts a few times. Lol. You've got a lot of good stuff out there.
 

Squibbly

Well-known member
408
1,039
93
Location
Alabama
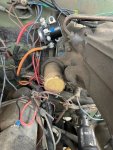
So, not surprisingly as I was looking at the wiring for my GPs today for another forum question, this is what came up.

1639016400137.jpeg

A melted up glob of wires that should have been connected to the relay.

The only wire connected to the relay from the cab is that black wire which goes to a switch, to which the other side is ... wait for it.... plugged directly into the fuse panel via a blade connector.

So either this relay is the wrong one, because it energizes with no ground to the other pole, or its broken. It does send the 10.2 V (or whatever it is) to the GPs, so it does work when I toggle the switch.

The pink and black wire had been cut and was resting on the block (nice), so each time the key was in the run position that thing was getting juice.
There was a melted black wire connected to the block, I assume to be a ground he melted at some point.
The orange and blue wires were ok....I think.

Anyways, new relay on order.
My brother is going to send me a burned-out GP module I can probably fix.
and I ordered an actual push button I'll put in the ashtray to toggle the GP relay, because the PO actually used the blackout light toggle as the GP relay switch.

Wasn't wanting to get into wiring this early, but I guess for these short daylight hours maybe it's not a bad idea to fix a few wires a day.
 

Bill Nutting

Well-known member
Steel Soldiers Supporter
573
1,284
93
Location
Chesterfield, Mi.
Once you use gas with your MiG you will through out the flux core wire. Not only is it cleaner you get better welds. Get some scrap sheet metal and practice “stitch welding”. Be sure the steel is clean and free of any paint. Eastwood sells a rust encapsulating under coat in a rattle can that has a small tube to deliver it. This way you can drill a hole in the repaired area and coat the back side of the repair area. It will slow future rust from forming. I sprayed inside of the frame panels on our M151. I kept spraying it in there while moving the tube around until the coating was dripping out of the seams.
Just go slow when stitching in the patch so you don’t over heat the metal. once you grind the welds you can use JB Weld to fill small holes and imperfections. You can do this!
 

Squibbly

Well-known member
408
1,039
93
Location
Alabama
Installed the transmission shift shaft seal.
Took 5 minutes with the correct tool.

It may not be much, but...the truck is more done today, than it was yesterday.


After mistakenly looking at wiring in this truck, I think this weekend will be "Wiring Weekend". I feel like this thing is a fire hazard right now.
Going to install new Glow Plugs, because I suspect that these are on their way out given the state of the relay (and hard starting + black smoke I get on initial startup), and I'll put all of the wiring back the way God intended.

Blinkers don't work, so I've got work to do on the steering column, and wire tracing.
 

WWRD99

Well-known member
Steel Soldiers Supporter
1,113
1,708
113
Location
York Pa
Installed the transmission shift shaft seal.
Took 5 minutes with the correct tool.

It may not be much, but...the truck is more done today, than it was yesterday.


After mistakenly looking at wiring in this truck, I think this weekend will be "Wiring Weekend". I feel like this thing is a fire hazard right now.
Going to install new Glow Plugs, because I suspect that these are on their way out given the state of the relay (and hard starting + black smoke I get on initial startup), and I'll put all of the wiring back the way God intended.

Blinkers don't work, so I've got work to do on the steering column, and wire tracing.
Do the turn signals at least light up at all? Get new flash relays...I like the heavy duty ones...they do click louder but will hold more lights without flash timing being off..all of mine were bad..I have a stock under dash harness that if you need help identifying stuff I can take pics of it laid out to help figure out what's broke or missing.

Sent from my SM-G975U using Tapatalk
 

Squibbly

Well-known member
408
1,039
93
Location
Alabama
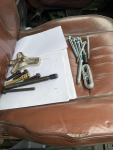
Getting ready to take the torch to this mother f***er.

Steering wheel puller having zero effect besides marring up my center bolt.

I feel like I’m failing to find a c clip someplace holding this thing down.


Sent from my iPhone using Tapatalk
 

cucvrus

Well-known member
11,472
10,421
113
Location
Jonestown Pennsylvania
You should haver a pointed puller to get that off.
MAC TOOLS STEERING Wheel Puller Set SWP700M - $61.00 | PicClick
I never had any issues getting them off with a puller. That looks like it has been beat on at one time. No good. I have seen guys beat the shaft. Not sure where the issue is here. Have you used the correct puller? You are going to have to put an alignment mark on that shaft. The original alignment mark is gone. Good Luck.
 

Mullaney

Well-known member
Steel Soldiers Supporter
Supporting Vendor
7,702
19,737
113
Location
Charlotte NC
Getting ready to take the torch to this mother f***er.

Steering wheel puller having zero effect besides marring up my center bolt.

I feel like I’m failing to find a c clip someplace holding this thing down.


Sent from my iPhone using Tapatalk
.
Like royalflush55 said, you need something to break loose the rust.

That isn't going to just "pop" off the column. Puller that cucvrus recommended will work better for sure. If I were you, I would soak it with your favorite penetrating oil then attach the puller and tension it - and go inside until morning. Maybe it will break free. If not, more penetrating oil and a few more turns on the puller - then walk away again.

Fighting that particular rust in the spot where it is won't be fun. BE CAREFUL because if you ruin the steering column - it is a lot more work than just the wiring you want to work on...

I would suggest a 50/50 mixture of ATF and Acetone but that might EAT your steering wheel. Ask your brother about Monkey Piss. Given enough time, it will eat the rust or at least it appears to...
 

Squibbly

Well-known member
408
1,039
93
Location
Alabama
I've got the puller @cucvrus has (Mine is a Craftsman from way back when they were still made in the US), but it doesn't have the bolts that fit this steering wheel.
I also have a regular steering wheel puller bar, compliments of China.

Snap77.png

Thank you China for the quality bolts.
Snap79.png

I've hit this thing with the PB Blaster penetrating lubricant.
I hit it with the torch (quickly), to make sure it wicked the PB Blaster up.


I tried getting this off with my impact wrench, which messed up the first few threads (now I need to rethread that part), with the socket I was using to ironically, prevent messing up the threads.

..at that point, I packed up my tools and went inside to think before I damage any more of the center bolt.

I think I need to get some hardened bolts instead of these ones made of rubber from China. They twist when tension is applied.
I have a new flasher /horn ring that I need to put on. I suspect the PO already tried to get this thing off and couldn't which is why nothing in the column works right. Flashers need to be held in place, horn didn't work (although the horn does work because I tested it).


Funny, each thing I think is going to be a simple task, ends up being another challenge.

What do you recommend for replacement bolts (or other methods for removing it)?
 
Last edited:
Top
AdBlock Detected

We get it, advertisements are annoying!

Sure, ad-blocking software does a great job at blocking ads, but it also blocks useful features of our website like our supporting vendors. Their ads help keep Steel Soldiers going. Please consider disabling your ad blockers for the site. Thanks!

I've Disabled AdBlock
No Thanks