• Steel Soldiers now has a few new forums, read more about it at: New Munitions Forums!

  • Microsoft MSN, Live, Hotmail, Outlook email users may not be receiving emails. We are working to resolve this issue. Please add support@steelsoldiers.com to your trusted contacts.

Superthermal's M813 Build, THE BOT

Superthermal

Well-known member
Steel Soldiers Supporter
314
858
93
Location
Utah, Murray, United States
@Superthermal are you replacing the float or do you have some sort of trick for draining it and re-sealing it?
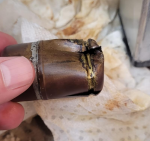
Unfortunately I kicked my float with my foot against a ladder where I was checking it out and pinched in the side of it.You can see with just the tap of my foot it was all messed up. The lower crack is where it was originally split causing it to sink. The mashed spot is Where I bumped it and it split just the same.1675299945403.pngAfter looking at the hairline crack in it I could have fixed it up with my torch and some solder. But after putting the dent in it.. nope... it is only 7 bucks for a new one so I tossed it in with the other parts I was buying up. Very thin copper on this gizmo.
This part below is what I purchased. Seems every car manufacturer from the 60's and 70's used the exact same float. If it doesn't work... I will make it work, but it does fit all the dimensions I could find. 1675299560601.png
On another note my air cleaner showed up today! So happy about that. 1675299909017.png
 

Ajax MD

Well-known member
1,569
1,415
113
Location
Mayo, MD
Unfortunately I kicked my float with my foot against a ladder where I was checking it out and pinched in the side of it.You can see with just the tap of my foot it was all messed up. The lower crack is where it was originally split causing it to sink. The mashed spot is Where I bumped it and it split just the same.View attachment 890086After looking at the hairline crack in it I could have fixed it up with my torch and some solder. But after putting the dent in it.. nope... it is only 7 bucks for a new one so I tossed it in with the other parts I was buying up. Very thin copper on this gizmo.
This part below is what I purchased. Seems every car manufacturer from the 60's and 70's used the exact same float. If it doesn't work... I will make it work, but it does fit all the dimensions I could find. View attachment 890084
On another note my air cleaner showed up today! So happy about that. View attachment 890085
That's cool that you managed to source the float. Little stuff like this is what helps amateurs like me keep the trucks running.
 

Superthermal

Well-known member
Steel Soldiers Supporter
314
858
93
Location
Utah, Murray, United States
Made what I am calling "The poor man's Air Intake MOD" or AIM. After looking into the replacement of my air filter, I came across some discussion on the filter only getting partially used due to the housing design. I saw this "issue" when I removed my filter for the first time. You can see in the pic a couple of posts back where the upper section of my removed filter, which is normally inserted into the inner air housing cylinder, is still very "white", This is due to the filter inserting into that cyclinder only has just a small 1/8" gap or so for air to make it to the back 40% of the filter. The "Fix" offered by some thinkers out there is to remove this inner cylinder and replace it with a stainless steel wire basket that holds the filter in place so air has no restriction to any area on the filter. However with this "Fix", I didn't like that the air coming in is directed straight down right at the filter media. From experience with a set of giant rotary screw air compressors that had a similar intake blasting right at a pleated filter area,this design always caused the filters to splay and bunch at that spot. Not a big deal when only dry air from a warehouse is blasting there, but my rig has potential to be pulling in rain drenched misted air. This other "Fix" at $140ish was out of my splurge budget, but my time was more abundant. So I made due and opened some air filter area in the best way I thought would retain the structural integrity of the unit and allow significantly more surface area flow to the filter. So I marked it up and made the depth wise cuts first with a sawzall and the horizontal cuts with an air die-grinder. I left the section just below the intake intact so that the filter would not be bombarded too heavily when the truck is sucking in rain drenched air, and that at least this section isn't heavily whetted and then ripped through with air pressure rushing down through the inlet tube. A quick pass of a file then some ugly lime green Rustolium paint on the cuts and done.
20230202_172803.jpg20230202_173440.jpg20230202_173514.jpg
The float also showed up.
20230202_173617.jpg
 
Last edited:

Superthermal

Well-known member
Steel Soldiers Supporter
314
858
93
Location
Utah, Murray, United States
Replacement float was an exact fit and VUALA! For the first time the Fuel gauge actually shows something on the dial and it IS HALF>>>>>>>> FULL! Yes!
I found that my down spout tube in my tank did not have any holes in it... Yet! But it was well underway of getting them. Because I have some other items on my list for now to buy, I decided to use some of my extra fuel line I had here at the house and made a sleeve to go over the top of it with a hose clamp at the top, so if it does pop a hole eventually, it will need to suck from the bottom of the hose anyway. I did need to cut the hose back about 3/4 of an inch to get the tube to fit down into the bottom of the tank suction system.

I pulled off my fuel line between the pump and the front of the head today and began to install my 6AN replacement line that will eventually have the dual fuel mod and a pressure gauge connected. The pressure gauge, a Pyro and boost gauge will all need to be mounted in the cab. I am feeling the best spot is either directly infront of the driver mounted down from the defrost channel on the window frame or from a mount on the steering columb. I am going to print whatever housing it is on a 3d printer I am guessing. Still sorting that out.

I took my first stab at removing the rear block plug but it wasn't budging. I would like to heat it up to get it out but that back head has quite a lot of old oil on it and I am sure I will start it cooking. So for the second I am going to hook up the front head "stock" supply and my pressure gauge and see where I am at on pressure. Then I will get the block all warmed up to operating temp and give it a shot. If it still doesn't budge I will cut a hole in the cab to get a better angle for heating and heat it up a bit then try again. I just don't want to strip it. From what I have read other locations these plugs have lock tight on them.

Still waiting on a couple fittings and my new fuel filter.
1675553241395.png1675553273179.png1675553378330.png1675553314312.png
 

Superthermal

Well-known member
Steel Soldiers Supporter
314
858
93
Location
Utah, Murray, United States
Connected up the rest of the 6AN dual fuel mod today. What a pain getting that plug out of the back of the head. I removed the defrost/heater box in the cab and drilled a 2 5/8 hole through the firewall directly behind the plug. To remove the lock-tight sealed plug I had read heat will bust it loose. Heat did not seem to help for mine. Even though I did use my MAPGAS torch to heat the area around it each time I tried to remove it. Came out after about 10 seconds on reverse with my Rigid Impact on #2.
I miss understood how the PT pump pressure worked and thought I had a big problem:

WhenI had tested the fuel pressure correctly, it was 150psi at 2000 driving up an incline on the freeway in 4th. I do remember seeing it hit 170 for about 2 seconds at some point but I tried a few times to get it to peek above 150 and couldn't .
With the Dual Fuel Mod now connected I was seeing about 162 steady on load at 2000 on the same stretch of freeway. From what I have read in other posts, I was expecting the fuel pressure to drop a few PSI.
I am running into one issue with running a gauge up into the cab and that is even with bleeding the hose up to the gauge I think there is still some air trapped in the dead end line. The reason this is bad is it retains fuel pressure for an extended period after you let you foot off the throttle. This sucks for shifting as when your expecting the engine to drop off in RPM as you push in the clutch and let off the throttle it continues to rev for a few seconds as if you didn't let your foot off the throttle.
I will pull the gauge off as soon as I have my fuel buttons swapped around and I am hitting about 200psi. I will try the #20 button first.

Note: I did not notice any change in power. But with this being said driving with THROTTLE lag makes driving it very odd but even then I didn't notice any change I could detect. In fact changing the air filter, fuel filter and dual fuel mod the BOT is still a lumbering hulk... and that is with an empty bed and no load. I am a bit disappointed but still looking forward to the fuel button and down the road a Turbo setup.
 

Superthermal

Well-known member
Steel Soldiers Supporter
314
858
93
Location
Utah, Murray, United States
My 13 year old and I made our way around the rig and pumped all the zerks with Mobile 1 Red Lithium grease. Also the transmission was full on gear oil but was looking a bit on the ugly side. So drained that all out and after looking at the chocolate looking garbage that came out I decided every fluid is getting a dump. Ordered another pair of 5 gallon Lucas oil 75-90 buckets that will hopefully help get the transmission and axles all changed out. This will be a total of 15 gallons or so of synthetic gear oil... or about $450 bucks or 150 with shipping per bucket.
I also pulled off the gauge from an extra "T" I had put into the fuel rail and the throttle response is SOOOO much better. Like instant. I put the unused hose into a bag for the time being as I get the rest of the fluids taken care of. I will re-attach it, temporarilly in the future when I get a pyro installed and work on the fuel button swap to get the 200psi I have been looking for. 20230220_121959.jpg
I20230220_121945.jpg20230220_122005.jpg20230220_121954.jpg
 

Superthermal

Well-known member
Steel Soldiers Supporter
314
858
93
Location
Utah, Murray, United States
Had to get my old heater core replaced. Since a replacement from any MV suppliers for the same bound plate design in copper was like $200 I made a different one from the sizing I cross referenced online. Instead of fitting straight up, it leans backward just slightly since it is 8.75ish inches tall rather than 8.25 like the original. It is aluminum which is a drawback but I was needing some kind of cab heat and defrost for the trip we were taking in the snow. I nestled it in with some padding and aluminum tape and then ran new hoses. I needed to protect the hose as it passed into the box where the old copper pipes would have protruded. I somehow have lost my 4 bolts to hold the lid of the box on so I had to use the aluminum tape to temporarily seal the box up for our outing.
20230223_105348.jpg 20230226_131340.jpg
Did a camp out with the local MV owners to our Hamburger Rock location. Was perfect after the heavy snows we had, which were melting off at a furious pace, making what would be called mud soup for all the roads. Screenshot_20230226_124919_Photos~2.jpgtempFileForShare_20230226-125119.jpg
While there wheeling around, I almost had to drive down a mountain side of trees to get out of a predicament where I couldn't double back on my return path due to my prior tracks having frozen solid on a north slope. The trial we were following made a horizontal traverse across the mountain side which then turns up the hill diagonally, Being covered in my now frozen tracks made it impossible to climb. Lucky I was able to "nudge" some smaller trees out of the way to make a second path back to the path which got us back on track. Unfortunately my flag pole took lets say... a "turn" for the worst and was bent almost level.
Out on the same mountain side, I did have an unfortunate issue where my power steering steel or copper line split a hole in it. This line which runs from the power steering housing down along the inside of the frame cross member split on the back side of the bend which is between the crossing the frame left to right then backwards where it hits a fitting that sends it through the frame. With this leak I lost about all the power steering fluid out of the pump giving me two 600lb tires to steer with my now manual steering wheel. I about lost my thumbs and gained a week of gym time on my arms trying to muscle the steering down the hill sides. Finally got to a good spot to check things out and needed to add to the power steering pump the only fluid we had on hand (80-90w gear oil), this was to keep the pump from burning up while limping back to camp. .This last turn of the tubing was actually completely encased in old dirt which I had to dig away to find where the actual leak was at. The leak I couldn't actually see but was able to get it under control after being lent three small hose clamps and a sliver of 3/8" hose. Was not able to get the leak to stop entirely under turning pressure but it stopped for just idling and right turns. Left turns got a little runny nose action from the patch.
20230226_131201.jpg
Made it back home OK. Now after driving the rig around a bit I have noticed it has more power than before with the dual fuel mod. Pulls better but I think if I even had double the power of this NHC250 I might still be feeling its wimpy. On some of the hill climbs I could not pull 3rd gear in low or 2nd in high. So my climbing gear is 2nd gear low range. I am finding wheeling this rig is all about traction, unlike when I had a 400HP Fj40 that threw so much mud out the back that I think it worked more on "Mud Thrust" to make it climb! Not going to get that with a 20,000 lb BOT. But lovin it just the same. 20230226_131137.jpg
 
Last edited:

Superthermal

Well-known member
Steel Soldiers Supporter
314
858
93
Location
Utah, Murray, United States
Pulled my left front tire off to get the bad wheel cylinder replaced. This wheel cylinder was not retracting. Even with the brake adjusters all the way relaxed, there was enough "brake grab" that I could just turn the tire by myself. I should have done this repair a while ago but I knew I wouldn't be able to just pull the hub off by hand. Lucky for me a friend (also a MV buddy) had a 12 ton hydraulic puller that just fit the drum and made quick work of pulling the hub off.
The bad thing is with all the extra heat the dragging brake made had turned the grease into the peanut butter mess we all hate. After inspecting and attempting to clean up the bearings we came to the decision it was best to change the bearings and races. The break liners looked fine and so did the rest of the assembly. I posted here a picture of what the puller looked like. This pic is of a 10 ton. The one we used I believe was a 12 ton and it just fit over the drum. Here is a youtube link of someone showing off their 12 ton of the similar model:

20230310_163037.jpg20230310_163108.jpg1678498521686.png
 
Last edited:

NebraskaFan

Member
51
37
18
Location
Kemmerer, Wyoming
Pulled my left front tire off to get the bad wheel cylinder replaced. This wheel cylinder was not retracting. Even with the brake adjusters all the way relaxed, there was enough "brake grab" that I could just turn the tire by myself. I should have done this repair a while ago but I knew I wouldn't be able to just pull the hub off by hand. Lucky for me a friend (also a MV buddy) had a 12 ton hydraulic puller that just fit the drum and made quick work of pulling the hub off.
The bad thing is with all the extra heat the dragging brake made had turned the grease into the peanut butter mess we all hate. After inspecting and attempting to clean up the bearings we came to the decision it was best to change the bearings and races. The break liners looked fine and so did the rest of the assembly. I posted here a picture of what the puller looked like. This pic is of a 10 ton. The one we used I believe was a 12 ton and it just fit over the drum. Here is a youtube link of someone showing off their 12 ton of the similar model:

View attachment 892811View attachment 892810View attachment 892820

Holy cow those bearings look terrible.
 

Superthermal

Well-known member
Steel Soldiers Supporter
314
858
93
Location
Utah, Murray, United States
Holy cow those bearings look terrible.
And that was the "good" bearing! The inside bearing had chipped rollers and full on cavities where rust had taken a bite! Ya, I was wishing the bearings would have been OK but $250 bucks to have a solid rolling corner on my rig is WAY more important. I will pull the caps on the other front once I chew down the cost of the first set. At least all the other tires rolled nicely when I was changing out my tires. I hope this is the worst one I will find.
I do have some nice Mobile 1 synthetic Red lithium grease to get it all put back together with.
 

NebraskaFan

Member
51
37
18
Location
Kemmerer, Wyoming
And that was the "good" bearing! The inside bearing had chipped rollers and full on cavities where rust had taken a bite! Ya, I was wishing the bearings would have been OK but $250 bucks to have a solid rolling corner on my rig is WAY more important. I will pull the caps on the other front once I chew down the cost of the first set. At least all the other tires rolled nicely when I was changing out my tires. I hope this is the worst one I will find.
I do have some nice Mobile 1 synthetic Red lithium grease to get it all put back together with.
I'm sure it'll be good to go with some quality grease! IMO I'd just bite the bullet on pulling all the other hubs, bearings aren't cheap but spindles are more expensive. Hopefully the rest are good to go though.
 

Superthermal

Well-known member
Steel Soldiers Supporter
314
858
93
Location
Utah, Murray, United States
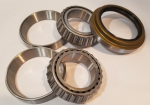
OK, Old bearing races and old seal popped out with the help of a extra 1" 80/20 aluminum "punch" ;). Placed the new bearings into the freezer and cleaned up the drum/hub to be respectable. Used a little sand paper to clean up a few ruff spots where the previous installer had "bumped" the edge of the race seat edge to make a burr. Made smooth again. New bearings and seal came as a set from EBAY seller:
1679026634224.png
Heated up the hub with my MAPgas torch enough to be warm to the touch (Is still winter and the hub was maybe 50°F sitting in my garage prior). Races went right in with a little help of my aluminum punch stated above.
New Mobile 1 Red Lithium grease for the inside bearing.
Tried 3 different times to get the main seal into the back of the hub and the opposite side would always slip out. Even with the hub being brought into the house (Guys! Guy! Don't let your wife catch you bringing your 5 ton hub into the house... mine is out of town with my Water polo playing monsters who are 15Y and 13Y old boys. They are down in San Antonio TX for the Olympic development Program ;) ) Anyway! Could not get that dumb seal of a thing to decide it wanted to live there so I grabbed a stack of 25 1/2"ID oversized thick washers from the hardware store and vuala! Hub is ready to mount tomorrow after I stuff some more grease in that race space and on the spindle.
20230315_212844.jpg20230316_213922.jpg
 

Superthermal

Well-known member
Steel Soldiers Supporter
314
858
93
Location
Utah, Murray, United States
Have a replacment pair of brake lines for the front axle. The one was cracked when the old bad wheel cylinder was removed. Also have a new front steering hose line on its way. I had thought I would make me a custom hose but I am running out of time as I need my rig operable to drive a 300 mile round trip to buy a couple of tons of wheat for food storage this next weekend.
Buying this pair of brake lines:

And this steering line:
Should be here soon.
 

US6x4

Well-known member
Steel Soldiers Supporter
1,238
2,273
113
Location
Wenatchee, WA
Have a replacment pair of brake lines for the front axle. The one was cracked when the old bad wheel cylinder was removed. Also have a new front steering hose line on its way. I had thought I would make me a custom hose but I am running out of time as I need my rig operable to drive a 300 mile round trip to buy a couple of tons of wheat for food storage this next weekend.
Buying this pair of brake lines:

And this steering line:
Should be here soon.

FYI...When I did my front frame-to-axle hose I found out that the M35 and the M809s used different hoses so beware of those advertised as both.
 

Superthermal

Well-known member
Steel Soldiers Supporter
314
858
93
Location
Utah, Murray, United States
This will be the set of chains I make. Since there is not enough gap between the two tires, running a single set on each of the rears is impossible with 16.00 R20s.
This will allow me to run off road a "track-chain". This will be two sets of chains mixed. (leaves about 40% waist from one set that will be used as spare links etc...)
The yellow bands are elastic budgie cords. The cords will be run either between every link to another link, either two or three links ahead. These will keep tension on the slack between the "gap" and keep the chains somewhat slacked but tight on the pair of tires. I believe the lugs on my Tires will keep the chain sufficiently "hooked-up" to the tire which will not allow the tires to "slip" inside the chain set.
Now, I have never seen anyone do this before and maybe it will be a fail, but I have used chains wheeling plenty and I think this is going to be a KICKIN way to add chains and to add an Extra 50+ inches of traction/flotation/grab between the tires with the span of chain along the ground side of the chain.
The original chain will be 160" or so and I will need to make it about 260". This particular set of chains uses a clasp to link the chain to itself. (You can see it on the right side tire about 2:30 above the tension slider. I think I will need to use some sort of link that would never come loose even if it had full slack.
This set of chains is for sale on EBAY. If I had 3,000 x3 I would buy a set of square link double diamond graider chains... but I don't have 9 grand for that LOL. This will let me run chains on all 6 at about 1700 bucks.
1680319854123.png
 
Last edited:
Top