• Steel Soldiers now has a few new forums, read more about it at: New Munitions Forums!

  • Microsoft MSN, Live, Hotmail, Outlook email users may not be receiving emails. We are working to resolve this issue. Please add support@steelsoldiers.com to your trusted contacts.

Trick, functional jake brake grenade shifter

US6x4

Well-known member
Steel Soldiers Supporter
1,234
2,247
113
Location
Wenatchee, WA
I need to back up a step here. Before the grenade can go on the shifter, the swivel base that mounts in the top of the transmission and the rubber boot has to go on first since it can't fit over the grenade and the same goes for the canvas shift boot. Once those 2 items are on the grenade can be threaded on and since the main wire is poking out the top and not snaked through the hollow stem yet there is no twisting of the wire.

20190807_155713.jpg 20190807_180721.jpg

After the grenade is tightened then the loose end of the main wire can be inserted into the grenade from the top and plumbed through the hollow stem leaving a small loop inside the grenade as the wire goes up from the switch, bends into a loop and then heads down into the shaft. So no twisted wire and since I'm actually able to use G.I. 14 ga. Prestolite wire (which is way cool) it's a good thing that I don't have to twist the wires!
 
Last edited:

US6x4

Well-known member
Steel Soldiers Supporter
1,234
2,247
113
Location
Wenatchee, WA
The wire exit hole on my shifter serves double duty as an anchor point for a ground strap since there is too much grease/oil & small contact area to rely on grounding through the shifter attaching points. I used a 3/8" fine thread grade 8 bolt that was 1/2" long and had the machinist drill a 11/64" hole through it to fit the 14 ga. prestolite wire. I used grade 8 to make up for removing some of the meat from the middle.
20190808_155719.jpg 20190808_155711.jpg

The bolt secures the ground strap with an external tooth washer and the wire is free to go where it wants. Of course the rubber boot has to be in place before the wire is plumbed and the strap is bolted down.
20190808_160332.jpg 20190808_160418.jpg
 

US6x4

Well-known member
Steel Soldiers Supporter
1,234
2,247
113
Location
Wenatchee, WA
Now everything is buttoned up and ready to install back into my truck. Since the canvas shift boot is already on the shifter and can't come off I have to put the tranny tunnel floor board loosely in place first and then lower the shifter into place. With the floor board loose there was just enough room to fit my arm under it to attach the set screw bolt for the shifter base, attach the ground strap under one of the 3/8" tranny cover bolts, and snake the wire up along the speedo cable? and up under the dash for later wiring.
20190808_171209.jpg 20190808_164402.jpg
 

US6x4

Well-known member
Steel Soldiers Supporter
1,234
2,247
113
Location
Wenatchee, WA
OK, this sick grenade shifter is now installed and looking good! It feels good in the hand going through the gears, but sadly I haven't had a chance to actually drive it down the road yet. I tested the micro switch function with a continuity tester from the wire to the shifter stem but I will need to check it again from the wire to the ground strap to ensure the paint isn't interfering with the connection. When I do get the jake heads installed and working hopefully I'll be able to update this thread with a video. Until then here are some pics of the final installation!

20190808_172006.jpg 20190808_172041.jpg 20190808_172052.jpg 20190808_172158.jpg 20190808_173000.jpg
 

US6x4

Well-known member
Steel Soldiers Supporter
1,234
2,247
113
Location
Wenatchee, WA
Work is continuing on making the rest of the circuit functional for the jake brakes. I'm going to use a rotary switch to select between OFF, LO (2 heads), and HI (3 heads) and I'm going to install the switch in the water fording cable location. Removing the knockout plug revealed a 5/8"+ hole and the switch has a 1/2" diameter neck so I had a thin ring laser cut from 14 gauge stainless to act as a spacer.
20191102_164026.jpg 20191103_101447.jpg 20191103_145207.jpg 20191104_171418.jpg

The hearing protection sticker was going to interfere with the data plate so I scraped that off and painted over the brown paint behind the decal. I tested out the spacer ring with a 1/2" bolt.
 

US6x4

Well-known member
Steel Soldiers Supporter
1,234
2,247
113
Location
Wenatchee, WA
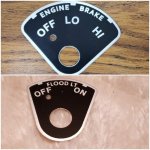
I almost gave in and went with the standard toggle switch but the data plates that would have looked the right vintage were going for $40+ on ebay for old scratched up data plates. Instead, I designed my own data plate that would look original and work with a 3-position rotary switch. I spent a lot of time comparing my current data plates, their layout, font styles and sizes, and spelling abbreviations and then I modeled exactly how I wanted it. With the model looking just right I sent it out to several data plate companies to get quoted and finally selected one who made several of them up for me. The data plate was inspired by the M816 flood light switch plate.
20191029_061930.jpg 20191029_061122.jpg 20191005_171844.jpg 20191105_164256.jpg

This data plate is the most exciting part about the switch and now that it's finally in hand I can mount it up!

20191104_171852.jpg 20191105_163335_001.jpg 20191105_164333.jpg 20191105_164658.jpg 20191105_164609.jpg 20191105_164635.jpg
 
Last edited:

US6x4

Well-known member
Steel Soldiers Supporter
1,234
2,247
113
Location
Wenatchee, WA
Here is what I'm thinking for the wiring from the switch to the jake heads.
20191107_172132.jpg

I've never worked with diodes before but they're simple and my buddy the electrical engineer says they'll work all day everyday and this is a simpler way to do it than with relays. All 4 of the wires that terminate at a common jake head connection get a diode to prevent back-feed but the third head just gets a plain wire. The instrument cluster harness is a neat way of splitting power without having a bunch of wye connectors stacked up.

All these little details keep me occupied while I continue searching for these white unicorn 425A jake heads...
 

US6x4

Well-known member
Steel Soldiers Supporter
1,234
2,247
113
Location
Wenatchee, WA
I'm not seeing where the grenade shifter switch ties into all this.
The +12 volts coming into the rotary switch will come from a relay that is controlled by the grenade; battery-->relay-->rotary switch-->jake head

So the grenade will tell the relay to activate the circuit and the rotary switch will direct the power on where to go.
 

US6x4

Well-known member
Steel Soldiers Supporter
1,234
2,247
113
Location
Wenatchee, WA
Pretty close. I will use model 25B if I can't find the 425A, but the advantage of the 425A is that they will work with a divided entry turbo which is more responsive in the low to mid range versus the single entry only usage of the 25B. Even if I find the 425A I don't believe I will repaint the grenade markings...
 

US6x4

Well-known member
Steel Soldiers Supporter
1,234
2,247
113
Location
Wenatchee, WA
Thanks for the compliments fellas - I appreciate it!

I had briefly thought about making these to sell and a few people have brought that idea up, but there is so much involved that it would not be practical - it would have to be a labor of love. My machinist says there's about $300 worth of machining in just the shaft and brass adapter. He says the correct tooling to turn the shaft down would be a Swiss lathe. Not sure what rifle barrel manufacturers use to contour a barrel but that is basically what I'm doing to this shaft. The conventional lathe made it a constant battle to get this shaft turned down.
 

Another Ahab

Well-known member
17,999
4,556
113
Location
Alexandria, VA
Thanks for the compliments fellas - I appreciate it!

I had briefly thought about making these to sell and a few people have brought that idea up, but there is so much involved that it would not be practical - it would have to be a labor of love. My machinist says there's about $300 worth of machining in just the shaft and brass adapter.
Yup. THat has GOT to be Love!!

:jumpin:

But when it's worth it to you, it's worth it.

:beer:
 
Top