• Steel Soldiers now has a few new forums, read more about it at: New Munitions Forums!

  • Microsoft MSN, Live, Hotmail, Outlook email users may not be receiving emails. We are working to resolve this issue. Please add support@steelsoldiers.com to your trusted contacts.

U.S.M.C gun trucks?

SgtMajHarper

Well-known member
301
585
93
Location
Falcon, CO
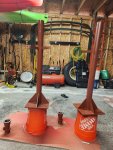
UPDATE: Radio (PRC-25/AM2060 in a MT1029 mount, AS-1729 antenna, VIC-1 acquired. Two .50 cal replicas on order for a total of 3 on the truck. Pedestal mounts have been fabricated and are ready for primer once the weather gets back into the 40's. I have two M23 cradles all ready to go as well. The two .50's will be mounted so that the driver's side will be a little to the rear of the gun box mid-point. The passenger side will be forward of the mid-point.

My plan for "armor" will be a double armor setup consisting of 4ft tall sections for the outer, and 40" tall for the inner. That way I may put a few old NDCC's in between along with other accessories. There will be a back wall of armor but far enough forward to allow additional tire storage. A removeable panel in middle of the rear wall will provide access to the gun box. Armor will be 2 layers of 1/16" steel sandwiching 1/2" plywood. Radio will be mounted in the forward driver's side area. Antenna will be on the driver's side as well. I will not line the bed with ammo cans only because that's pricey and I plan on letting lots of folks on board. I want a good walking surface. No door or windshield armor for now. I still need to figure out how to make it removeable/retractable enough to keep the truck street legal.

My thought is to make this sort of a rolling museum piece when I take it to car shows. I will have placards, signs, etc. around to educate people on the gun trucks in general. I'll have plenty of pics of actual gun trucks too. I will advertise my truck as a "fictional" truck but kitted with what was typically found, or could be found on the trucks.

Two questions...
1. Anyone see any issues with this plan so far?
2. Did Marines name their War Wagons? A few people have already asked what I'm naming the truck. So far I've told them that Marines didn't paint their trucks the way the soldiers did theirs.
I'm liking it! For my $.02 Yankee dollars' worth, in the artillery we named our howitzers, the name was picked by the gun section chief, approved by the battery Gunny and IstSgt., pilots named their planes, tankers name their tanks, even Marine gun crews on the big grey ships of WW2 named their particular gun section, I've seen some that had a different name for each barrel even. Once upon a time, I picked up a new gun crew and we hadn't gotten around to naming the gun yet. The 1stSgt. happened past our position to chat about something or other and looking everyone over made the comment that I had the butt-ugliest gun crew he had ever seen......"BUTT-UGLY" it was.

One other lil' thing I saw on some of our various vehicles were like pilots scores in dogfights. I did see some pictures of guys in Vietnam depicting lil' VC guys as scores (likely offending nowadays), but we also had guys keeping score on the door of their trucks of things that turned into roadkill. Turtles, snakes, bunnies.....just musing here again.

Once more, sounds like a great project, looking forward to seeing the progress and it's your truck.....make it the way you want it, name it what you want to (maybe let the Mr.'s name it.....almost valentine's day you know).
 

Sgt C

Well-known member
129
388
63
Location
Hudson/new Hampshire
I'm liking it! For my $.02 Yankee dollars' worth, in the artillery we named our howitzers, the name was picked by the gun section chief, approved by the battery Gunny and IstSgt., pilots named their planes, tankers name their tanks, even Marine gun crews on the big grey ships of WW2 named their particular gun section, I've seen some that had a different name for each barrel even. Once upon a time, I picked up a new gun crew and we hadn't gotten around to naming the gun yet. The 1stSgt. happened past our position to chat about something or other and looking everyone over made the comment that I had the butt-ugliest gun crew he had ever seen......"BUTT-UGLY" it was.

One other lil' thing I saw on some of our various vehicles were like pilots scores in dogfights. I did see some pictures of guys in Vietnam depicting lil' VC guys as scores (likely offending nowadays), but we also had guys keeping score on the door of their trucks of things that turned into roadkill. Turtles, snakes, bunnies.....just musing here again.

Once more, sounds like a great project, looking forward to seeing the progress and it's your truck.....make it the way you want it, name it what you want to (maybe let the Mr.'s name it.....almost valentine's day you know).
Was hoping you'd chime in, SgtMaj. Glad to hear that Marines could get a little creative too. No way I'd let my wife name the truck. She's already called it a P.O.S. and a few other choice names over the past few years.

I already have a punisher skull on the bridge plate so I am kicking around the idea of 2 more skulls; one on each side of the armor. A Marine buddy who has a HMMWV with every conceivable option, has a punisher skull on his turret. We attend shows together so I think keeping to that theme may work. Maybe call the truck, Reaper? Anyways, plenty of time to think about that. Got the pedestal mounts and pintle sockets primered today. Hoping to start the armor in March.
 

Attachments

jeffhuey1n

SMSgt, USAF (Ret.)
Steel Soldiers Supporter
1,886
1,474
113
Location
Laramie County, Wyoming
Was hoping you'd chime in, SgtMaj. Glad to hear that Marines could get a little creative too. No way I'd let my wife name the truck. She's already called it a P.O.S. and a few other choice names over the past few years.

I already have a punisher skull on the bridge plate so I am kicking around the idea of 2 more skulls; one on each side of the armor. A Marine buddy who has a HMMWV with every conceivable option, has a punisher skull on his turret. We attend shows together so I think keeping to that theme may work. Maybe call the truck, Reaper? Anyways, plenty of time to think about that. Got the pedestal mounts and pintle sockets primered today. Hoping to start the armor in March.
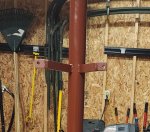
Looking good! When I made my first mounts for the equaliberator to fit on, they looked just like the ones you made. I had to add bracing to keep them from flailing around. Looking forward to your progress!
 

Sgt C

Well-known member
129
388
63
Location
Hudson/new Hampshire
Looking good! When I made my first mounts for the equaliberator to fit on, they looked just like the ones you made. I had to add bracing to keep them from flailing around. Looking forward to your progress!
I've already welded on bracing as seen in the attached. I figure 2 points on the side armor and 4 to the bed floor should keep it stable. Did you need to add more? If so, where?
 

Attachments

jeffhuey1n

SMSgt, USAF (Ret.)
Steel Soldiers Supporter
1,886
1,474
113
Location
Laramie County, Wyoming
I've already welded on bracing as seen in the attached. I figure 2 points on the side armor and 4 to the bed floor should keep it stable. Did you need to add more? If so, where?
Looks good. I didn’t weld my supports (don’t know how to weld yet) on either end. I drilled a hole and bolted both ends of the support rods. My aft mount isn’t satisfactory. I’ve been contemplating different options. I’ll get it fixed this year. As best as I can figure out, with those mounting points, you should be rock solid.
 

Sgt C

Well-known member
129
388
63
Location
Hudson/new Hampshire
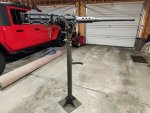
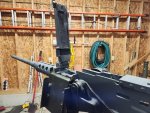
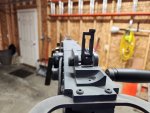
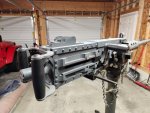
Status update. The weather still sucks so not much action yet on the build. I did receive the two .50's for the pedestal mounts. Jeff at Iron Creations was a pleasure to work with on this purchase. Pics are from the test fit of the guns in their cradles. Hopefully this weekend I can start mocking up the gun box armor placement.
 

Attachments

jeffhuey1n

SMSgt, USAF (Ret.)
Steel Soldiers Supporter
1,886
1,474
113
Location
Laramie County, Wyoming
Status update. The weather still sucks so not much action yet on the build. I did receive the two .50's for the pedestal mounts. Jeff at Iron Creations was a pleasure to work with on this purchase. Pics are from the test fit of the guns in their cradles. Hopefully this weekend I can start mocking up the gun box armor placement.
If I may, how much did the .50’s cost?
 

Sgt C

Well-known member
129
388
63
Location
Hudson/new Hampshire
If I may, how much did the .50’s cost?
They were $2500 each. These are mainly aluminum compared with the all steel $1600 ones from The US Replica Gun Co. guns; however, I think these are better quality. The top cover actually latches shut on these compared with the others that flop around. The detail is better too. I'm glad I didn't buy these two from US Replica Gun Co. I also had these within 10 days of placing the order.
 

Sgt C

Well-known member
129
388
63
Location
Hudson/new Hampshire
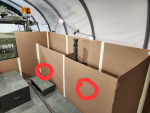
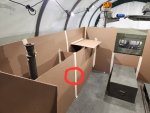
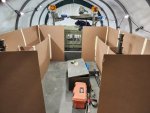
Update: I was able to get some time in on the truck today. Got the troop seats out and stored. Then used cardboard slip sheets to mock up my idea for the box armor. All side pieces are 3ftx4ft. The 4 panels that span the width are 31" x 4ft. Pedestal mounts are offset from each other by about 24". The shelf in the front left corner is for the radio. The red circles are where I intend to put fold- down seats. I will probably radius the rear-most side panels similar to "Pure Poison", but that's a decision for another day. Overall gun box dimensions are 86" wide by 96" long.

Now I'd appreciate your input and suggestions on this layout.20230312_152326.png20230312_152322.jpg20230312_144855.jpg
 

SgtMajHarper

Well-known member
301
585
93
Location
Falcon, CO
Update: I was able to get some time in on the truck today. Got the troop seats out and stored. Then used cardboard slip sheets to mock up my idea for the box armor. All side pieces are 3ftx4ft. The 4 panels that span the width are 31" x 4ft. Pedestal mounts are offset from each other by about 24". The shelf in the front left corner is for the radio. The red circles are where I intend to put fold- down seats. I will probably radius the rear-most side panels similar to "Pure Poison", but that's a decision for another day. Overall gun box dimensions are 86" wide by 96" long.

Now I'd appreciate your input and suggestions on this layout.View attachment 892940View attachment 892943View attachment 892942
What is going into the space between the outer and inner bulkhead? Sandbags? Are you leaving the rear end open like in the mockup or putting in something like a halftrack rear hatch?
 

Sgt C

Well-known member
129
388
63
Location
Hudson/new Hampshire
What is going into the space between the outer and inner bulkhead? Sandbags? Are you leaving the rear end open like in the mockup or putting in something like a halftrack rear hatch?
I'll put a couple of un-mounted tires, ammo cans, and other odds and ends similar to what I'm able to glean from photos. Trying to stay away from sandbags because they weren't used very much because they held water and rotted the floors out. A rear hatch is a possibility but undecided as to whether it's an actual hatch or a removable panel for visitor access .
 

jeffhuey1n

SMSgt, USAF (Ret.)
Steel Soldiers Supporter
1,886
1,474
113
Location
Laramie County, Wyoming
Update: I was able to get some time in on the truck today. Got the troop seats out and stored. Then used cardboard slip sheets to mock up my idea for the box armor. All side pieces are 3ftx4ft. The 4 panels that span the width are 31" x 4ft. Pedestal mounts are offset from each other by about 24". The shelf in the front left corner is for the radio. The red circles are where I intend to put fold- down seats. I will probably radius the rear-most side panels similar to "Pure Poison", but that's a decision for another day. Overall gun box dimensions are 86" wide by 96" long.

Now I'd appreciate your input and suggestions on this layout.View attachment 892940View attachment 892943View attachment 892942
I need to send you pictures of my access hatch. It’s very simple and invisible. Overall it looks great! A couple things you may want to look into. Where will you mount your antenna? If it will be in the same corner as the radio, no problem. If you place it on the opposite side, look into placing a section of dexion to bridge the gap up front. There may be an issue with your convoy lights. None of the photographic histories I’ve reviewed have these lights, at least in the Vietnam record. They got in the way when firing the weapons.
I’ll post a couple pics once I can get back out to the barn.
 

Sgt C

Well-known member
129
388
63
Location
Hudson/new Hampshire
I need to send you pictures of my access hatch. It’s very simple and invisible. Overall it looks great! A couple things you may want to look into. Where will you mount your antenna? If it will be in the same corner as the radio, no problem. If you place it on the opposite side, look into placing a section of dexion to bridge the gap up front. There may be an issue with your convoy lights. None of the photographic histories I’ve reviewed have these lights, at least in the Vietnam record. They got in the way when firing the weapons.
I’ll post a couple pics once I can get back out to the barn.
Antenna is going on the same side as the radio. Convoy lights probably will come off but not until I can get the truck out of the shelter. The inner light poles are too long to remove inside. Very much interested in pics of your hatch.
 

SgtMajHarper

Well-known member
301
585
93
Location
Falcon, CO
Looking good! "If" I was PFC Schmuckatelli riding in the back on a .50 or had me one of them spiffy jump seats to ride on when not looking around for bad guys in the land of live pop-up targets, I'd have a little warmer fuzzier feeling if that big opening in the back had something in it to slow down high-speed metal other that Mother Schmuckatelli's youngest son. But that's just me, I never just grew fond of getting shot at.

I take the ring mount gunner has the .50 swung around to the rear of the ring so he's also riding inside of the bed? How does that look from the front? Do you see a little window under the ring and between the armor in the bed that kinda says " Shoot here"? If that gunner is standing in the bed, I was wondering how that side's armor would look raised higher to fill in that gap?

As far as the convoy beacons go, yeah, true, not a Nam thing, but people like bright and shiny things in parades and on the way to and from parades so we don't become statistics in a crash. I put some smaller ones on the sides of a "Convoy Ahead" sign I put on a trailer when hauling my Mule, so I hopefully don't get killed. Once at the parade marshalling area, the sign comes off to unload my Mule and I have male / female plus to unplug the lights. Sometimes the sign goes back on with lights for the parade, sometimes not, my option. I was wondering that since there is a practical use to your lights, maybe some kind of telescoping pole to mount them on in transit, lower it and take them off with some kind of quick disconnect when in the parade or static?

OK, enough of my spending your money and time for one day. Its looking great and again; it's your truck, make it the way you want (or make it the way I want and keep it at my house).
 

Sgt C

Well-known member
129
388
63
Location
Hudson/new Hampshire
Looking good! "If" I was PFC Schmuckatelli riding in the back on a .50 or had me one of them spiffy jump seats to ride on when not looking around for bad guys in the land of live pop-up targets, I'd have a little warmer fuzzier feeling if that big opening in the back had something in it to slow down high-speed metal other that Mother Schmuckatelli's youngest son. But that's just me, I never just grew fond of getting shot at.

I take the ring mount gunner has the .50 swung around to the rear of the ring so he's also riding inside of the bed? How does that look from the front? Do you see a little window under the ring and between the armor in the bed that kinda says " Shoot here"? If that gunner is standing in the bed, I was wondering how that side's armor would look raised higher to fill in that gap?

As far as the convoy beacons go, yeah, true, not a Nam thing, but people like bright and shiny things in parades and on the way to and from parades so we don't become statistics in a crash. I put some smaller ones on the sides of a "Convoy Ahead" sign I put on a trailer when hauling my Mule, so I hopefully don't get killed. Once at the parade marshalling area, the sign comes off to unload my Mule and I have male / female plus to unplug the lights. Sometimes the sign goes back on with lights for the parade, sometimes not, my option. I was wondering that since there is a practical use to your lights, maybe some kind of telescoping pole to mount them on in transit, lower it and take them off with some kind of quick disconnect when in the parade or static?

OK, enough of my spending your money and time for one day. Its looking great and again; it's your truck, make it the way you want (or make it the way I want and keep it at my house).
As usual, Sgtmaj, you make some good points. A decision hasn't been made regarding a rear hatch. As this will be a "rolling exhibit ", I want easy access for the public at events. Although it takes away from authenticity, I have to accommodate all ages. Jeff is going to send me photos of his removable hatch. That may be the compromise...we'll see.

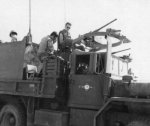
As for the ring mount gunner, he has more protection than many of the gun trucks. The attached shows the one and only Marine war wagon. As you can see, he's got a nice comfy seat but zero protection; however, you bring up a valid point. I'll have to do some thinking on that. Maybe I can come up with a bit more cover for him.

And you're right about the convoy lights. Great for parades but not authentic to a gun truck. I'm reluctant to take them off because I just put them on last winter.

As for the opening where the cab rear window is... I might just add a full panel there. Figured I'd wait for feedback from all of you before deciding.Screenshot_20221218_182445_DuckDuckGo.jpg
 

jeffhuey1n

SMSgt, USAF (Ret.)
Steel Soldiers Supporter
1,886
1,474
113
Location
Laramie County, Wyoming
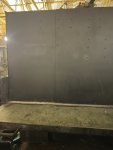
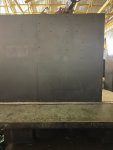
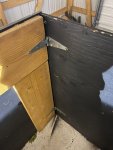
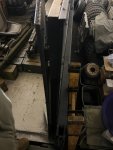
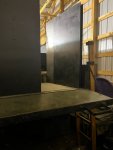
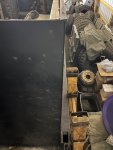
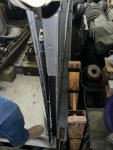
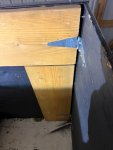
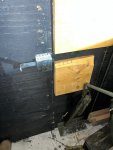
Here’s the pics of my back bulkhead. Each sheet of steel is 3ft wide by 4 ft tall. They are backed up with 1/2 inch (IIRC) thick plywood. All around the top of the gun box is 2x12” boards. Those serve two functions. 1st, safety. If you are riding in the back and loose your balance, it’s better to smack into wood than 1/16 inch steel. The other function is proving support for the walls. Without support, the outer bulkheads kinda wobble back and forth. With the 2x12’s, the walls are pretty solid.
Now to the aft bulkhead. Starting on the drivers side, install a sheet metal/plywood panel across the back. You’ll need some support to hold it in place. Then go to the passenger side and do the same thing. Finally, install a third panel in the very center of the aft bulkhead. It’s important to get it as close to center as possible. Attach the left and center panels and brace up the center panel with 2x12 at the top and a section of angle iron at the bottom. You don’t want a section of 2x12 on the right hand panel. Add one more section of 2x12 vertically on the right hand wall. You need at least two fence type hinges attached to that vertical 2x12 and the top section. Two seemed best. As long as everything balances out, it’ll be solid once you close it up. Last details: figure out a locking mechanism so you can secure the door while you are in the box.

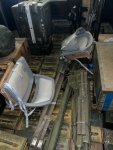
that’s the way I did it. It was much simpler than writing it all out. You’re indicating you’ll have secondary bulkheads internally. The aft bulkhead is relatively easy to change where you want the door. One of the pics shows the two fold up seats I got from a guy who wrecked his boat. I need to mount them, just got to figure out the details. Pics below:
 

Attachments

Top