• Steel Soldiers now has a few new forums, read more about it at: New Munitions Forums!

  • Microsoft MSN, Live, Hotmail, Outlook email users may not be receiving emails. We are working to resolve this issue. Please add support@steelsoldiers.com to your trusted contacts.

Valence's M116A3 Mounted MEP-803A (10kw generator)

Valence

Well-known member
Steel Soldiers Supporter
2,112
555
113
Location
Davis County, UT
What was the current rating of the red fuse?
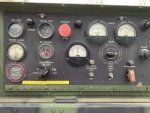
I am not sure. The other side is largely unreadable, but that doesn’t look like “FNQ-R-3” to me. Looks like it starts with an ‘A’. Hopefully potentially the wrong fuse didn’t damage the Voltage Regulator or something else.

IMG_4979.jpeg IMG_4980.jpeg
 
Last edited:

kloppk

Well-known member
Steel Soldiers Supporter
2,145
3,526
113
Location
Pepperell, Massachusetts
I suspect the red fuse was an amperage rating less than 3 amps or possibly not a time delay fuse which cause it to pop.
The popping of the red fuse shouldn't have damaged anything.
The fuse there is to protect the Quad Winding in the gen head from getting damaged should the AC Voltage Regulator fail in a certain way.
When it pops it just removes power to the VR. When that happens your AC output voltage goes to near zero.
 

Valence

Well-known member
Steel Soldiers Supporter
2,112
555
113
Location
Davis County, UT
Thank you so much Guyfang and Kloppk (and everyone else too!) for taking so much of your time to share your expertise here. I sincerely appreciate it.


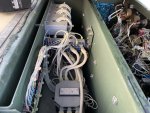
I did open up the top of the control panel, well, partially at least, because it was REALLY stuck down to the right side and I didn't feel like getting aggressive with prying it apart if I didn't HAVE to.

2024-01-28 14.57.11.jpg

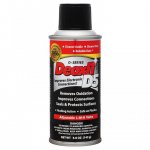
I did not find any signs of wire chafing, and I sprayed Deoxit contact cleaner on each of the connectors inside. I also sprayed the shaft of the Reconnection Switch and turned it back and forth a few times to hopefully work the contact cleaner into it as well.

1706509007714.jpeg
https://www.amazon.com/gp/product/B00006LVEU/
 
Last edited:

2Pbfeet

Well-known member
433
772
93
Location
Mt. Hamilton, CA
I think the fuse was/is a (Mersen) Ferraz Shawmut "Amp-trap" ATX-3, where the X is missing, perhaps "M" for midget (1 1/2" long)?
There are eBay listings for Ferrari ATM-3 listings, if you want to look it up.
e.g. https://www.ebay.com/itm/383671751698?

That would have been a fast acting fuse;

I could be wildly off here.

All the best,

2Pbfeet
 

Light in the Dark

Well-known member
Steel Soldiers Supporter
3,828
5,938
113
Location
MA
Thank you so much Guyfang and Kloppk (and everyone else too!) for taking so much of your time to share your expertise here. I sincerely appreciate it.


I did open up the top of the control panel, well, partially at least, because it was REALLY stuck down to the right side and I didn't feel like getting aggressive with prying it apart if I didn't HAVE to.

View attachment 915581

I did not find any signs of wire chafing, and I sprayed Deoxit contact cleaner on each of the connectors inside. I also sprayed the shaft of the Reconnection Switch and turned it back and forth a few times to hopefully work the contact cleaner into it as well.

View attachment 915580
https://www.amazon.com/gp/product/B00006LVEU/
You got one of the "lucky" ones with an RTV top. That stuffs a nightmare... all you can do is pry and work it over. That right side is always stuck the worst. Thankfully its not on the majority of machines.
 

Valence

Well-known member
Steel Soldiers Supporter
2,112
555
113
Location
Davis County, UT
I think the fuse was/is a (Mersen) Ferraz Shawmut "Amp-trap" ATX-3, where the X is missing, perhaps "M" for midget (1 1/2" long)?
There are eBay listings for Ferrari ATM-3 listings, if you want to look it up.
e.g. https://www.ebay.com/itm/383671751698?

That would have been a fast acting fuse;

I could be wildly off here.

All the best,

2Pbfeet
Thank you for the investigation. It is always curious what the history of the machines are and who did what/when. Whether a previous owner put that fuse in or it was that way when surplused, all I can tell is that the fuse looked old. (I suspect most likely is a used/old fuse was put in to sell the unit). Glad that to hear that it likely didn't hurt anything.


You got one of the "lucky" ones with an RTV top. That stuffs a nightmare... all you can do is pry and work it over. That right side is always stuck the worst. Thankfully its not on the majority of machines.
I have not yet read about there being differences on how the panels are sealed (I actually didn't expect there to be anything). Should I be scraping it off and putting in some other low profile seal?
 
Last edited:

Light in the Dark

Well-known member
Steel Soldiers Supporter
3,828
5,938
113
Location
MA
Its your call. Theoretically whatever stuck to the frame, and to the lid... will line up properly when you reinstall. If you find its easy to scrape it off... I would. You aren't fielding this equipment across the world. Its not leaving your property.

I assume they must have had an ingress issue that was partially attended to during production... or it was a field mod. I am not certain. I've never had issues in the enclosure (either section) under normal use so its nothing but a PITA to me.
 

Guyfang

Moderator
Staff member
Moderator
16,766
24,074
113
Location
Burgkunstadt, Germany
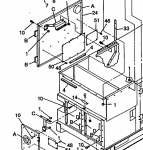
Originally, There was a seal up top, sealing the panels to the control box. In the -24P, Fig. 5, Item #4. If you look at all the parts breakouts for the metal housing, you will find that part number 20941 is used all over the set.

4. MOOZZ MOO MOOZZ 30554 88-22705 .SEAL, DOOR MAKE FROM P/N 20941 (56329), AS REQUIRED.

So, most people did not want to order a non NSN item, and used RTV. Sadly, those people are the ones who did not RTFB. Every parts TM, has a "Bulk" section at the end of the TM. There, it will give you about the same info as the parts break out. BUT, if you RTFB farther, and go to: CROSS REFERENCE INDEXES NATIONAL STOCK NUMBER INDEX section, and look up the part number 20941, it gives you an NSN of: 5330-01-367-6329. Farther digging tells you, the UNIT of ISSUE is in feet. And thats the reason there is RTV on most gen sets instead of the seal. The seal worked well. I put a tiny dab of, Yes you guessed it, RTV to hold the seal in place. It had tape on the back side. Peal the pape off and press the seal down. I found the tape was not real good. so a tiny dad of RTV smeared on the metal parts held it on. Let it dry, and you never had to fight the RTV monster to get the top off.

1706556095567.png
 

Valence

Well-known member
Steel Soldiers Supporter
2,112
555
113
Location
Davis County, UT
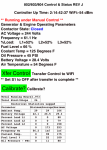
The %Load function on my system is measuring the voltage/current that each winding pair is contributing to the load. It's actually measuring the voltage at the 3 different phase load inputs to K8 the overload relay from the burden resistors.
When in 120 or 120/240 mode the %Load readings from my board should all be about the same value since each winding pair is equally supporting the load.
Yes, you need to perform the calibration function to tweek my system to provide matching accurate readings.
As for the Hz reading the set has to output near proper voltage for the Hz reading to work. Way too low a voltage will cause the inf reading.
The 150 ish % load reading and your contactor opening are likely due to a contact issue in S8. When in 120 or 120/240 contacts 13 and 14 should close which puts burden resistor R13 in parallel with R12. If the resistor paralleling doesn't happen the reading on L3 will be twice the other readings and cause the set to trip an overload. S8 may need cleaning and exercising to correct the issue. Deoxit.
The sets %Load meter only displays the load on one winding pair when in 120 or 120/240.
Originally, There was a seal up top, sealing the panels to the control box. In the -24P, Fig. 5, Item #4. If you look at all the parts breakouts for the metal housing, you will find that part number 20941 is used all over the set.

4. MOOZZ MOO MOOZZ 30554 88-22705 .SEAL, DOOR MAKE FROM P/N 20941 (56329), AS REQUIRED.

So, most people did not want to order a non NSN item, and used RTV. Sadly, those people are the ones who did not RTFB. Every parts TM, has a "Bulk" section at the end of the TM. There, it will give you about the same info as the parts break out. BUT, if you RTFB farther, and go to: CROSS REFERENCE INDEXES NATIONAL STOCK NUMBER INDEX section, and look up the part number 20941, it gives you an NSN of: 5330-01-367-6329. Farther digging tells you, the UNIT of ISSUE is in feet. And thats the reason there is RTV on most gen sets instead of the seal. The seal worked well. I put a tiny dab of, Yes you guessed it, RTV to hold the seal in place. It had tape on the back side. Peal the pape off and press the seal down. I found the tape was not real good. so a tiny dad of RTV smeared on the metal parts held it on. Let it dry, and you never had to fight the RTV monster to get the top off.
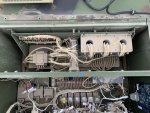
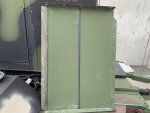
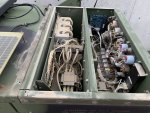
I found a warmer day when it wasn't snowing or raining for me to take the top off the green 803. (Utah has had a very wet second half of winter) water supply in January 04th, 2024 vs Feb 16th, 2024 (percentage totals based on the average Snow Water Equivalent from 1991 to 2020)

1708584122535.png

A pretty interesting interactive map tax dollars have created. How accurate is the data being measured and fed into it? Well, I suppose it depends on human falacy and the political pressures at the time...

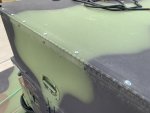
Anyway, not surprisingly, this wonderful piece of equipment had the special door seals on the top panel instead of the RTV like my tan 803. I still have some of this exact door seals left from replacing missing ones on my tan 803. I will have to open the top of my tan 803 once again, get rid of the RTV, and put these nice seals in place instead using the handy method above from @Guyfang.

2024-02-19 14.59.22.jpg

All the dust inside is definitely what was causing the burden resistors R13 and R12 to not be in parallel.

2024-02-19 14.13.48.jpg 2024-02-19 14.14.10.jpg

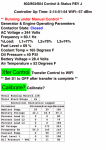
I sprayed DeoxIT on all connections and the S8 switch and gently worked it back and forth, sprayed again and repeated a couple times. I then ran a 6kw 240v electric heater (+ whatever incidentals in the house that were on) and ended up at about 52% load on all internal winding pairs (L1/L2/L3). Looks like the overload was solved! Thanks @kloppk!

2024-02-19 15.05.37.png

I then turned on 16amps of florescent lights in the garage and 7A of 120v flood lights. This pushed the machine to almost 75% load, but those internal windings still stayed realtively equal. I think proper contacts are still being made.

2024-02-19 15.14.55.png 2024-02-19 15.15.13.jpg

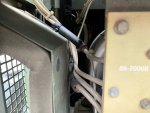
I found a couple wires that were resting against the air intake shroud that might have been wearing from the vibration. Without taking the generator housing apart further, I covered them with extra pieces of rubber SOOW insulating jacket that I had saved for just a use.

2024-02-19 14.53.19.jpg

In my test, I normally would have just ran both of my 6kw heaters, but I discovered that one of my two 6kw electric heaters (that I have barely used for maybe 10 hours), already has a failed thermostat. The unit is thermostat controlled and can't just be set to "heat" manually. If you can set the desired temperature above the thermostat ambient reading, the unit will run. In this case, the thermostat reads 99F (ambient was 50F) but I can only set the heater to run up to 99F (so it'll never turn on). Perhaps it's a protection from over heating to prevent the heater from damaging itself running when the ambient temperature is "too warm", or just a hardware/software limitation. I am currently waiting on parts from the manufacturer.

Maybe next time I won't buy the "smart" wi-fi heater and just stick to a "dumb" one with a simple on/off switch. (Through an employee connection I had gotten the smart heater for cheaper than i could buy the dumb heater, well, not now I suppose).

The first pic is the front heater that wouldn't run, and the second pic is the rear heater that I was able to use in the above load test.
2024-02-19 15.09.22.jpg 2024-02-19 17.15.17.png
 
Last edited:

Valence

Well-known member
Steel Soldiers Supporter
2,112
555
113
Location
Davis County, UT
I lived for a short time in Roy, Utah. First snow I ever saw in my life, and i was 17 years old. Nice place to live, or at least 50 years ago.
You lived here before I was a twinkle in my mother's eye. :smile: Roy is just a little north of me. I'm sure it was nicer then, but I wouldn't say it is bad now just a lot more people/way more crowded and I-15 was a lot smaller then too.

The state has just built a "West Davis Corridor" (State Route 177) - basically a 2-lane freeway much further west out in the marshes that parallels I-15 from West Point/Clearfield south to Farmington. Over 16 years ago, the state built Legacy Highway (State route 67) that ran from Farmington, UT to Salt Lake City and connected to the partial I-215 belt route. Legacy Highway was originally suppose to run the whole distance that the new West Davis Corridor does (West Point to SLC I-215), but so many environmentalists got in the way, delayed the project by 7 years and cost millions more. Now, instead of a single freeway that runs parallel to I-15 from the northern edge of Davis County to Salt Lake County, there are two highways with multiple very expensive interchanges that connect each to other and to I-15... It's a whole debacle in my opinion. Nice roads, but the whole execution and eminent domains that took place were unnecessary, to say the least.

west_davis_corridor_legacy_highway.jpg

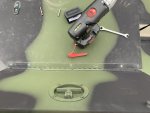
Er, well, to stay on topic of my generators, when I took off the front control panel flap, all of those pan-head philips screws were quite corroded and several were nearly stripped (one I had to drill out). So I replaced all 7 screws. Perhaps I should have used stainless but eh, if they last another 20 years, it'll be fine.

2024-02-19 16.17.57.jpg 2024-02-22 15.44.02.jpg
 
Last edited:

Ray70

Well-known member
2,592
5,907
113
Location
West greenwich/RI
Er, well, to stay on topic of my generators, when I took off the front control panel flap, all of those pan-head philips screws were quite corroded and several were nearly stripped (one I had to drill out). So I replaced all 7 screws. Perhaps I should have used stainless but eh, if they last another 20 years, it'll be fine.

The best way to handle those panel screws is always hold the Phillips head and turn the nut with a wrench / socket.
Don't hold nut and turn Phillips head, chances are you'll strip the heads.
[/QUOTE]
 

Valence

Well-known member
Steel Soldiers Supporter
2,112
555
113
Location
Davis County, UT
The best way to handle those panel screws is always hold the Phillips head and turn the nut with a wrench / socket.
Don't hold nut and turn Phillips head, chances are you'll strip the heads.
Good knowledge there, thank you. I have literally been doing it wrong the whole time. Well, either way, shouldn't be a problem for a while!
 
Top
AdBlock Detected

We get it, advertisements are annoying!

Sure, ad-blocking software does a great job at blocking ads, but it also blocks useful features of our website like our supporting vendors. Their ads help keep Steel Soldiers going. Please consider disabling your ad blockers for the site. Thanks!

I've Disabled AdBlock
No Thanks