-
Steel Soldiers now has a few new forums, read more about it at: New Munitions Forums!
What have you done to your 5 ton this week?
- Thread starter dezert ratt
- Start date

More options
Who Replied?- 1,079
- 59
- 48
- Location
- New Palestine Indiana
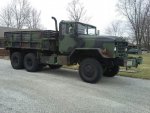
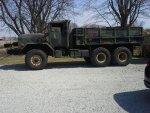
I switched to super singles on the M925.
Attachments
-
79 KB Views: 58
-
99.9 KB Views: 61
davo727
Member
- 742
- 2
- 18
- Location
- Cleveland, TX , Spring , TX
Good idea r thanks, will give it a try after I get the second 923 from Ft. Hood this week.
- 5,637
- 381
- 83
- Location
- Spring Branch, TX
Heading up to Hood tomorrow to help a friend recover one. Fingers crossed it goes as easy as the last one. At least he'll be driving it not meGood idea r thanks, will give it a try after I get the second 923 from Ft. Hood this week.
PureMayhem
Active member
- 116
- 26
- 28
- Location
- Houston, TX
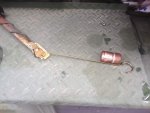
I fixed my non functioning fuel gage. Took the sending unit out and it wasn't gunked up or frozen. I checked the resistance and it varied like it was supposed to when moved up and down. I plugged it back in without putting it in the tank, turned on the battery switch and the fuel gage worked just fine so I put it back in the tank and checked it again. It read just above empty and I knew I had closer to a full tank so I pulled the sending unit back out and then noticed that there was diesel in the float. No wonder it was reading low. Upon closer inspection I found a hairline crack in the float so I emptied the diesel out of the float, brazed the crack up, put it back in the tank and now I have a working fuel gage.
I also adjusted my idle speed back up to 630 rpm.
I also adjusted my idle speed back up to 630 rpm.

Last edited:
Amer-team
Well-known member
- 1,716
- 48
- 48
- Location
- Centralia/WA
Davo from the looks of your picture, you have a very nice tool box and it opens a bit, even if only 2 or 3 inches. I use Kroil but PB is good too. In the picture, I don't see any over spray or drip from too much oil. I would say oil it good and keep wiggling it back and forth and it is going to go, then go to the heat if necessary, although the carc paint will take quite a bit of heat before anything disasterous happens.
silverstate55
Unemployable
- 2,124
- 1,077
- 113
- Location
- UT
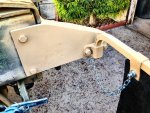
Fabricated some mudflap mounts for my M931A2 out of leftover 1/4-inch steel plate...it was a little rusty in spots, so I broke out the needle scaler & wire wheel on grinder to remove it all before welding.
I thought about modding some mudflap hangers to include a 90-degree bend and simply bolt the hanger mounts to the frame, but I wanted to be able to remove the flaps and store them on the truck like on M915s when towing short trailers. I used the 3 existing holes per side, but the bolts holding the ramps were too short...I had some carriage bolts of the same size but longer, so I filed the round holes square and used the carriage bolts. When all completed I added some retaining chain for the R-hooks, bolted to the flaps so I could still use them when stored on the back of the truck (M915-style).
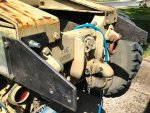
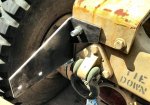
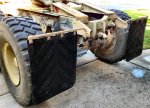
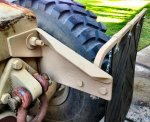
I thought about modding some mudflap hangers to include a 90-degree bend and simply bolt the hanger mounts to the frame, but I wanted to be able to remove the flaps and store them on the truck like on M915s when towing short trailers. I used the 3 existing holes per side, but the bolts holding the ramps were too short...I had some carriage bolts of the same size but longer, so I filed the round holes square and used the carriage bolts. When all completed I added some retaining chain for the R-hooks, bolted to the flaps so I could still use them when stored on the back of the truck (M915-style).


- 1,962
- 433
- 68
- Location
- Culver City, CA
I installed a new oil cooler element to include associated seals and gaskets. A fairly simple job just a little time consuming.
silverstate55
Unemployable
- 2,124
- 1,077
- 113
- Location
- UT
Thank you sir!Nicely done SilverState55!
silverstate55
Unemployable
- 2,124
- 1,077
- 113
- Location
- UT
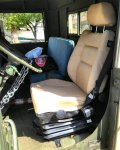
Found a pair of NEW air-ride seats for M915A4 trucks in Phoenix, AZ, that a guy was selling...he originally bought them out of OK City from GL for his Deuce, but ended up selling his Deuce and kept the seats. The price was worth the all-day drive down there, only spent $150 in fuel. They were still in the plastic wrapping & bolted to the pallet they were shipped on, but both were passenger-side seats. Once I got them home I was able to disassemble one and swap the parts to the opposite side for driver's position use....the only iffy spot was on the upper cover, the top 3-point seatbelt mount required a hole to be cut over the left shoulder side, and the original hole was left open. But other than that it was pretty straight-forward to swap all the controls over for driver's side use.
I used 4 of the 6 original bolt mounting locations from the stock seat; one of the original bolt holes I removed the captive nut and installed an air line bulkhead fitting. I removed one of the 1/2-inch plugs from the secondary tank under the passenger side of the cab, and tapped in 1/4-inch nylon Parker air line. I had to drill 2 new holes in the right side of the new seat base to match the stock seats' 14-inch bolt hole centers, then welded in some 1/4-inch steel stock on the left side of the new base to match up with the other 2 stock captive nut locations. I cut the floor mat to better fit the new seat base as well as the fuel tank selector switch.
Today I fired her up and pressure-checked her; the new seat works GREAT!! What a HUGE difference it makes, much more comfortable and safe as well. I love it!

MO MV man
New member
- 397
- 4
- 0
- Location
- Imperial, MO
Wow! How I'd love to have a pair of those in my M931A2.


Csm Davis
Well-known member
- 4,168
- 402
- 83
- Location
- Hattiesburg, Mississippi
Yeah those are the same ones used in the uparmored 939 trucks I am putting a pair in my 931a2.
- 1,962
- 433
- 68
- Location
- Culver City, CA
silverstate55
Unemployable
- 2,124
- 1,077
- 113
- Location
- UT
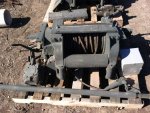
NICE!Almost forgot, I bought a complete winch setup.
silverstate55
Unemployable
- 2,124
- 1,077
- 113
- Location
- UT
I got tired of continually having to reposition my mirrors every time I opened the driver's door too far...where the mirrors are is perfect for me while driving, so I made a little bumper out of a leftover bracket and cut-down exhaust hanger rubber isolator. I cut the rubber isolator in half (and trimmed it to fit), drilled 2 holes for machine screws to fit through, and bolted them in place. I still need to mask & paint everything, but it works great and I don't have to mess with my mirrors anymore; they stay set where I want them. Now I need to do one for the passenger side...
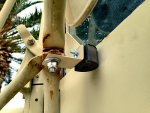
I also had issues with the long threaded 1/4-inch rod that held the mirrors together...when I got the truck both sides were seized with rust, and one broke off when I was trying to adjust it. So, I removed both, drilled everything out to 5/16-inch, and replaced both sides with stainless steel threaded rod & stainless nuts. MUCH BETTER.
I also had issues with the long threaded 1/4-inch rod that held the mirrors together...when I got the truck both sides were seized with rust, and one broke off when I was trying to adjust it. So, I removed both, drilled everything out to 5/16-inch, and replaced both sides with stainless steel threaded rod & stainless nuts. MUCH BETTER.

machinist75
Member
- 777
- 7
- 18
- Location
- Murphy, TEXAS
Look good. I believe there's a rod that goes from the door through the jam and into the small vent door on the side. You can add a piece of rubber to the end to take up some room so it doesn't open quite so far. A piece may have been there originally but corroded over time.I got tired of continually having to reposition my mirrors every time I opened the driver's door too far...where the mirrors are is perfect for me while driving, so I made a little bumper out of a leftover bracket and cut-down exhaust hanger rubber isolator. I cut the rubber isolator in half (and trimmed it to fit), drilled 2 holes for machine screws to fit through, and bolted them in place. I still need to mask & paint everything, but it works great and I don't have to mess with my mirrors anymore; they stay set where I want them. Now I need to do one for the passenger side...
I also had issues with the long threaded 1/4-inch rod that held the mirrors together...when I got the truck both sides were seized with rust, and one broke off when I was trying to adjust it. So, I removed both, drilled everything out to 5/16-inch, and replaced both sides with stainless steel threaded rod & stainless nuts. MUCH BETTER.
View attachment 485284
First week of ownership of my new 5 Ton:
Mounter rear license plate bracket and light
fixed leaking valve on front left glad hand
fixed leaking coolant pipes
found loose bolts around coolant/oil interchanger and stopped a leak there
replaced broken fuel primer pump
replaced fuel filter and cleaned fuel filter canister
installed new wiper blades
installed pulse tech battery maintenance system
bought all the tools I need to change a flat (torque multiplier, sockets, chain hoist, strap, 20 ton air/hydraulic bottle jack, etc)
made an air filling system out of a new glad hand, air hose, and tire filler/gauge
glued down some loose flooring mat in the cab
I am sure there is more but that covers most of it.
Last edited:
- 540
- 22
- 18
- Location
- Greenville SC
Pulled everything out of the cab to put in a diamond plate floor and update the cab. After some scrapped knuckles while removing the grit coating from the floor I found that a air chisel works like a charm for removing the granite sand coating. A 60 grit grinding and its smooth as silk. Got several holes in the floor under the battery box. Just cut out the cancer and have to weld in the new pieces. Rain is slowing things down a bit today. Well it's a neglected Army truck. The new Army! What can I say.
- 112,579members
- 166,187threads
- 2,340,713posts
- 1,597online users

