• Steel Soldiers now has a few new forums, read more about it at: New Munitions Forums!

  • Microsoft MSN, Live, Hotmail, Outlook email users may not be receiving emails. We are working to resolve this issue. Please add support@steelsoldiers.com to your trusted contacts.

What have you done to your CUCV today/lately - Part 2

Mainsail

Well-known member
Steel Soldiers Supporter
1,492
1,662
113
Location
Puget Sound, WA
I've wanted to paint mine for a while now but I also live in an apartment (townhouse) so outdoor painting is a no-go. I was shocked to discover that none of the military bases with auto hobby shops in my area have paint booths anymore. McChord, Ft. Lewis, and Bangor Base don't list a paint booth. I was just down at McChord a few days ago and the building is still there, but they must have closed them all due to funding.
 

JSF01

New member
172
0
0
Location
Newport News, VA
I used a paint roller with my truck which allowed me to paint it in my aprtment. I beleive some people use the power sprayers, which than if you have a friend with a drive way you may be able to do it there.


The good news for me is as of last night when I checked I had found ony a single bubble. Hopefuly by the time the rain stops there will be no more.
 

Durango_USMC

Member
663
0
18
Location
Indianapolis, IN
I'm still trying to get the king pins out... can anyone recommend a tie-rod puller from napa, advance auto, oreilly, or autozone with a part number or picture? I can't get the tierod or steering arm out. the pitman arm puller I have keeps falling off the tie-rod. Any help will be greatly appreciated.
 

Mainsail

Well-known member
Steel Soldiers Supporter
1,492
1,662
113
Location
Puget Sound, WA
I replaced the brake pads up front. No real drama but after I was done I fired up the tuck and mashed the brake pedal to pump the pads into place. The motor stuttered a bit- vacuum pump? I can also with enough pressure get the pedal almost to the floor even though the brakes are well beyond locked. Air in the system somehow?

I took it around the block and it stops sure and the miserable squeak is gone.
 

Durango_USMC

Member
663
0
18
Location
Indianapolis, IN
Test drove after reassembly of the driverside front wheel. I had it all the way down to the knuckle. I need a new spindle the inside was pitted bad as was the little axle shaft. Now it apears i may have over torqued one of the spindle nuts just a hair to get it to line up with that washer, i think its pressing too much on the wheel bearing. Not a lot as the wheel still turns freely but i think there may be just a hint of drag to it. Not sure though, that hub feels hotter than the passengerside.
 
408
0
16
Location
Colo.
Installed the HD lighting relays from LMC. The only thing that was weird was that it was reversed. The main connector from the harness is on the driver's side light, not the battery side. So I ran the power taps to the 12v bus bar on the firewall.

While I was at it I installed the complete Pusletech system: solar panel on hood, 24v battery tester, junction box w/ circuit breakers and 12 and 24 volt taps. Very cool, but that box is big. Had to mount it by the washer fluid. Spliced and ran some 2 g to the 24v bus but the 12v reached the 12v bus. Happily pulsing away!
 

cptd

New member
30
0
0
Location
Cibolo, TX
Went on an unscheduled mudding jaunt the other day. In cleaning up after my behr tan paint job showed its weaknesses. Result being that there are touchups necessary all over the truck. Maybe whole sections re-painted.

Any recommendations for behr repair tips? Seems the behr didn't bond to the base paint quite as well as I'd have liked.

Also the rain here lately and the pressure washing of the mud exposed a leak in the drivers door top gasket. I need to replace all of the door and window rubber and felt and am confused on all of the avialble parts. LMC has too many options and classic trucks is not really clear which parts are the right ones.

Thanks,

CPTD
 

K9Vic

Active member
1,261
7
38
Location
Fort Worth, TX
Went on an unscheduled mudding jaunt the other day. In cleaning up after my behr tan paint job showed its weaknesses. Result being that there are touchups necessary all over the truck. Maybe whole sections re-painted.

Any recommendations for behr repair tips? Seems the behr didn't bond to the base paint quite as well as I'd have liked.

Also the rain here lately and the pressure washing of the mud exposed a leak in the drivers door top gasket. I need to replace all of the door and window rubber and felt and am confused on all of the avialble parts. LMC has too many options and classic trucks is not really clear which parts are the right ones.

Thanks,

CPTD

How did you prep it, did you sand & clean the truck down first? With the Suburbans that I have built I will sand them down with 120 to get most of the clear coat and any chemicals off before I paint. You also do not want to paint over metal and use use primer if so. With how Behr goes on there is no need to have a smooth surface like auto paint, so I will just paint after I sand it down with the 120. I also will clean the whole truck with water and use a safer non-hazardous paint thinner called Crown Next 1G. This is also great for thinning the paint to use a spay gun and will not alter the colour when dried. It is a perfect match between rolling and spraying with it thinned out.

I also do not recommend using a high power washer on these paint jobs, but you can use the low setting or spay farther away after it cures for about a month or two.

I do not see the issue with the door parts with LMC as they have the best catalog to find your parts. Everything you need expect the rear doors on a Suburban are available at LMC. They even sell a kit that has all the door trim & seals for the front doors on these square body trucks and they are all the same expect the early K5 that had the full top.
 

Baer

Member
66
1
6
Location
Weatherford, Tx
HELP! I am trying to find parts for my troop seats. I need one troop seat clamp and several of the seat pins. Where should I look for these items?????
 

TBob

New member
32
1
0
Location
Harrison, Arkansas
Took off the shorty glass packs the moron before me put on, and replaced with some full size mufflers. Neighbors are happy, cops are happy, and most importantly, I'm happy.
 

chief1983

Member
290
1
16
Location
Saint Charles, MO
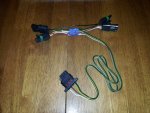
Finally sat down to build my custom trailer wiring adapter. Instead of using the T-One connectors (that require two spliced together on CUCVs, unlike civvy trucks) I made a weatherpack inline adapter. You can have both your civvy plug and NATO plug wired up all the time. Going to get a mounting bracket and dust cover from eTrailer, got the wire from Walmart or Target, I forget. Has builtin LED tester. All my weatherpack stuff came from HipoParts.com. This was also my first weatherpack project, these are pretty easy to work with when you get the hang of it. Plan on doing my fuel pump with weatherpacks as well, so something I could do at the kitchen table served good as my weatherpack training wheels. I'm considering making more of these if there's any interest, could use various trailer plugs, combos, etc, whatever I can pick up at eTrailer's place down the road. Wouldn't be too cheap though, weatherpack is expensive and there's 4 housings on one adapter, probably minimum $20 for the most basic setup like this. Any suggestions for improvement? I plan on using liquid electrical tape over the butt connectors tomorrow.
 

Attachments

twlinks

New member
225
3
0
Location
Hutchinson, KS
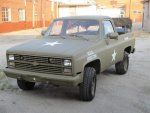
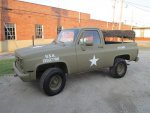
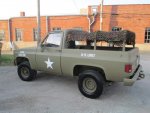
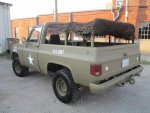
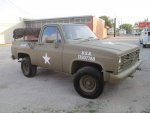
Got the stenciling all done on the M1009 yesterday. Now that she's painted and stenciled, I'm going to start enjoying driving her, while I put everything back together inside. I have like new M1009 front seats (back is staying out), new seat belts, new door and window rubber to install. I remember thinking when I first started this project that I would have it done in three months...now coming up on a year and a half. It has been a labor of love though, so I'm not complaining and it really feels good to know that I have done everything myself. IMG_0251 (Large).jpgIMG_0252 (Large).jpgIMG_0253 (Large).jpgIMG_0254 (Large).jpgIMG_0257 (Large).jpg
 

85CUCVtom

Active member
712
26
28
Location
Lakewood, Ohio
Got the stenciling all done on the M1009 yesterday. Now that she's painted and stenciled, I'm going to start enjoying driving her, while I put everything back together inside. I have like new M1009 front seats (back is staying out), new seat belts, new door and window rubber to install. I remember thinking when I first started this project that I would have it done in three months...now coming up on a year and a half. It has been a labor of love though, so I'm not complaining and it really feels good to know that I have done everything myself.
Wow. I really like it. It really looks great!
 

Durango_USMC

Member
663
0
18
Location
Indianapolis, IN
Rebuilt the driverside hub again using the right grease and some different torque specs and a slightly different technique than I tried last time. So far so good. I think im going ti repaint a few pieces and the tailgate tomorrow and see what the camo rattle can looks like. Changed a tire that went flat as I was looking st it. Turns out its got some dry rot going on. Ill try to get some new tires next weekend i think the bfgoodwrench T/KOs looked pretty good and seemed affordable.
 

KevinsM1009

New member
15
0
0
Location
Manchester/NH
Spent Saturday 15 June disconnecting all 3 Batts.(Rear is only Mil-spec batt left, Front 2 are 925 cca SANEL Auto Parts Heavy-duty Diesels turned into a 1850 CCA 12 volt source..), PMing Terminals, Took dash apart to CLEAN ALL OXIDATION off of PC traces and Bulb contacts, Finalized AUX 24 V Fusible Link Block on PSSNGR side of Firewall for Additional 24 V usages in Future, Ran 2- Aux 8 ga. 12 Volt supply wires from Newly Cleaned Batt Termnals for 30A Circuit Breaker Fuse holder for Power Windows in 1989 Suburban Donor Doors(had to get them out of Light Circuit Jumper lead in Fuse Block, was causing GEN1 lite to Flicker when I acitvated Windows)other one is for future 12 V sourcing due to CUCV's Woe-Fully inadequate fuse block.... Thought was Going To have to yank DRVRs Alt for rebuild @ local Auto Electric shop but when was all done Idiot Lights GLOW brighter than Panel lights when the Self-check happens at Key Turn! No Alt Rebuild Here Yet (KOW(knock On Wood)). Still Have to Chase Down New Glow Module and Relay BEFORE WINTERS return!!
 
Last edited:

twlinks

New member
225
3
0
Location
Hutchinson, KS
Can you enlighten me about the bows your netting is attached to. I would like to do something similar on my M1008
Yep, sure can. I simply "re-purposed" two bows from a M101 trailer. Had to cut square holes in the bed rail and bolted "L" brackets the bed and the bows...turned out to be very stable. For the camo netting, I used a piece of aluminum trim coil that I wrap house trim with...cut to 1", then bent it in half with my siding brake. When the topper is off of the M1009's there is a double sided flange that would have one of the topper seals on it, but since the topper isn't going back on, I wrapped the netting over the fabbed strip of trim coil and then pressed it down in the groove of the flange. It's in there good and tight. I used plastic wire ties to secure the netting to the bows. For me, my '09 is kind of like a big Jeep...but a lot easier to get in and out of. I've had hip replacements and some nerve loss in my legs, so I just don't get around as good as I used to. If you need close up pics, just holler and I'll get what I can for you.
 
Top
AdBlock Detected

We get it, advertisements are annoying!

Sure, ad-blocking software does a great job at blocking ads, but it also blocks useful features of our website like our supporting vendors. Their ads help keep Steel Soldiers going. Please consider disabling your ad blockers for the site. Thanks!

I've Disabled AdBlock
No Thanks