• Steel Soldiers now has a few new forums, read more about it at: New Munitions Forums!

  • Microsoft MSN, Live, Hotmail, Outlook email users may not be receiving emails. We are working to resolve this issue. Please add support@steelsoldiers.com to your trusted contacts.

Wheel bearing pre load

rsl0311usmc

Member
83
70
18
Location
NC
Alright guys I have been replacing a good amount of stuff on the front end here lately from the drag link to wheel bearings, spindle bearings, and axle shaft u joints on both sides. The other day I luckly came across a really bad axle shaft u joint that literally has no needle bearings in the cap and a ton of play. I am shocked it didn't let go. Thankfully I contacted hillbilly wizard and I got all new bearings and seals on the way. I am glad he advised me to get the spindle bearing because when I took it apart one of the needle bearing was missing and it fell apart. I got everything cleaned up and the races out. My biggest question is in all the information I have gathered I am still unsure of final torque specs for these nuts that preload the bearing and hold the spindle. My assumption is the one with the divet threads on and while turning the hub you do 50 ftlbs torque then loosen and spin while seating it again at 50 ftlbs. Then you back it off 90 degrees and slide the washer with the holes in it on making sure to get everything lined up. Finally you put the last locking nut on and torque to 50 ftlbs or is it more? I have heard up to like 150 or 120 ftlbs I think it was and that seems like alot. Thanks again everyone for any information you can give me.
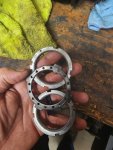
20240211_150333.jpg
 

Barrman

Well-known member
5,266
1,781
113
Location
Giddings, Texas
Every manufacturer seems to have a different method for this. I once found a 1957 Buick factory service manual that said to tighten the bearing nut to 40 ft pounds, spin the hub 19 times and then do some other form of magic before putting the lock nut on.

I have developed my own technique for all of my different vehicles:

Tighten the bearing nut until the hub/rotor/drum/whatever is hard to turn but not so tight it won’t turn. This gets everything seated and in place with the 2 bearings, seals and such.

Very slowly and gently back off that nut. if possible I will install the wheel for this step to get more leverage. Grab the top of the wheel/rotor/hub/whatever and try to push and then pull side to side while backing the nut off. Keep loosening the nut until you feel or hear a click of slop in the bearing. If it is a trailer bearing I am working on, I normally just stop there, install the lock nut and move onto the next problem since I don’t want them too tight. If it is front wheel of say a CUCV where no slop is wanted for steering feel. I will tighten the bearing nut up just a hair until the slop goes away. The lock nut always takes up some slack in the bearing nut and will make everything just a hair tighter even if the bearing nut never turns. The M35 needs this done at all 6 corners. Their lock nut really seems to tighten things up.

I really haven’t made a video about your exact question. This one deals more with taking it apart. But, you also asked about the nuts and lock washer so here it is:


rsl0311usmc

Member
83
70
18
Location
NC
Every manufacturer seems to have a different method for this. I once found a 1957 Buick factory service manual that said to tighten the bearing nut to 40 ft pounds, spin the hub 19 times and then do some other form of magic before putting the lock nut on.

I have developed my own technique for all of my different vehicles:

Tighten the bearing nut until the hub/rotor/drum/whatever is hard to turn but not so tight it won’t turn. This gets everything seated and in place with the 2 bearings, seals and such.

Very slowly and gently back off that nut. if possible I will install the wheel for this step to get more leverage. Grab the top of the wheel/rotor/hub/whatever and try to push and then pull side to side while backing the nut off. Keep loosening the nut until you feel or hear a click of slop in the bearing. If it is a trailer bearing I am working on, I normally just stop there, install the lock nut and move onto the next problem since I don’t want them too tight. If it is front wheel of say a CUCV where no slop is wanted for steering feel. I will tighten the bearing nut up just a hair until the slop goes away. The lock nut always takes up some slack in the bearing nut and will make everything just a hair tighter even if the bearing nut never turns. The M35 needs this done at all 6 corners. Their lock nut really seems to tighten things up.

I really haven’t made a video about your exact question. This one deals more with taking it apart. But, you also asked about the nuts and lock washer so here it is:

My big lock ring came right out for the locking hub assembly. I was lucky and had a good day lol. So I am used to the newer style vehicles were you have the bearing in the hub and you just bolt it up. Honestly I have never owned anything I have had to repack bearings. I know when bearings are bad you grab the wheel at the 12 and 6 and see if there is play or you can obviously hear it. With this I am afraid I will have it to tight or to loose. Is the slope easy to feel when tightening it down? Is that the top bottom play I was saying I should look for or should I just go to 150?
 

rsl0311usmc

Member
83
70
18
Location
NC
Yes, you can feel it with hands at 6 and 12 when it is there.

I always worry more about too tight instead of too loose. That is why I find the line and try to lock it down right on the line.
OK your method is all done with the first lock nut only correct? The last nut just seems to lock the first nut in place. Hopefully I am understanding correctly and what do you think your final torque really is because mine wasn't anywhere near 150 taking it off. I wish you had a video on how you do yours. I didn't realize I am subscribed to your channel on YouTube btw.
 

Barrman

Well-known member
5,266
1,781
113
Location
Giddings, Texas
Yes, all adjustment is done with the nut next to the bearing. The lock nut just locks it down.

The TM’s seem to skip over this procedure. The civilian factory service manual says this:

1. torque inner nut to 50 ft. lbs. while spinning the bearing hub to seat the bearings.
2. back off the inner nut and retorque to 35 ft. lbs., again, while spinning the bearing hub.
3. back off inner nut 3/8's of a turn.
4. install washer.
5. install outer nut and torque to 150 ft. lbs. while spinning bearing hub.

Which is basically what I wrote to do for dummy’s that can’t feel slop in my opinion.

150 foot pounds on the lock nut is the take away.

We just got a bunch of rain and a return of winter here. I will do a video just on wheel bearing adjustment soon though. I don’t know why I didn’t explain it when I did the other video.
 

rsl0311usmc

Member
83
70
18
Location
NC
Yes, all adjustment is done with the nut next to the bearing. The lock nut just locks it down.

The TM’s seem to skip over this procedure. The civilian factory service manual says this:

1. torque inner nut to 50 ft. lbs. while spinning the bearing hub to seat the bearings.
2. back off the inner nut and retorque to 35 ft. lbs., again, while spinning the bearing hub.
3. back off inner nut 3/8's of a turn.
4. install washer.
5. install outer nut and torque to 150 ft. lbs. while spinning bearing hub.

Which is basically what I wrote to do for dummy’s that can’t feel slop in my opinion.

150 foot pounds on the lock nut is the take away.

We just got a bunch of rain and a return of winter here. I will do a video just on wheel bearing adjustment soon though. I don’t know why I didn’t explain it when I did the other video.
Ok I appreciate it. I am about done getting the new ujoint on the axle shaft and then I gotta press the races in. You wouldn't happen to know the torque spec for the drag link ends would you? I am replacing that as well
 

87cr250r

Well-known member
1,267
1,988
113
Location
Rodeo, Ca
There is no preload. You tighten it and then back off until the next pin on the washer aligns. It's a rigid assembly so any movement backing off will add clearance. Tapered roller bearings want to see 0.001-0.003" of clearance. This applies almost universally. The thread pitch of the nut and the spacing of the holes on the lock washers work together to give this clearance. You can measure this with a dial indicator if you want to verify.

If you're starting with clean bearings use polyurea thickened grease! There are many brands available from industrial suppliers but Lucas XTra HD is the only one I know of at the parts store.
 

rsl0311usmc

Member
83
70
18
Location
NC
There is no preload. You tighten it and then back off until the next pin on the washer aligns. It's a rigid assembly so any movement backing off will add clearance. Tapered roller bearings want to see 0.001-0.003" of clearance. This applies almost universally. The thread pitch of the nut and the spacing of the holes on the lock washers work together to give this clearance. You can measure this with a dial indicator if you want to verify.

If you're starting with clean bearings use polyurea thickened grease! There are many brands available from industrial suppliers but Lucas XTra HD is the only one I know of at the parts store.
Ok I definitely saw how you can tighten up these bearings and they get a little tough to spin at an estimated 65 ft lbs. I then ended up trying the 50 ft lb and back off 90 degree method and I about lined up perfectly with the nut and the rotor spun nice with no bearing noise or play at all. I ended up using lucas red and tacky the other day for bearings and locking hubs
 
Top