• Steel Soldiers now has a few new forums, read more about it at: New Munitions Forums!

  • Microsoft MSN, Live, Hotmail, Outlook email users may not be receiving emails. We are working to resolve this issue. Please add support@steelsoldiers.com to your trusted contacts.

M109A4 Sub-Zero Oil Field

rickf

Well-known member
Steel Soldiers Supporter
3,146
1,679
113
Location
Pemberton, N.J.
Worse comes to worse you could always attach high density foam board directly to the walls and mount the shelves over that. The green foam board interlocks for a good seal.

Rick
 

jmoneysmithmas

New member
72
0
0
Location
Montana
I'm still here...

Sorry it's been so long since my last post. I've been working out in BFM (Montana), and there is no convenient internet source out there. I've added some photos to make up for my absence.

Since getting my M109 home, it's been at work every day with me since April. Although the truck doesn't move much, the 109 box has become my job-site office and is working great. I've been too busy to do much work to it, but I plan to do some more refurbishing this fall when work slows down.

On the to-do list:

Remove CTIS; I need to keep things simple
replace/re-seal wheel rings
new tachometer (recently opened up the dash panel, and found why mine isn't working: it had been wrenched upon with some pliers, and looks pretty shredded)
replace all wood in window frames (on 109 box)
replace screens in said windows
diagnose/fix/replace M109 electrical. I may re-wire the whole thing and install RV style 30-amp cord to the outside

I'm working in a pretty remote area of Montana, and there is limited phone service and no internet, but I will try to get more photos uploaded.

A couple quick and easy mods I did since my last post:

I bought a motion-sensory LED light (battery powered) and installed on the shifter casing which faces the drivers feet (or an intruders eyes). I think it was under $10 at Walmart, and it came with a sleeve so you can remove it and use as a flashlight.

Also at Walmart, I found a steel box in the sporting goods area. It's a locking pistol case made by Winchester (not a safe). I think it was around $20-30. I bolted it upright on the rear of the cab so that the single swinging door opens towards the front of the cab. I now have a locking compartment. I left a gap under it, so there is just enough room for my power inverter to sit on the floor.

I found a new (still in wrapper) Titan 3500 diesel Generator for a good deal on craigslist, and it's ready to go... as soon as i can get the electrical system in the 109 working.

I have a new shore power cord for the M109 box if you (or anyone else) is interested... I don't think I'm going to utilize it. $200 OBO I'll probably put it up in the classifieds as soon as i am eligible (need some more posts I think).
 

Attachments

jmoneysmithmas

New member
72
0
0
Location
Montana
I've finished the shelving (to the ceiling), and the 109 is packed with survey gear now. I'll get some photos of the finished 109 shelving and the pistol box in the cab uploaded soon.

Here's a couple more photos...
 

Attachments

jmoneysmithmas

New member
72
0
0
Location
Montana
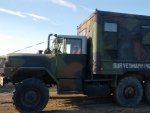
By the way, you'll see my company name painted on the side and rear of the 109. I found 6" tall number/letter stencil kit at Home Depot in the garage sale product area near the 'for sale' and restroom signs. The stencil kit was <$10. I used some fluorescent orange spray paint, and it worked pretty good for a couple months, but the rain and weather has already faded it out to a pale yellow... I'll just refresh it when I get a chance.
 

jmoneysmithmas

New member
72
0
0
Location
Montana
Thanks for keeping us updated. Looking good and functional.

I've added your name to the 'Steel Butt" Registry (those who have made a recovery or trip of more than 1000 miles in their MV).

I like it! Actually, mine was over 3,000 miles... does that make my butt something harder? Like Titanium? haha
 

MWMULES

Well-known member
Steel Soldiers Supporter
In Memorial
5,580
349
83
Location
DESOTO, KANSAS
By the way, you'll see my company name painted on the side and rear of the 109. I found 6" tall number/letter stencil kit at Home Depot in the garage sale product area near the 'for sale' and restroom signs. The stencil kit was <$10. I used some fluorescent orange spray paint, and it worked pretty good for a couple months, but the rain and weather has already faded it out to a pale yellow... I'll just refresh it when I get a chance.
When you redo your fluorescent paint do it white base first, wait a couple days till it is good and dry then the fluorescent. It will really show up and last a lot longer.2cents
 

BadMastard

New member
392
5
0
Location
Duvall, Wa.
Saw you had questions still about the evil lights. You may have them fixed already, but here's my two cents. (for free). If you have zero dc power, check the thermal breaker front of box, outside kinda inbetween cab and box. runs straight to battery from there. This should be powered. Next up, fuses. Then, the cute big box on your inside front wall of the truck is a 24v volt to 110 converter/inverter scary sort of thing. it's got a fuse too. If you have 24v to the inverter, it should work. Next up, the light fixtures. Lovely design, mine had two sets of wires shorted to the roof. Kept the lights from working nicely! Fan is separate from lights, so I'm guessing it's the thermal breaker/connection. Hopefully all is great with you, getting ready for another kick butt winter! I removed the military 408 volt connection and brought straight 110 into the truck, seemed fine for everything. Just connected it to the posts on the fuse box. let me know if you have questions?
 

jmoneysmithmas

New member
72
0
0
Location
Montana
Hey guys, sorry for the long hiatus. I have been travelling a lot, and just got back home from a 3 month work venture in California (thought I'd go somewhere warm this winter). I got a hard top (from boyce equipment in Utah CLICK HERE) in January to be installed in the next couple weeks, and will get some photos of how I setup the van with work bench, desk, and shelving. It's nothing fancy- just plywood, 2x4's and 2x6's, but I'm a big fan of photos too, so I'll gladly share.

As things have worked out, Gladys has only been used in summer months, so there hasn't been any other radical customization made (besides an engine block heater). I did remove the CTIS, and had my tires sealed and replaced the valves with loader valve stems with adapters so I can inflate with a standard automobile tire inflator.

There is a good chance Gladys and I will be working in North Dakota in the next month or so. We'll be on a 6 month subdivision construction project near Williston (tentative). Thus far, Gladys has been an invaluable tool- as my field office/job trailer on remote heavy construction projects. I'll get some new photos up this week.

BadMastard: thanks for the electrical advice. You're an invaluable source for information. I did, however find the electrical problem. The power supply cable that runs under the cab and into the van had been worn through from pinching between the bottom of the cab and the top of the 'tool compartment?' area under the cab. A quick fix with a butt-connector, and the van has had lights and evac fan power. :)
 

jmoneysmithmas

New member
72
0
0
Location
Montana
Hi Jason,
Truck is looking good, I mounted a Harbor freight lift in the back of my truck, so I can lift heavy stuff, you could add one in your trailer if needed, and here is some pictures of my 12v alternator
Wow. Your rig is looking good! You have a thread on your truck? I guess i'll investigate... I'd love to see photos of the interior. As far as the 12v alternator, I'm still debating on that vs. a 24v to 12v converter... the good ones run about $1000. ...thats what the owner of Boyce Equipment told me about 2 months ago.
 

jmoneysmithmas

New member
72
0
0
Location
Montana
Mobility.jpg
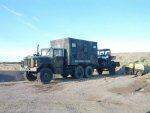
Here's a photo I took last October (end of construction season) of my field equipment. That's a full-size Polaris Ranger 800XP in the M105 trailer. It fits snug as a bug.

If you look closely, you can see the CTIS has been removed as well.
 
Last edited:

BadMastard

New member
392
5
0
Location
Duvall, Wa.
Wow. Your rig is looking good! You have a thread on your truck? I guess i'll investigate... I'd love to see photos of the interior. As far as the 12v alternator, I'm still debating on that vs. a 24v to 12v converter... the good ones run about $1000. ...thats what the owner of Boyce Equipment told me about 2 months ago.
Ya know, for $1000, you could probably find one of those rare 24v/12v alternators. has both outputs. Just a thought.
 

jmoneysmithmas

New member
72
0
0
Location
Montana
Gladys has been a fine investment for my business, and opened up a lot more opportunity and provided a lot of comforts out in the remote parts of Montana and North Dakota the last couple years. Unfortunately, the modification process has been slow- since I work out in the field during the warm weather months, and since I don't have a shop available, nothing gets done in the winter. Either I'm too busy to tinker, or it's winter. But, just to add an update, here's what's new:

Last January, I drove through Utah and picked up a fiberglass hard top from Boyce Equipment. The guys there were great to chat with and gave me a little tour of their facility. They have some REALLY cool projects going on inside their shop, and have some good trucks for sale in their yard. It wasn't until spring when I got the chance to begin installing the hard top. The weekend I planned to get it installed, I was called and asked to go to North Dakota. Turned out to be a rush to get the roof on, so I could still have time to pack and get my gear loaded and organized. I removed the tattered vinyl top, and then used the existing bolts in the rear portion of the cab to secure the fiberglass top to the rear cab rail. Attaching the front of the fiberglass to the top of the windshield frame had me scratching my head. So... out of time, and rushing to get Gladys to North Dakota in 48 hours (570 miles away), I threw a ratcheting tie down strap over the roof to hold the front down until I could get some time to secure it properly (and think about how to do so).

I got busy with work- as usual. The tie-down strap stayed on there for 2 months. Finally, this weekend I got to work on finishing this roof install. What I've done is buy a 2"x2" aluminum L-bracket to tie the roof to the windshield frame. I drilled 2 holes in the bracket to accommodate the bolts that hold the top of the electric wiper motor in-place. The plan was to adhere the L-bracket to the fiberglass roof and another bead of roofing adhesive (found in gutters/roofing supplies at home depot)... but my calk gun was bent/broken, and Gladys is 1.5 hours from Home Depot. ...out in the boonies, a $1.99 item can shut an operation down. Not a big worry- as I can easily calk the seams (and seal the roof gaps) next week on a lunch break at work. I did manage to measure and cut all my aluminum window sill/frame (provided with the roof from Boyce), which I will also attach with the same adhesive/calk. I thought about riveting these aluminum parts to the fiberglass, but imperfections in the fiberglass may make that easier said than done. What do you guys think?

I ordered a gallon of Herculiner from Amazon.com, and it should arrive this week. I'm going to lay a couple coats on the fiberglass roof- inside and out. Since it's slightly rubberized, I'm hoping it will be sound deadening, and maybe even add a touch of insulation from cold. If anything- it will stiffen the fiberglass up a bit and make it more armored from branches and other flying debris out in the windy regions i work in.

Last week I picked up a 2000W inverter generator (with yamaha motor) from Costco for $600. I toted a 250lb diesel generator around last year, but it took up too much real estate, and since I often use electronics (laptop and printer usually), an inverter generator is safer by providing a pure sine wave. The new generator works great, and handy for a couple of my power tools; its also quiet, and only weighs 45 lbs.

After the roof project is finished (hopefully by next weekend), I'm going to do some research here on steelsoldiers to figure out the best way to power my van. I have the huge cable that came with the M109s, but I see a lot of guys converting their systems into more civilian/RV friendly cord attachments. I will probably do the same, unless someone can convince me otherwise...? I may have a (perfect condition) shore cable for sale soon.

I also want to look into installing some sort of air-conditioner unit. I see roof-top/RV style ones in some M109's on here, but I don't really spend more than an hour in there at a time, so I can't justify $1000 roof mount A/C unit. I may do something like this, and hope my 2000W generator can run it: http://www.walmart.com/ip/Haier-10-000-BTU-Portable-Air-Conditioner-White-HPD10XCM-LW/23206507 I could run the exhaust out the existing evacuation fan hole, or even the exhaust door for the (non-existent) diesel heater. ...still thinking about this one, since I work in such a dusty environment, I'd hate to spend the money on an A/C unit that may live a short life on a construction site. Any suggestions?

Last on the short-term list, is getting Gladys painted. I want to do this before this winter if I can. There are a couple rust patches on the van body I need to address- it looks like there was some 8"-12" metal plate/patch jobs done to the front of the van box years ago. These areas seem to be the biggest rust areas. There is also a little rust around the seams and rivets in the hood... which I think I can fix with a wire wheel and some primer.

Thats about all for now. I'm looking forward to comments and suggestions. I'll have some more photos as soon as the roof is complete.

new roof 2.jpgnew roof.jpg
 

jmoneysmithmas

New member
72
0
0
Location
Montana
By the way, in the 2 above photos, you'll see the remaining flap of vinyl top in front of the fiberglass roof. I left that on there as a half-assed water and wind barrier until I can get the roof sealed and attached to the windshield frame. Once that's done, I can slide that last bit of vinyl out and into the trash. :)
 

Maverick1701

Well-known member
1,433
181
63
Location
Lubbock, TX
When you do you Herculiner I recommend doing more than the 2 coats explained in the directions on the box. I did the exact same thing you did (Herculined my hard top). I found that I had to do quite a few coats to get the herculiner think enough to actually protect the top.
 

stampy

Active member
1,321
22
38
Location
Henderson. NC
I bought a 40 watt solar panel and a jump pack and a small 400 watt inverter for my low power stuff like computers, phones, radar detector. They have a small 500 watt A/C unit Haier I think so you could run off your battery and an 1000 watt inverter. The 1000 watts would leave room for your misc gear. As far as insulating the cab. The metalized bubble wrap insulation could be glued to the underside of the cab then either styrafoam could be cut to fit (use silicone to glue together) or you could buy K flex insulation(about 2-3" thick black foam rubber really great stuff) it would insulate great and deaden sound
 

jmoneysmithmas

New member
72
0
0
Location
Montana
I bought a 40 watt solar panel and a jump pack and a small 400 watt inverter for my low power stuff like computers, phones, radar detector. They have a small 500 watt A/C unit Haier I think so you could run off your battery and an 1000 watt inverter. The 1000 watts would leave room for your misc gear. As far as insulating the cab. The metalized bubble wrap insulation could be glued to the underside of the cab then either styrafoam could be cut to fit (use silicone to glue together) or you could buy K flex insulation(about 2-3" thick black foam rubber really great stuff) it would insulate great and deaden sound
Thanks Stampy. I already bought a roll of aluminum bubble wrap insulation, with plans of using that for insulation. However, the thought of driving around inside a jiffypop bag seems more and more unappealing. I don't see an easy or attractive way to paint or cover it either, since that aluminum layer is so thin. I just looked into the K flex sheets online, and that stuff seems perfect! I think I'll return the bubble wrap to the hardware store, and try to get my hands on some K flex instead.

Pricing 40W solar panels, that might be a good backup and power source for small electronics and charging my GPS and survey instrumentation batteries; a lot cheaper than running my generator for 5-6 hours at a time. Here's the generator I picked up at Costco here in Montana last week for $599.99, if anyone is looking for a smoking deal on a nice yamaha-powered inverter generator: http://www.amazon.com/Smarter-Tools-ST-GP2000i-Generator-2000-watt/dp/B00CJGQ4DK
 
Top
AdBlock Detected

We get it, advertisements are annoying!

Sure, ad-blocking software does a great job at blocking ads, but it also blocks useful features of our website like our supporting vendors. Their ads help keep Steel Soldiers going. Please consider disabling your ad blockers for the site. Thanks!

I've Disabled AdBlock
No Thanks