-
Steel Soldiers now has a few new forums, read more about it at: New Munitions Forums!
camber adjustment shims and plates
- Thread starter 1993
- Start date

More options
Who Replied?Action
Well-known member
- 3,575
- 1,561
- 113
- Location
- East Tennessee
Use the seatch feature in pdf for "alignment"
- 1,735
- 2,362
- 113
- Location
- Rosamond, CA
Sorry about font color
Trying to help. Curb Weight
The curb weight of your vehicle is the weight of the car with all of the standard equipment and amenities, but without any passengers, cargo or any other separately loaded items in it. Thus, the curb weight is the amount that the vehicle weighs when it's resting on the curb and not in use. This is generally the standard weight that the manufacturer assigns to the car.
Gross Vehicle Weight
The gross vehicle weight is the combined weight of the vehicle and all passengers and cargo pieces in "gross," that is to say, in total. Gross vehicle weight is especially important if you're driving in a delicate area or if you're carry exceptionally heavy cargo. Gross vehicle weight is particularly important for truck drivers, who may be carrying huge quantities of cargo that might alter the total weight of the vehicle considerably.
This is very important to understand and just how you want to load up or run your rig. I would guess most are not going to be loaded with bullets, not in California, anyway. More likely a bread and beer runs to the store. Read section 7 > https://hummerhuren.files.wordpress.com/2013/01/hmmwv_test-diagnostics.pdf
Having been there, done this makes me no expert. but I did learn a lot by reading and doing and work. Set-up is easy and even by the book it will be set for various models loaded for bullets. There is no table for bread.
If it is severe, wearing tires on the outer edges and not square to the road (eye balled)? ... Pull ALL of the shims and set front and rear toe (see below). Must have good squared up tires to the ground, properly inflated for the (daily driver load expected (bread) add weight as needed for your requirements, bricks, bullets, sandbags, PB&J sandwiches).
Here's what I did.
Everything connected must be in good service condition. No losseie goosie parts. Drive it around, forwards and reverse. Last 75 feet roll it thru some loose dirt to dust the tires and then roll straight up onto smooth flat concrete, one or two revolutions.
Look to see the wear pattern (dusting or lack of) on tire. Take careful notes, front left, front right, rear the same, Draw pictures if you have to. Add shims using the recorded data. Will take one or two tries each wheel to get a feel of how much shims have for effect.
Set rear toe-in carefully. It is east to mess up here with respect to center-line of truck and have the rear "crabbing" down the road, not good. Google it. Front toe-in can and maybe 1/4" more the recommended. Another point is proper steering wheel indexing or center spoke pointing straight down when going straight and center of rotational travel.. Easy to fix with proper front toe balance left / right adjustments. AND then adjust left & right wheel stops. A lot of "ANDs" in my writing do to it's a lot of stuff going on under there.
Like the Farmers Commercial, been there, seen a thing or to, too, two........
Best Humvee tool ever? CREEPER. Why? viewed from above, sort of COOL, From below " What the **** were they thinking" Next best? The TM's and a little help from friends.
CAMO
Last edited:
Thanks Milcommoguy.
I understand curb weight and Gvrw.
My hope was that there might be some kind of shim chart for approximately how much change to expect from certain thicknesses of shims at factory curb weight.
but I guess trial and error it will be!
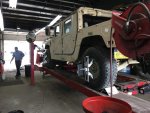
Btw, just got back from alignment visit.
They gave up on camber quickly and even rear toe.
while they were still struggling with rear toe I grabbed a wire brush and cleaned the threads up front.
the front adjusted like warm butter.
seems that the tar-like undercoating clogs up the threads and even a torch wont melt it.
they charged me $116 instead of $147 and promised to do the rear toe if I return within a month with the a rods movable.
one of the attachments has the results thus far...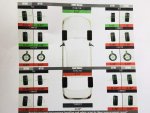


Action
Well-known member
- 3,575
- 1,561
- 113
- Location
- East Tennessee
The manual does have a chart for degrees of change per shim. I think I found a typo in the TM. The amount of change on the rear wheel is the same for both shim thicknesses. The front wheel has a difference of .2 degrees between shims. This is if add/remove the same shims for both buckets of the same upper a-arm.
what page?The manual does have a chart for degrees of change per shim. I think I found a typo in the TM. The amount of change on the rear wheel is the same for both shim thicknesses. The front wheel has a difference of .2 degrees between shims. This is if add/remove the same shims for both buckets of the same upper a-arm.
Action
Well-known member
- 3,575
- 1,561
- 113
- Location
- East Tennessee
There is a section in the front titled, "How To Use This Manual"....what page?
did you try what post #2 stated to do? It will come right up. Or try "alignment procedures"
page 2512.
But, I have a 2009 update. Yours may be a different page.
Carrera911
Active member
- 138
- 31
- 28
- Location
- Cumming, Georgia
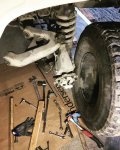
Got started on removing the rear shims today actually. Was surprised how clean they were along with the bolts. Must have been done during the 2014 overhaul. Same number of shims on both ends of the A arm. Therefore having both equal with no shims against the frame should be fine. At the end of the day you can’t make the camber any worse on the backs of these trucks unless you’re hauling a lot of lead or bricks.


Sent from my iPhone using Tapatalk


Sent from my iPhone using Tapatalk
Nice!Got started on removing the rear shims today actually. Was surprised how clean they were along with the bolts. Must have been done during the 2014 overhaul. Same number of shims on both ends of the A arm. Therefore having both equal with no shims against the frame should be fine. At the end of the day you can’t make the camber any worse on the backs of these trucks unless you’re hauling a lot of lead or bricks.

Sent from my iPhone using Tapatalk
They do look clean.
How was removal of upper swing arm?
The alignment "specialist" at the shop went at mine with great enthusiasm but after partially undoing a few nuts was overwhelmed and gave up. said if they had all day they would tackle it. one of the fears was that they might snap bolts.
It seems they where not aware that the threads need to be cleaned of that tar coating. As a nut gets backed off it gets packed tighter and tighter with "tar" until you break the bolt.
Having figured it out while watching them work, I think I got them to understand it by the end, at which point they were thoroughly frustrated with how much time it took to get very little done.
the camber seems to be beyond what they want to deal with, but they're willing to finish rear toe when I return with everything freed up.
as you can see from the printout I posted, my rear camber varies quite a bit from left to right.
I'll probably just pull the left plates out and leave the ones on the right side in.
My one concern is that maybe the plates(unlike shims) need to be there?
do they have a function other than as a spacer?

looks like not all civilian trucks used shims, but many get converted back to shims in the rear.
at least now I know approximately what to expect from shim thickness.
My TM pdf does not let me search, may be because I'm using a MAC?

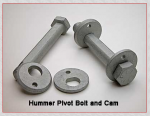
source of screenshots is:
http://flashoffroad.com/Maintenance/FrontEnd/align/alignment.htm
Last edited:
Carrera911
Active member
- 138
- 31
- 28
- Location
- Cumming, Georgia
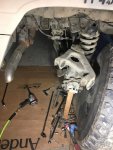
I’m not sure how bad the coating on the bolts is but it’s not bad at all. I already had the tire off the truck to service the hubs but I got to the point pictured in about 40 minutes before it got dark by myself. This is laying on my back in my driveway and walking back and forth inside to grab tools. Not in an air conditioned shop with it on a lift and my tool chest an arms width away from me and a helper to hold the nuts on the back. They’re probably used to doing prius alignments and the such that take 15 minutes and thus the 100 dollars or whatever they’re charging lines their pockets.
While I have everything easy to access I’m going to grind down the surface rust with a wire wheel and throw it back together for paint.
Sent from my iPhone using Tapatalk
While I have everything easy to access I’m going to grind down the surface rust with a wire wheel and throw it back together for paint.
Sent from my iPhone using Tapatalk
did you have to jack up the bottom swing arm to release the top?Got started on removing the rear shims today actually. Was surprised how clean they were along with the bolts. Must have been done during the 2014 overhaul. Same number of shims on both ends of the A arm. Therefore having both equal with no shims against the frame should be fine. At the end of the day you can’t make the camber any worse on the backs of these trucks unless you’re hauling a lot of lead or bricks.

Sent from my iPhone using Tapatalk
when the wheel is off, is there any significant tension on the top swing arm?
Carrera911
Active member
- 138
- 31
- 28
- Location
- Cumming, Georgia
I have jack stands under the center crossmember and got the wheels off. Undo the large bolts on the upper swing arm. Leave the nuts on and hit them with a hammer go get them freed some. I was able to lift up and down on the hub while jiggling the bolts and they came out.did you have to jack up the bottom swing arm to release the top?
when the wheel is off, is there any significant tension on the top swing arm?
I decided to paint what I could on the suspension while it was off and haven’t had someone to help me reattach the upper swing arm mounts. I got tired of holding the impact and the nut on the other side and gave up after 4 bolts. But I am putting it back together with no shims then I’ll do a basic tape measure alignment for the toe.
Sent from my iPhone using Tapatalk
the bolts holding the rear cups sure are not easy to get at.I have jack stands under the center crossmember and got the wheels off. Undo the large bolts on the upper swing arm. Leave the nuts on and hit them with a hammer go get them freed some. I was able to lift up and down on the hub while jiggling the bolts and they came out.
I decided to paint what I could on the suspension while it was off and haven’t had someone to help me reattach the upper swing arm mounts. I got tired of holding the impact and the nut on the other side and gave up after 4 bolts. But I am putting it back together with no shims then I’ll do a basic tape measure alignment for the toe.
Sent from my iPhone using Tapatalk
removing them is going ok for now.. reinstalling might be trickier.
any tips?
Action
Well-known member
- 3,575
- 1,561
- 113
- Location
- East Tennessee
- 1,735
- 2,362
- 113
- Location
- Rosamond, CA
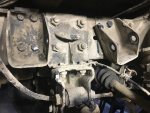
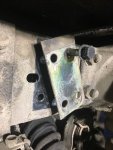
Patients, SMALL hands, a good creeper, better friends and the wrench above. Shims, I got shims... Here's a picture of the ones I left out to get things lined up. Put back two - three thin ones as needed to meet MY camber / caster needs. Your results may very. Note to self: Thirty year old Hummwv banging around, things are going to get whacked. See post with the front right side, lower controls arm pulled right out of the cross member, Holly Smokes (Driver to Commander...just bumped the curb??)
Keep that in mind when making measurements. Index to tooling holes or frame points to be sure your not going in circles trying to fix a bigger problem.
I can't see a shop wanting to take on an alignment on the cheap, labor alone. Got to cost $. Add in the rust and learning curve $$$. Parts $$$$
DIY if you can and save $$$, for the love of the hobby.
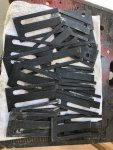
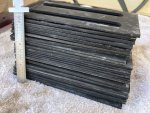
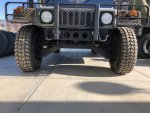


did you get it back together? how is it without shims? was your camber the same on both sides?I have jack stands under the center crossmember and got the wheels off. Undo the large bolts on the upper swing arm. Leave the nuts on and hit them with a hammer go get them freed some. I was able to lift up and down on the hub while jiggling the bolts and they came out.
I decided to paint what I could on the suspension while it was off and haven’t had someone to help me reattach the upper swing arm mounts. I got tired of holding the impact and the nut on the other side and gave up after 4 bolts. But I am putting it back together with no shims then I’ll do a basic tape measure alignment for the toe.
Sent from my iPhone using Tapatalk
ill probably have mine back together tomorrow. as predicted I only had one plate per bucket, no shims as you can see in the photos i just posted. i’m guessing mine is still going to be high but hopefully much more balanced with the other side.
Carrera911
Active member
- 138
- 31
- 28
- Location
- Cumming, Georgia
I finally got it back together today. Camber looks spot on to me without any shims. There was tons of toe out at first after bolting it all back together. I probably said every cuss word in my vocabulary a dozen times while trying to get the radius arms to move. Finally got them to turn with a 24 inch pipe wrench and a floor jack to get it about 1/6 turn at a time. After a rotation or two I could barely do it with all my weight on it. I did the alignment per the military spec with 1/2" toe out. I also checked against the frame rails to make sure they were even and it wouldn't crab walk down the road. Flash offroad has a PDF of one of the cartoon TMs that shows the alignment specs and procedures. It's on their page for H1 alignment.did you get it back together? how is it without shims? was your camber the same on both sides?
ill probably have mine back together tomorrow. as predicted I only had one plate per bucket, no shims as you can see in the photos i just posted. i’m guessing mine is still going to be high but hopefully much more balanced with the other side.
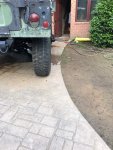
camber lookin good.I finally got it back together today. Camber looks spot on to me without any shims. There was tons of toe out at first after bolting it all back together. I probably said every cuss word in my vocabulary a dozen times while trying to get the radius arms to move. Finally got them to turn with a 24 inch pipe wrench and a floor jack to get it about 1/6 turn at a time. After a rotation or two I could barely do it with all my weight on it. I did the alignment per the military spec with 1/2" toe out. I also checked against the frame rails to make sure they were even and it wouldn't crab walk down the road. Flash offroad has a PDF of one of the cartoon TMs that shows the alignment specs and procedures. It's on their page for H1 alignment.
View attachment 728746
did you see my post about what i found out to be the cause of problem with turning one of my radius rods?
it’s a bit long winded but i had to get my frustration out. still waiting for a new radius rod.
https://www.steelsoldiers.com/showthread.php?178784-Rear-radius-rod-adjustment-sleeve-not-turning
any idea why the military specs want the toe out 1/2”? does the toe point in more as weight is added?
- 112,601members
- 166,187threads
- 2,340,743posts
- 956online users


