
I have an ECV M1114, cast rear upper spring mounts, non progressive rear springs. I had trouble driving it over 2MPH off road and wouldn't take it on some of the bad roads around town because it was so rough. Per some other threads I pulled the shocks completely for a few miles, rode much much better, definitely over sprung but hitting some bumps, rocks and dirt wasnt bad at all. This took care of the bumps but it was way too bouncy, unsafe above 30MPH on slow deep whoop style bumps, felt ready to head into orbit. Also the un-damped dual spring with center mass system caused some issues too.
I almost went with the Cepek shocks but was worried the compression damping would be too much and wanted to try and keep the stock springs so I decided to see what could be done with the stock shocks. I am also designing some new suspension on another car so I wanted to see if I could apply anything here.
I picked up a set of 4 new 12k shocks (Rear ECV shocks are actually shorter with external bump stop but the total length extended/collapsed was the same so I put the 12K's on all 4 corners) and practiced on my two original front shocks. I made the modifications and put them back together and am very pleased with the performance. I did not dyno these shocks before or after nor did I get corner weights on the truck. The modifications may increase cavitation/aeration in the shock oil so time will tell if they hold up. I will probably end up going with a new combo before that happens anyway. This info is intended for information only.
The shocks are a standard twin tube design, oil filled. They are not gas charged and with no gas bag, so no worries opening them. The majority of the compression resistance is from an unbelievably tiny orifice in the base valve. The majority of the low-mid speed rebound resistance looks to be from a stiff (spring managed) main piston valve with the higher speed resistance added by a two stage base valve. (Im not an expert these are assumptions from observations)
Tools needed (Minimum), removal not covered:
-Angle grinder (I used a chop saw also)
-1 1/8 socket
-7/8 wrench
-New shock oil if desired (I used 2.5W)
-Tig welder (Or a friend with one)
Procedure
-Grind open the outer shock body
-Disassemble the piston stack
-Drill 4 holes in the piston
-Bevel 3 of the holes
-Drill one hole in the base valve
-Clean
-Add shock oil (Or filtered original oil)
-Resemble (Make sure EVERYTHING is in the proper order and orientation)
-Weld shut
I am in ~150 USD for four new-modified shocks.
To disassemble the shock I put the shock body in my chop saw and carefully rotated it until I removed the majority of the crimp on top and just a drop of oil came out. I touched up the remainder of the spots with an angle grinder. A lathe would have been much better but I dont have one and didnt want to sink any money into the project as I didnt know how it would pan out.
Dont cut all the way through as the outer shock body top hat extends below the crimp so as long as the crimped part is removed it is easy to slide back together and weld up.

I put a bar through the upper eye and tapped up until the upper hat popped off.
I slooooooooowly (Very slowly) lifted the assembly up, this left the inner shock tube inside of the shock body and the shaft/piston came out. If you lift up too fast the inner shock body will come out too, fall off, drop back into the shock body and splash all the oil into your face (How do I know)
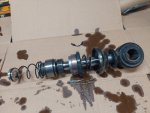
The guts:

Left -> Right:
1) Compression bump stop valve (silver) (This plugs the base valve when it gets down far enough)
2) Compression bump stop spring
3) Compression bump stop nut
4) Rebound valve/shim stack nut (Covered here)
5) Rebound valve/shim stack spring (Compressed here)
6) Shock piston (Largest diameter silver piece)
7) Compression spring retainer (Right above the shock piston)
") Extension bump stop (This fits inside the upper inner shock tube hat and meters fluid at full extension, only about 1/4" of stroke)
Extension bump stop (This fits inside the upper inner shock tube hat and meters fluid at full extension, only about 1/4" of stroke)
9) Inner shock tube hat
When disassembling (After the compression bump stop nut is removed) the rebound shim stack spring retainer can be removed with a 1 1/8 socket. There is preload here but the spring will fully relax before the retainer runs out of thread so it can just be zipped off:

Disassembled:

Top -> Bottom, left to right:
1) Compression bump stop valve (silver) (This plugs the base valve when it gets down far enough)
2) Compression bump stop spring
3) Compression bump stop nut
4) Rebound valve/shim stack nut
5) Rebound valve/shim stack spring
6) Rebound valve spring nut shim (helps set spring preload)
7) Rebound valve/shim stack spring seat
8 ) Rebound valve shim stack (My shock had 3 shims, lowest shim had a cut out in it, presumably for low speed rebound)
9) Shock piston
10) Compression valve (No shims here)
11) Compression valve spring.
12) Compression spring retainer (Right above the shock piston)
13) Extension bump stop (This fits inside the upper inner shock tube hat and meters fluid at full extension, only about 1/4" of stroke)
14) Inner shock tube hat.
My inner shock tube hat was stuck inside the outer tube top. I pried it out of the ones it didn't fall out of. This makes assembly easier. It may pop out from the shaft seal retainer spring.
Inner shock tube view from the bottom. This is the shock base valve as well

To disassemble this place it in a vice (Loosely so the lower portion can be pressed out):
you can see the lip is supported by the vice but the smaller diameter valve can be pressed out

I used a small deep socket and some extensions to get in there to hammer it out from the top:


Here is the base valve hammered out:

The base valve hole is the key. The base valve is why the compression is sooo stiff on these shocks. On rebound the 4 fingers let the star shaped piece inside push up letting fluid back into the inner body. The smaller inner piece opens under even higher shaft velocities. BUT under compression there is only two tiny nicks in the valve seat, cant be more than 1/32 total so as the shaft enters the shock it takes a tremendous amount of force to move fluid through the base valve making the shock unbelievably stiff. The compression spring on the main piston is so light that it does "nothing" the fluid just pours right out (Especially after more holes are added).
I couldn't find a way to disassemble the base valve without breaking the springs but it was not needed but a cut one is shown below:

I drilled a 1/8" hole in the base valve in the following location (Red):

I drilled x3 1/8" holes FROM THE TOP in the piston on the outer ring (The drill direction is very important or you could drill through a valve seat on the opposite side (The raised rings)). These 3 holes decrease compression resistance on the main piston in the following locations (Red). There is one additional 1/8 hole drilled for rebound this must be done FROM THE BOTTOM for the same reason.

This gives 4 holes total for compression (Outer ring) and 3 holes for rebound (Inner ring). I also enlarged the two existing rebound holes to 1/8" as well.
I beveled the bottom side of the compression bleed holes and added a small cutout (Circled in red) in the rebound valve seat to allow for more low speed bleed before the valve opened.

This cut out was to increase the cutout capacity of the 1st shim in the rebound stack. The shim is shown placed on the piston. It can be seen that the slot extends inside of the valve seat allowing some low speed bleed.

After the holes are drilled, re-assemble everything and add about 380mL of shock oil. I chose 2.5W from summit. My guess is that the original oil is 5w.
All this work was done in a "clean" environment and re-assembly was kept as clean as possible. Any grit or dirt in the shim stack can stick the valve open, mar the piston, change the spring preload etc.
After the 1st shock I had all 4 rebuilt in about 3hrs. Getting them shut again was tricky, I put a socket under the top shock eye so I could push down on the shock shaft to compress the shaft seal spring. I used a hammer to tap the outer shock body top back into the lower outer shock body. Friction kept it together and I tacked it shut.
The welding was tricky, I TIG'ed it only about 1/4" at a time, cooled it down with a damp rag and went to the other side. This took about 2 hrs so I didnt melt the shaft seal.
The shock compresses to the bump stop but I cant get it down that far, here is the front right on a rock (Right rear is off the ground):

With some lighter springs I could probably get another 2-3 in of travel.
The rig is much more pleasurable to drive, most road bumps are much much softer (not the big ones though, its not a caddi) and off road is much improved, still slow going but much faster. This did not (For me) completely solve the high spring rate/oversprung ride. I will probably move to a softer spring down the road but the shock mod goes a long way. Time will tell if they hold up but so far so good and worth <$200.
I almost went with the Cepek shocks but was worried the compression damping would be too much and wanted to try and keep the stock springs so I decided to see what could be done with the stock shocks. I am also designing some new suspension on another car so I wanted to see if I could apply anything here.
I picked up a set of 4 new 12k shocks (Rear ECV shocks are actually shorter with external bump stop but the total length extended/collapsed was the same so I put the 12K's on all 4 corners) and practiced on my two original front shocks. I made the modifications and put them back together and am very pleased with the performance. I did not dyno these shocks before or after nor did I get corner weights on the truck. The modifications may increase cavitation/aeration in the shock oil so time will tell if they hold up. I will probably end up going with a new combo before that happens anyway. This info is intended for information only.
The shocks are a standard twin tube design, oil filled. They are not gas charged and with no gas bag, so no worries opening them. The majority of the compression resistance is from an unbelievably tiny orifice in the base valve. The majority of the low-mid speed rebound resistance looks to be from a stiff (spring managed) main piston valve with the higher speed resistance added by a two stage base valve. (Im not an expert these are assumptions from observations)
Tools needed (Minimum), removal not covered:
-Angle grinder (I used a chop saw also)
-1 1/8 socket
-7/8 wrench
-New shock oil if desired (I used 2.5W)
-Tig welder (Or a friend with one)
Procedure
-Grind open the outer shock body
-Disassemble the piston stack
-Drill 4 holes in the piston
-Bevel 3 of the holes
-Drill one hole in the base valve
-Clean
-Add shock oil (Or filtered original oil)
-Resemble (Make sure EVERYTHING is in the proper order and orientation)
-Weld shut
I am in ~150 USD for four new-modified shocks.
To disassemble the shock I put the shock body in my chop saw and carefully rotated it until I removed the majority of the crimp on top and just a drop of oil came out. I touched up the remainder of the spots with an angle grinder. A lathe would have been much better but I dont have one and didnt want to sink any money into the project as I didnt know how it would pan out.
Dont cut all the way through as the outer shock body top hat extends below the crimp so as long as the crimped part is removed it is easy to slide back together and weld up.
I put a bar through the upper eye and tapped up until the upper hat popped off.
I slooooooooowly (Very slowly) lifted the assembly up, this left the inner shock tube inside of the shock body and the shaft/piston came out. If you lift up too fast the inner shock body will come out too, fall off, drop back into the shock body and splash all the oil into your face (How do I know)
The guts:
Left -> Right:
1) Compression bump stop valve (silver) (This plugs the base valve when it gets down far enough)
2) Compression bump stop spring
3) Compression bump stop nut
4) Rebound valve/shim stack nut (Covered here)
5) Rebound valve/shim stack spring (Compressed here)
6) Shock piston (Largest diameter silver piece)
7) Compression spring retainer (Right above the shock piston)
9) Inner shock tube hat
When disassembling (After the compression bump stop nut is removed) the rebound shim stack spring retainer can be removed with a 1 1/8 socket. There is preload here but the spring will fully relax before the retainer runs out of thread so it can just be zipped off:
Disassembled:
Top -> Bottom, left to right:
1) Compression bump stop valve (silver) (This plugs the base valve when it gets down far enough)
2) Compression bump stop spring
3) Compression bump stop nut
4) Rebound valve/shim stack nut
5) Rebound valve/shim stack spring
6) Rebound valve spring nut shim (helps set spring preload)
7) Rebound valve/shim stack spring seat
8 ) Rebound valve shim stack (My shock had 3 shims, lowest shim had a cut out in it, presumably for low speed rebound)
9) Shock piston
10) Compression valve (No shims here)
11) Compression valve spring.
12) Compression spring retainer (Right above the shock piston)
13) Extension bump stop (This fits inside the upper inner shock tube hat and meters fluid at full extension, only about 1/4" of stroke)
14) Inner shock tube hat.
My inner shock tube hat was stuck inside the outer tube top. I pried it out of the ones it didn't fall out of. This makes assembly easier. It may pop out from the shaft seal retainer spring.
Inner shock tube view from the bottom. This is the shock base valve as well
To disassemble this place it in a vice (Loosely so the lower portion can be pressed out):
you can see the lip is supported by the vice but the smaller diameter valve can be pressed out
I used a small deep socket and some extensions to get in there to hammer it out from the top:
Here is the base valve hammered out:
The base valve hole is the key. The base valve is why the compression is sooo stiff on these shocks. On rebound the 4 fingers let the star shaped piece inside push up letting fluid back into the inner body. The smaller inner piece opens under even higher shaft velocities. BUT under compression there is only two tiny nicks in the valve seat, cant be more than 1/32 total so as the shaft enters the shock it takes a tremendous amount of force to move fluid through the base valve making the shock unbelievably stiff. The compression spring on the main piston is so light that it does "nothing" the fluid just pours right out (Especially after more holes are added).
I couldn't find a way to disassemble the base valve without breaking the springs but it was not needed but a cut one is shown below:
I drilled a 1/8" hole in the base valve in the following location (Red):
I drilled x3 1/8" holes FROM THE TOP in the piston on the outer ring (The drill direction is very important or you could drill through a valve seat on the opposite side (The raised rings)). These 3 holes decrease compression resistance on the main piston in the following locations (Red). There is one additional 1/8 hole drilled for rebound this must be done FROM THE BOTTOM for the same reason.
This gives 4 holes total for compression (Outer ring) and 3 holes for rebound (Inner ring). I also enlarged the two existing rebound holes to 1/8" as well.
I beveled the bottom side of the compression bleed holes and added a small cutout (Circled in red) in the rebound valve seat to allow for more low speed bleed before the valve opened.
This cut out was to increase the cutout capacity of the 1st shim in the rebound stack. The shim is shown placed on the piston. It can be seen that the slot extends inside of the valve seat allowing some low speed bleed.
After the holes are drilled, re-assemble everything and add about 380mL of shock oil. I chose 2.5W from summit. My guess is that the original oil is 5w.
All this work was done in a "clean" environment and re-assembly was kept as clean as possible. Any grit or dirt in the shim stack can stick the valve open, mar the piston, change the spring preload etc.
After the 1st shock I had all 4 rebuilt in about 3hrs. Getting them shut again was tricky, I put a socket under the top shock eye so I could push down on the shock shaft to compress the shaft seal spring. I used a hammer to tap the outer shock body top back into the lower outer shock body. Friction kept it together and I tacked it shut.
The welding was tricky, I TIG'ed it only about 1/4" at a time, cooled it down with a damp rag and went to the other side. This took about 2 hrs so I didnt melt the shaft seal.
The shock compresses to the bump stop but I cant get it down that far, here is the front right on a rock (Right rear is off the ground):
With some lighter springs I could probably get another 2-3 in of travel.
The rig is much more pleasurable to drive, most road bumps are much much softer (not the big ones though, its not a caddi) and off road is much improved, still slow going but much faster. This did not (For me) completely solve the high spring rate/oversprung ride. I will probably move to a softer spring down the road but the shock mod goes a long way. Time will tell if they hold up but so far so good and worth <$200.
Last edited:


 ). Unbelievable difference, I would compare it to a HD truck suspension but very much comparable to POV vehicles. And I haven't sacrificed any loading capability this way. If and when I have to load some weight, all I need to do is air up to specs. That change by itself has made a 99% improvement for me.
