• Steel Soldiers now has a few new forums, read more about it at: New Munitions Forums!

  • Microsoft MSN, Live, Hotmail, Outlook email users may not be receiving emails. We are working to resolve this issue. Please add support@steelsoldiers.com to your trusted contacts.

1952 M135 W/Winch

SturmTyger380

Active member
482
30
28
Location
Easley SC
If the surface is clean metal and not huge holes bondo will stick for years. It does not repel water so it needs to be primed and painted, or you will get rust under it and then it will pop off. You want a thin coat of bondo. If you are laying more than 3 mil or 1/4 of an inch you should be doing metal body work then skim coat it with bondo. Mix bondo with the hardener on a slick surface not some left over piece of cardboard. Or you will get lots of bubbles mixed into it. (Don't ask how I know. :whistle: )

Once the bodo is cured you sand it so you can't feel an edge when you slide your hands over it. Then you need to put body putty on. That is goes on the thickness of a hair and fills in the small grain of the bondo. Lightly sand the body filler and clean and you are ready to prime.
 
Last edited:

USMC 00-08

Well-known member
1,183
180
63
Location
Skiatook, OK
What I have to fill is mainly some small pits from welding that could not be avoided and the heat from the weld made some of the larger patches dish inwards a bit. Nothing close to 1/4 inch deep.

I did spray primer on everything for now since it is so humid here, everything rusts really quick if left exposed.

Looks like I have to learn to do body work. Keep the advice coming. I need it.
 

SturmTyger380

Active member
482
30
28
Location
Easley SC
You might be able to get the larger areas to shrink some by heating the metal and using a hammer and a wooden dolly or by putting a wet cold quenching rag on the metal to shrink it. Google that and you find bunches of info. I would try that first before doing bondo on those areas.

There is also a metal shrinking disc which I have yet to try but looks fantastic. http://www.oldcarsweekly.com/restor...le-shrinking-disc-can-save-valuable-old-metal
 

SturmTyger380

Active member
482
30
28
Location
Easley SC
Yes that product link looks like it is the same as Lab Metal. I saw the quote -
Can be drilled or tapped.
I believe it. This is tough stuff. I remember now when I put thin layers on my knuckle housing. Each time it cured out, to smooth it down I had to use a metal file first and then many sheets of cut sand paper in the orbital sander.
 

1944mb

Active member
419
110
43
Location
Big Timber, MT
If you are wanting something that is permanent, lead-ing is permanent. The way you shape it is by using a body file. It's old school before the body filler days, but can be a lot of work. If you think of solder copper pipe, body leading is similar. The metal must be prepped with an acid(flux), and very clean. You heat the panel, and solder the lead to it, which I think they call tin-ing the metal. Then form the lead using some wooden paddles with wax on them. After cooling you use a body file to form the contour-basically remove the material you don't want on the body. I am told in the old days they used a sanding primer to fill any low spots-meaning they had the panels very close to perfect. Now a days they typically use putty/glazing putty to smooth the small discrepancies. Leading is quite often what manufacturers used in the 60's/70's(not sure all when but I have seen this on these vintage cars that I have been a part of the restoration) to seal imperfections when the put the rood on a car. I can try to make a small video if interested, I know where my leading materials are. I am the apprentice for sure, my old man is the master-he is into restoring 69 mercury cougars, and learned from a mexican guy that was a PIA cause he was so picky-but an amazing body man. Let me see if I can find you some pics at least.
 

Another Ahab

Well-known member
18,003
4,565
113
Location
Alexandria, VA
If you are wanting something that is permanent, lead-ing is permanent. The way you shape it is by using a body file. It's old school before the body filler days, but can be a lot of work. If you think of solder copper pipe, body leading is similar. I can try to make a small video if interested, I know where my leading materials are. I am the apprentice for sure, my old man is the master-he is into restoring 69 mercury cougars, and learned from a mexican guy that was a PIA cause he was so picky-but an amazing body man. Let me see if I can find you some pics at least.
I hear you that the guy might have been a PIA, but those are the true craftsmen and you need some of them around to help keep the trade moving forward as the art that it is.

When those kinds of people are gone, and nobody around cares anymore, the art (whatever it is) can disappear forever. That would be sad.
 

1944mb

Active member
419
110
43
Location
Big Timber, MT
I hear you that the guy might have been a PIA, but those are the true craftsmen and you need some of them around to help keep the trade moving forward as the art that it is.

When those kinds of people are gone, and nobody around cares anymore, the art (whatever it is) can disappear forever. That would be sad.
no doubt. He passed a lot of info on to my father. He would work on a panels with a hammer and dolly, not damage the paint, and get the vehicle back in the road where other were replacing and painting panels. He was amazing. He took a Mazda van, cut a bunch of different features off different cars and built it to be a bmw. Then took it to the bmw show, with factory representatives from Germany. They were pissed cause they thought the factory had kept this back a secret model-which I guess bmw would do from time to time. He was nothing short of a one of a kind body man. Leading is disappearing cause today's vehicle don't have thick enough panels to heat for leading. It would worp them and be counterproductive.
 

Another Ahab

Well-known member
18,003
4,565
113
Location
Alexandria, VA
He was amazing. He took a Mazda van, cut a bunch of different features off different cars and built it to be a bmw. Then took it to the bmw show, with factory representatives from Germany. They were pissed cause they thought the factory had kept this back a secret model-which I guess bmw would do from time to time. He was nothing short of a one of a kind body man. .
My hat is off to the man, whatever became of him.

There are geniuses hiding among us that don't get recognition (just the way it is), and he would be one of them.

That BMW story is great!
 

USMC 00-08

Well-known member
1,183
180
63
Location
Skiatook, OK
If you are wanting something that is permanent, lead-ing is permanent.
Could you move your trip down here to next weekend instead of this fall so you can show me how to do it? :-D

I was out looking at what I have to fill and was using a straight edge to see how bad things are. I really don't think it will be too bad. Everything was way less than 1/4 inch deep. Probably 1/8 inch or less really. I decided to try USC All Metal. I was trying to look at reviews on all the different options and was not getting very far. Everything had great reviews as well as horrible reviews. I'm just going to try it and see what happens.

I will remove all the primer, degrease, rough up with sand paper or wire wheel, apply, let cure overnight and go from there.
 

Another Ahab

Well-known member
18,003
4,565
113
Location
Alexandria, VA
If you are wanting something that is permanent, lead-ing is permanent. The way you shape it is by using a body file. It's old school before the body filler days, but can be a lot of work. If you think of solder copper pipe, body leading is similar.
Here's a video of something called tinning, which if I remember from a roofer i used to work with, might be close to the same thing as "leading".

It's kind long (I didn't check out the whole thing):


https://youtu.be/J0X6E5HuOd4
 

1944mb

Active member
419
110
43
Location
Big Timber, MT
You lead a side panel by controlling your heat. It is easier to learn to lead on horizontal to the ground panel. The more heat you apply the more the lead flows. The less, the more solid it is. If you watch the first video he has it pretty hot and kind of piles it on. The video with gene Winfield-he's know what he is doing with it. Clean clean clean. He uses a copper scratch pad cause the flux doesn't react as much with it. That was how I learn leading was to heat the panel with the flux and scrub it. The flux cleans and removes oxidation. Also digging the junk out of the cracks is very good advise. Again keep it clean. Gene is a definitely a seasoned hand with this process. On the first video the body file he uses is straight. I prefer an adjustable body file to help match your contour. I'll run out and snap a few pics to illustrate. I've never used the is chemical stuff. It looks interesting. The better lead er you r the less work you have the finish the panel. That being said it's pretty straight forward, and really doesn't require a bunch of expensive tools. If you want paul I would loan you my stuff. Having a panel "tinned" is the process of getting it fluxes and some lead on there. Basically the same deal.
 

1944mb

Active member
419
110
43
Location
Big Timber, MT
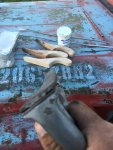
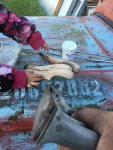
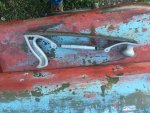
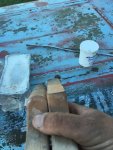
The three pics I am trying to show how the body file adjust to be concave or convex depending on the shape of the panel you r trying to work. The four shows that the paddles have different contours. You could really make a paddle out of any different woods. The Eastwood kit is nice and as you can see my flux/tinning butter is from there-actually all the tools except for the file are.
 

Attachments

USMC 00-08

Well-known member
1,183
180
63
Location
Skiatook, OK
If you want I would loan you my stuff.
Thank you for the offer. Since I already ordered the All Metal, I am going to experiment with it first. If it doesn't work, I'll order my own tinning tools since I will have at least one more truck that will need some work too.

SturmTyger....I also found these shift knobs at McMaster Carr. They are a little bit taller than the original knob, but not by much if their dimensions are correct.

http://www.mcmaster.com/#6050k35/=12o2e28
 

USMC 00-08

Well-known member
1,183
180
63
Location
Skiatook, OK
If you get one, could you post some pics of it compared to the original? Maybe we can add this to the parts list if they are right.
 

USMC 00-08

Well-known member
1,183
180
63
Location
Skiatook, OK
Does anyone have a NOS u-joint laying around that measurements could be taken off of to confirm if this is a replacement? If anyone already has a good part number for them, that would be great too.

http://www.oreillyauto.com/site/c/detail/OPJ0/330.oap?ck=Search_330_-1_751&keyword=330

I figured I might as well replace all of them while they are easy to get to as I prep to paint.

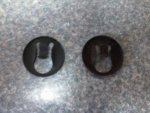
I also might have found a source for window regulator clips at a reasonable price. I ordered some and will add them to the parts list if they work. They look almost identical to the originals. The original is on the right.

0602161708.jpg

Here is where I found them.

http://www.althafastener.com/60-61-62-63-64-GMC-truck-regulator-arm-stud-clip-_p_126.html
 
Top
AdBlock Detected

We get it, advertisements are annoying!

Sure, ad-blocking software does a great job at blocking ads, but it also blocks useful features of our website like our supporting vendors. Their ads help keep Steel Soldiers going. Please consider disabling your ad blockers for the site. Thanks!

I've Disabled AdBlock
No Thanks