• Steel Soldiers now has a few new forums, read more about it at: New Munitions Forums!

  • Microsoft MSN, Live, Hotmail, Outlook email users may not be receiving emails. We are working to resolve this issue. Please add support@steelsoldiers.com to your trusted contacts.

Artisan's M916

Artisan

Well-known member
2,761
227
63
Location
CDA Idaho
Who is the 1 with the long finger nails ?? Lol

You mean the gal whom I spoke to on film, saying ; You got your finger right in front of the lens.
...and do you mean the one whom barked back something like; NO I DON'T!!!
You mean THAT person?

That is my beloved Babis, My living ANGEL, my doting, brilliant, genius, gorgeous wife!
I don't deserve her, God has been good to me.


If you have never met an Angel in real life come say hello to her, I kid you not.
 

redstroke

New member
35
0
0
Location
MI
Interesting my line to the quad lock was plumbed backwards. My front axle would engage but not quad lock.... I had to swap the lines to get it all to work and I was very impressed as well.

It was the first day for me in the dirt w/ the M916 today. I had not tested
the front axle so I set myself up so if it did not work I would
not be stuck and started testing and IT DID NOT WORK. A

After dinkin' around w/ things and listening and feeling the T/C it
finally dawned on me why it was not working! During reset
they PLUMBED THE ACTUATOR AIR LINES BACKWARDS, Arggh! s
So when ENAGGED it was actually DISENGAGED.
I had read the TM and I knew the InterLock switch was supposed
to be in the center and it always was so I was NOT driving thet
ruck in 6x6 on the road.

Once I figured out what was going on I was able to see what it
would do and I was VERY Impressed w/ that monster's capabilities,
VERY Impressed.
 

Artisan

Well-known member
2,761
227
63
Location
CDA Idaho
Interesting my line to the quad lock was plumbed backwards. My front axle would engage but not quad lock.... I had to swap the lines to get it all to work and I was very impressed as well.

snip
.
I don't trust none of that piping anymore for that InterLock Valve.
I think I will open up the pneumatic schematic and duble check it all.

I do not know what you mean by "Quad Lock" Is that the rear axles
locking up as well as the front axle?

( I appreciate the input! )
 

Artisan

Well-known member
2,761
227
63
Location
CDA Idaho
I wrote Truck-Light this AM and they replied w/ the following;

"Our Headlamp part number 27270C is designed to replace certain Headlamp Types.
The 7" round is designed to replace #6014, 6015, 6016, H6024 Headlamp designs.
It does not have a heater. In harsh weather conditions the snow may accumulate
on the lamp. We are in the process of designing a Heated version. I do not have
availability of this lamp at this time as its still in the design phase."


So I was right, Snow/Ice can accumulate on LED lens. If you live in
the cold, you might care, if not, punt...
 

Artisan

Well-known member
2,761
227
63
Location
CDA Idaho
As I said in post #220, "I had read the TM and I knew the InterLock
switch was supposed to be in the center..."
so today when I was looking
at things I keyed on the DATA PLATE installed in my truck. Something
seemed in err. I looked up that Data Plate P/N and shonuff, my dataplate
is for a different truck, I presume an M915!


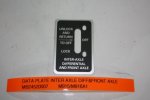
This is the data plate that is SUPPOSED to be in an M916;

M-B245-20007.jpg


Mine has what I believe to be a data plate from and M915;

M-B245-20006-maybe.jpg

I wonder if others were reset w/ this in err as well, or is yours A-OK?
 

Castle Bravo

Hundredaire Socialite
Steel Soldiers Supporter
1,964
215
63
Location
Arizona
That does look like a 915/A1 plate. Also, the "unlock and return" part is important. It has to go back to the middle position to unlock.
 

redstroke

New member
35
0
0
Location
MI
Quad lock I mean the rear axle interlock. My tag has the 3 positions on both my trucks. After I swapped the lines mine worked.
 

Artisan

Well-known member
2,761
227
63
Location
CDA Idaho
RE: Rear Differential Lock / Front Axle Engage Switch INOP / Plumbed BACKWARDS


I "think" I found my air line issues.

Redstroke, was yours the same***?


If you look at the TM there is a picture that shows the air line piping from
the valve. I highlighted one of those DELivery lines from the valve in the dash
RED in color and the other DELivery line GREEN in color.

Looking at the drawing in the TM you can see the RED LINE that has a "T" in it
is plumbed to the FRONT of the Air Shift T/C valve, and the same RED line that branches off
the "T" goes to the DIFF LOCK in the rear.
Also you can see the GREEN DELivery line plumbs to the BACK of the
T/C Air Shift device.

So the TM has the line w/ the T in it plumbed to the front to the Air Shift Valve
and the single line is plumbed to the rear of the air shift vale.


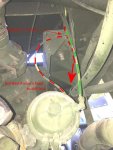
***NOW LOOK at how mine is plumbed in the picture below. The RED line w/ the "T" in it is plumbed
to the BACK OF MY AIR SHIFT VALVE and the GREEN is to the FRONT!

SO I believe mine will be fixed if I just swap the two lines at the Air Shift Valve. Is that
how you fixed your Redstroke?


One of the pics are too big for SS so alls I can do is link to it, CLICK HERE, alternately
you can see what I speak of in TM 9-2320-273-20, PDF Pg 60 .


piping5.jpg
 

Artisan

Well-known member
2,761
227
63
Location
CDA Idaho
That does look like a 915/A1 plate. Also, the "unlock and return" part is important. It has to go back to the middle position to unlock.

Indeed Matt, that is another thing that got me thinking, it just
seemed like it was for just a rear diff lock and NOT the M916.
I had read the TM and it was clear, unlock then return to the middle.
GLAD I read it.

I will tell everyone where I grabbed that Data Plate from tomorrow. If I tell
everyone now they will be gone before they fill
my order and I will be left w/ squat!
 

redstroke

New member
35
0
0
Location
MI
Mine would engage the front axle but not both rears. (opposite of your problem) I swapped the two lines on the t case to get the t line in the right place but i also had to swap them at the valve in the dash to make mine work.

Sounds like you got it figured out and your fix will be easier than mine. You will be happy with the results..
 

Artisan

Well-known member
2,761
227
63
Location
CDA Idaho
I was in PM engineering headlight heights and I want to save
my calculations for future reference and for others to see.


If you swap on 1600 tires onto an M916 / M920 it raises the truck and the headlights are
already at Federal MAX HEIGHT from ground to C/L of light, which is 54"
so if you raise the truck you are opening yourself up to suit. Ask
me how I know this can happen. It did NOT happen to me but
I have a factual story that will hush any naysayer, well, any except
for those who do not care, and/or do not have anything to loose...

______________________________________

If your tires are anything like mine, I have Bridgestone MSX 857 tires (M857)
on 24" rims. So here is the poop comparing the Goodyear 1600's
to the Bridgestone 11.00R24;


16.00R20 AT-3A 51.6" DIAMETER
11.00R24______46.7" DIAMETER
-___________________________
=.......................4.9" Difference in Diameter

...So, 4.9" ÷ 2 = 2.45"

So, w/ new tires at recommended pressures a 1600 is going to lift
the truck 2.5" approximately.

That means you would need to lower the lights 2.5" , maybe a smidge more to be safe.

If I had the means I would have a good metal-smith / fabricator / body shop
who deals w/ repairing truck beds simply cut the OE headlight mounts, the whole
shooting match off and slide it down 2.5" VERTICALLY ( not 2.5" on the angle)
and weld them back on.

NOTE: UNDER THE HEADLIGHTS, IN THE LIGHT MOUNTING CANS ON BOTH SIDES
ARE ELECTRICAL BUSS BARS. THEY WOULD BE RELATIVELY EASY TO LOWER TOO.
Just pull a headlight and look, you need to service those electrical grounds anywho.

OR leave them on (disconnected) and add bumper mounted lights, just like snowplow lights.
 
Last edited:

Artisan

Well-known member
2,761
227
63
Location
CDA Idaho
Mine would engage the front axle but not both rears. (opposite of your problem) I swapped the two lines on the t case to get the t line in the right place but i also had to swap them at the valve in the dash to make mine work.

Sounds like you got it figured out and your fix will be easier than mine. You will be happy with the results..

There are two air lines for the T/C Air Valve.
Does anyone know how that valve operates?
Is it;

PRESSURIZE THE FRONT SIDE TO ENGAGE ?

PRESSURIZE THE BACK SIDE TO DISENGAGE AND VENT?

MattU is a brilliant guy, maybe he will chime in... :)
 

redstroke

New member
35
0
0
Location
MI
There are two air lines for the T/C Air Valve.
Does anyone know how that valve operates?
Is it;

PRESSURIZE THE FRONT SIDE TO ENGAGE

When the red line has air to it it will engage, looking at your diagram its the front of TC actuator.
 

Artisan

Well-known member
2,761
227
63
Location
CDA Idaho
Thank u Red and Thank U R R

I sub'd into Red's thread and NOW I SEE the method of Phillips and Temro's madness!
I was pondering just how to do a block heater and by looking at what Red did, and
then the catalog, I see why there are so many different configurations of block heaters
for the 855. BINGO!

CLICK HERE for the Phillips and Temro catalog and go to PDF Pg 40, you will
see what I speak of. Red are you ready to cry? ;-) I applaud the resourcefulness though.
Looks like something I would do!


ADDENDUM

After reviewing my installation I have determine we need a #8601100 Block Heater.

You can buy it HERE for $54.xx Free Shipping (Now I know Red is crying.... :) )

Here is a picture of mine pre-heater FWIW ;

block-heater-location.jpg
 
Last edited:
Top