-
Steel Soldiers now has a few new forums, read more about it at: New Munitions Forums!
goldneagle's 1985 M1008 recovery and restoration thread...
- Thread starter goldneagle
- Start date

More options
Who Replied?goldneagle
Well-known member
- 4,490
- 977
- 113
- Location
- Slidell, LA
I saw that being done on Youtube. It reminds me of pulling a calf out of a cow. (Incredible Dr. Pole) If I was going to keep the tires I would have done that. However, the tires were trash and it took 15 minutes to do all 5 my way. I bet it took at least 15 minutes each to do it your way.Easiest way to get those out is to tie a strap to them and tie the tire to something and pull them out with a truck. I did it to a set i have
goldneagle
Well-known member
- 4,490
- 977
- 113
- Location
- Slidell, LA
Yes they are except for the beads. That is why I cut the sidewalls near the tread as seen in the picture. I use a fine tooth metal cutting jigsaw blade. It was so fast i could not believe it! I just drilled a 1/2" hole and went in both directions with the saw. I made sure the run flats were slid to the bottom and out of the way.Hadnt thought of it that way haha i only had to do two and i was trying to save the tires. Are the sidewalls as thin as people say?
Abbylind
Member
- 284
- 14
- 18
- Location
- Palm Harbor FL & NM
As to your IP leak mine had the same (leaking fuel out the back of the engine) I removed the intake manifold and bought a IP rebuild kit. Remove the top of the injector pump and pull out the throttle shaft that runs across the pump. (The o rings are rotted and thats why its leaking) Replace the o rings on the shaft and replace the shaft into the IP housing. Install a new gasket on the top cover and button up the pump. Reinstall the intake manifold and your set! Unfortunately you can remove the throttle shaft without removing the intake manifold. Good luck
Abbylind
Member
- 284
- 14
- 18
- Location
- Palm Harbor FL & NM
Sorry that was "you CANT remove the throttle pump without removing the intake manifold"...
goldneagle
Well-known member
- 4,490
- 977
- 113
- Location
- Slidell, LA
Thanks for the info.Sorry that was "you CANT remove the throttle pump without removing the intake manifold"...
goldneagle
Well-known member
- 4,490
- 977
- 113
- Location
- Slidell, LA
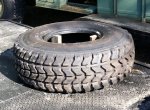
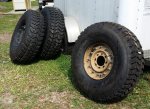
Was a nice day out today so I decided to work on my HMMWV tires and rims for the truck. I vacuumed the water out of the tires. I tried one ratchet strap on the runflat. It was hard to pull it together to deform it enough to insert into the tire. Decided to call in a professional to help.
As soon as he saw the project he was shaking his head and said it would not work. The problem was the beads on the tires were not spread enough to install as is. There was no way to get the run-flats in-between them. So we ended up cutting and inserting 8" pieces of 2x4 studs between the tire beads. Three per tire. We laid them on top of the car hauler to warm up in the sun for a few days. They should be wider once we remove the wood blocks. We will try to install them on Monday.
I had 2 new silicone o-rings installed on rims about a week ago. They came out great. I had to use silicone calk to glue them to the rim. They would not lay flat due to the way they were packaged. I used blue painter's tape to hold the o-rings in place until the silicone adhesive dried.
I had to sand the edges of the rims to remove the rust where the beads made contact with the rims. Once I cleaned up the rims from the run-flat lube I spray painted the edges of the rims that I had sanded. I also cleaned the areas where the o-rings are placed and glued the new o-rings to the rims. Then I used the blue tape again to hold them in place. Now all the parts are ready to assemble once the tires are done baking in the sun.
Attachments
-
75.9 KB Views: 59
-
71.4 KB Views: 56
-
87.9 KB Views: 57
Last edited:
goldneagle
Well-known member
- 4,490
- 977
- 113
- Location
- Slidell, LA
This afternoon I decided to tackle the insertion of the run-flats into the new HMMWV tires. I removed the wood blocks and applied one tube of run-flat lube. I used a large paintbrush to spread it around the underside of the tread. I then used a heavy duty ratchet strap to squeeze the run-flat into a oval shape so i can force it into the HMMWV tire. I had to use crow-bars and a dead blow hammer to manipulate the run-flat into the HMMWV tire. Once the run-flat was inside the tire I released the ratchet strap and pulled the strap out of the tire. It took me 4 hours with breaks to get 4 of the run-flats inserted into the tires. I will get the 5th one tomorrow before my tire guy shows up.
Attachments
-
85.2 KB Views: 62
-
81.6 KB Views: 58
-
61 KB Views: 57
-
96.5 KB Views: 57
Csm Davis
Well-known member
- 4,160
- 393
- 83
- Location
- Hattiesburg, Mississippi
Did the blocks do any good?
goldneagle
Well-known member
- 4,490
- 977
- 113
- Location
- Slidell, LA
In my opinion they did. When we installed them in it took 2 people to get them in. Sitting in the LA sun for a few days allowed the beads and sidewalls to expand out. It allowed me to get the run-flats in easier. (when I removed the blacks the side walls only moved a little and there was a significant gap between the beads compared to the way they were when we started)Did the blocks do any good?
goldneagle
Well-known member
- 4,490
- 977
- 113
- Location
- Slidell, LA
Update: Went out this morning and installed the last run-flat into the HMMWV tires. (got a little help from my tire guy who arrived as I was wrestling with the run-flat) We mounted all 5 HMMWV tires with the run-flats on the rims. I found an easy way to align the valve stem to the notch in the run-flat. This is what i did: Using a yellow crayon I made a tiny mark on the run-flat where the notch was. (bead-lock part of the run-flat) I then laid the top portion of the rim (part with air inflation stem attached) with the valve stem at the tiny yellow mark I made. I marked the tire bead where the extra hole was drilled through the rim between the stud holes. I removed the top rim piece and extended the yellow crayon mark to the run-flat. (must be straight down)
The tire installer lubed the run-flat where it will contact the rim. With the bottom of the rim section (section with studs attached) on the ground we laid the tire over the rim aligning the extra hole in the rim with the yellow line. (O-ring is already installed at this time) We then fitted the top portion of the rim over the bottom portion with the extra hole in the rim lining up with the one on the bottom portion. Then we tightened up the 12 bolts that hold the 2 sections of rim together. Added air and the tire was ready to mount on the truck.
I hope this aligning procedure will help others install tires and run-flats on HMMWV rims. All 5 of out tires inflated without any problems.
Attachments
-
72.3 KB Views: 119
-
100.1 KB Views: 105
Csm Davis
Well-known member
- 4,160
- 393
- 83
- Location
- Hattiesburg, Mississippi
Have you figured out what leveling kit you are going to use up front?
goldneagle
Well-known member
- 4,490
- 977
- 113
- Location
- Slidell, LA
Have you figured out what leveling kit you are going to use up front?
Funny you should ask! It's been 4 months now and I am finally going to complete the lifting of the truck so I can use the HMMWV tires and rims for front and back of the truck. After doing some searching on the net I decided to go with the Summit Racing 1983 CHEVROLET K30 Pro Comp Suspension Lift Kits K1059. The only part not included in the kit is the 2" wheel spacers and the shock boots. I chose Forest Green for the shock boots.
The kit and boots ran $625.99 including shipping. It included new front springs and U-bolts, new front shocks, New Pitman arm, 4" cast blocks and new U-bolts for the rear, and new shocks for the rear. Shock boots were sold separately due to color choices. I got the 2" wheel spacers for the front from another source I will not include.
I will be dropping the truck off to my mechanic for installation tomorrow.
goldneagle
Well-known member
- 4,490
- 977
- 113
- Location
- Slidell, LA
Well mixed news today. I dropped off my truck to get the lift done. I get a call from the mechanic to tell me that the Pitman arm did not fit the front axle. It seems the front axle in FORD not Chevy design. Also the U-bolts for the front and rear axles were wrong! Ordered a Superlift Adjustable Drag link for the truck. Had it sent overnight. The mechanic managed to find the front U-bolts at Autozone and the rear ones were ordered from Advance Auto.
What I learned was that you cannot use the 1983 Chevrolet K30 truck spec's to order suspension parts for the lift!
Hopefully I can have the truck done tomorrow.
What I learned was that you cannot use the 1983 Chevrolet K30 truck spec's to order suspension parts for the lift!
Hopefully I can have the truck done tomorrow.
goldneagle
Well-known member
- 4,490
- 977
- 113
- Location
- Slidell, LA
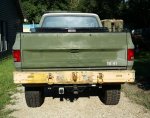
I got the truck home today. All done with the lift. The ride is smooth and no binding when turning.
Looks like the front springs and U-bolts were correct for the front axle. The front shocks were also correct. Had to install a Super Lift 3040 Adjustable Drag Link (Summit Racing SLF-3040) $89.95. That worked out perfect for the front. The rear U-bolts that came with the kit were wrong. The rear required square U-bolts. Got them in from Advance Auto. Had to make flt bar spacers for the brake line assembly above the differential. 2 pieces of flat bar drilled solved the problem. There was one with the kit but we used 2 heavier ones about 4" long to do the job. Shocks in the rear had to be flipped with the shock boots on the bottom to fit into the brackets on the axle. The truck sits nice and drives great! Here are some pictures when I got it home:
Looks like the front springs and U-bolts were correct for the front axle. The front shocks were also correct. Had to install a Super Lift 3040 Adjustable Drag Link (Summit Racing SLF-3040) $89.95. That worked out perfect for the front. The rear U-bolts that came with the kit were wrong. The rear required square U-bolts. Got them in from Advance Auto. Had to make flt bar spacers for the brake line assembly above the differential. 2 pieces of flat bar drilled solved the problem. There was one with the kit but we used 2 heavier ones about 4" long to do the job. Shocks in the rear had to be flipped with the shock boots on the bottom to fit into the brackets on the axle. The truck sits nice and drives great! Here are some pictures when I got it home:
Attachments
-
75.9 KB Views: 113
-
83.1 KB Views: 124
-
95.4 KB Views: 119
-
80.2 KB Views: 112
- 1,577
- 137
- 63
- Location
- Norwood LA
Looks good, glad the front doesn't bind. Now you can go 4x4.
goldneagle
Well-known member
- 4,490
- 977
- 113
- Location
- Slidell, LA
Thanks guys. Here are some more pictures I just took.
Attachments
-
65.7 KB Views: 117
-
40.5 KB Views: 112
-
49.1 KB Views: 111
-
63.3 KB Views: 126
-
95 KB Views: 106
-
80.6 KB Views: 138
-
79.1 KB Views: 126
goldneagle
Well-known member
- 4,490
- 977
- 113
- Location
- Slidell, LA
I ordered some Bully BBS-1103 Aluminum Side Step - Pair from Pep Boys and picked it up in store. I installed one of them on the driver's side so I can get into the cab much easier. I plan to install the 2nd one Monday. I plan to fabricate a custom nerf bar out of heavy angle so I can attach 2 of these steps on each side of the truck. One for getting into the cab and the other for reaching the tool box in the truck bed. These steps will bolt easily to the angle nerf bar. Here is a picture with the step installed on the driver's side.
Attachments
-
95.9 KB Views: 94
Last edited:
- 110,655members
- 165,172threads
- 2,324,086posts
- 1,410online users


