• Steel Soldiers now has a few new forums, read more about it at: New Munitions Forums!

  • Microsoft MSN, Live, Hotmail, Outlook email users may not be receiving emails. We are working to resolve this issue. Please add support@steelsoldiers.com to your trusted contacts.

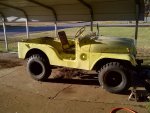
Just purchased my 2nd MV...M38A1

clinto

Moderator, wonderful human being & practicing Deuc
Staff member
Administrator
Super Moderator
Steel Soldiers Supporter
Supporting Vendor
12,596
1,129
113
Location
Athens, Ga.
I do not know if the dash factory horn wiring is still in place. I have not reached that point in the project...yet. However the under-hood sections of the horn wiring are still there.

On the battery question:
I had read that online during my research but I am always weary of trying stuff I read online without first double checking the information hahaha.
That would make life A LOT easier...and clean up the battery box. So I can keep both batteries hooked up to the vehicle wiring and charge each battery individually using a 12v charger...correct?
A. Horn wiring is in the column like a deuce.

B. Yes, I'll try to remember to take pictures tomorrow. But go do this trick with your multimeter:

Put the positive lead on the positive terminal of the 2nd battery. This is the positive terminal that the battery cable is hooked to that goes to the starter.

Now, put the negative test lead on the negative terminal of that 2nd battery. Note readout. Then move the negative test lead to the other battery negative post. Note readout.
 

Maverick1701

Well-known member
1,433
181
63
Location
Lubbock, TX
A. Horn wiring is in the column like a deuce.

B. Yes, I'll try to remember to take pictures tomorrow. But go do this trick with your multimeter:

Put the positive lead on the positive terminal of the 2nd battery. This is the positive terminal that the battery cable is hooked to that goes to the starter.

Now, put the negative test lead on the negative terminal of that 2nd battery. Note readout. Then move the negative test lead to the other battery negative post. Note readout.

A. I vaguely recall reading that somewhere in the TM. I haven't had the chance to test the remaining wiring after removing the POs. I need to replace some wires due to age, wear, and mice.

B. Thanks. Ill run out and do that now (I can always use an excuse to play with the jeep hahaha).
 
Last edited:

Maverick1701

Well-known member
1,433
181
63
Location
Lubbock, TX
ran the voltmeter and sure enough. Thanks Clinto!

After thinking about it there is really no difference in running 2 12v chargers (one per battery) and having a vehicle/etc with two 12v battery banks that were wired in series. We are still supplying each "side" with 12v...either with a charger or multiple batteries wired in parallel.
 
Last edited:

Maverick1701

Well-known member
1,433
181
63
Location
Lubbock, TX
I am still fishing for the straw from the PB blaster can. I picked up one of those claw things and am fishing around in the cylinder...I almost had it out a few times hahaha.


Well my spark plug wires FINALLY arrived...dang UPS!!! I installed my new plugs and wires (plugs not in the block so I can visually check spark). The M38A1 has spark!


Last week (when I had the tank pulled) I rinsed out the old fuel and ran a snake camera/inspection camera down inside of it. The tank is REALLY clean.
I picked up 5gal of fuel after work today and tossed it in the fuel tank with some seafoam. I cranked the motor over a few times and now I have fuel...woohoo!!!
Obviously it took a few cranking treatments for me to push out all the old fuel. Once the old fuel was pushed out of the system, I reconnected everything to the carb.
I haven't tested my carb...yet.


After all this I went into my house for a bite to eat.


I came back outside after enjoying some food and noticed a pretty good sized mark/stain on the ground. I did some looking and apparently I have a pin-hole leak in the fuel tank of the jeep. I pulled the tank and turned it on its side. I have a temporary fix in place but I will complete a "real" fix once the jeep is up and running.


Tomorrow I am going to re-install the fuel tank and then check the carb...assuming work does not get in the way.
 

Maverick1701

Well-known member
1,433
181
63
Location
Lubbock, TX
ITS ALIVE!!! After 12 years of sitting, the Jeep finally returns to the land of the living!!!


I was able to pull the straw using one of those magic claw things.


today I installed the new plugs + wires. I decided to pull the carb and give it a good cleaning.
The carb was full of old nasty fuel. Also the accelerator pump spring keeper had become detached from the shaft (I replaced the keeper on the shaft).
On reassembly I filled the bowl with seafoam. After re-installation the jeep was soooo close to catching (it sure was trying).
I gave the Jeep a small shot of start fluid and she kicked off. The Jeep ran fairly well....it blew out a bunch of crap/mice nest/oil out of the exhaust.
 

Maverick1701

Well-known member
1,433
181
63
Location
Lubbock, TX
(most) everything is looking good on the jeep.

I have three main issues that I am going to tackle next. I might find that they are the same issue once I tear into the motor.
1. motor burning oil after approx 45sec of running (heavy blue smoke out exhaust).
2. possible sticky valve (I did the "old timer" test by holding a piece of paper up to the exhaust pipe. the jeep attempts to suck in the paper every so often).
3. tick around valve cover.

I am reading the manual to what it says concerning these issues.

Off the top of my head:
I am going to start with adjusting the intake valves (since it is super easy/quick) and a compression check. The compression check will determine my next course of action.

This is a project jeep so I may pull the head just for the heck of it (and so I will have the experience of pulling the head off a vehicle).

I will update as more info becomes available.
 

NDT

Well-known member
Steel Soldiers Supporter
10,417
6,438
113
Location
Camp Wood/LC, TX
Make sure the oil level is correct, too much can cause the oil burning. Don't forget the head bolt inside the intake manifold!
 

Maverick1701

Well-known member
1,433
181
63
Location
Lubbock, TX
Make sure the oil level is correct, too much can cause the oil burning. Don't forget the head bolt inside the intake manifold!
Thanks for the heads up on the hidden head bolt... you saved me a LOT of time vs having to comb the TM when I couldn't find the missing bolt.

I have been keeping track of my oil while running/working on the Jeep. At the moment I am between 1/2 to 3/4 way up the hash marks on the dip stick...so a little on the low side.
 

Maverick1701

Well-known member
1,433
181
63
Location
Lubbock, TX
This morning I ordered a compression tester for $21 off ebay. It should be here in a few days and I can test compression.


After work today I checked the oil and started the jeep. Still had large amounts of blue smoke and a light tic near the valve cover (I used the screwdriver to the ear method to located the tic).


I got a wild hair about me and decided to use up some seafoam I had sitting around. I seafoamed-ed the upper end of the engine and added some to the motor oil in hopes that it would clean out any crap the Jeep had accumulated after sitting for 12 years...also because I was bored and wanted to occupy some time (idle hands are the devils plaything...right?). I should note that I already had seafoam in the fuel/carb to clean out the carb.


I let the seafoam sit in the upper end of the motor for about 45min. After cranking I had the usual stinky white smoke that is seafoam (along with my blue smoke). I let the jeep run for approx 30-45min. I mixed up the throttle between idle/mid rpm/high rpms. As the running time increased I noticed that the the jeep smoked less white smoke. Eventually the white smoke stopped all together (assuming because upper-end seafoam was gone/used). Eventually the blue smoke stopped as well.... which was a pleasant surprise. During todays running of the motor, the blue smoke progressed from smoking all the time to smoking only during throttle acceleration to no blue smoke at all.


***correlation does NOT imply causation***
I can't say for sure if the seafoam helped my blue smoke issue or not. I might have just burned off all the residual oil/crap I had used to coat the cylinders before cranking. WHO KNOWS?!?!?!?
All I can say for sure is that I enjoyed making a huge stinky white smoke cloud (who doesn't???) and I will might be sending the City of Lakeview an invoice for mosquito control (yes, this half sentence is sarcasm for those few ppl who have no funny bone)
***correlation does NOT imply causation***


This weekend I am going to drain & fill fluids in the drivetrain (x-mission, x-fer case, and front/rear differentials). I also need to purchase said fluids (tomorrow) once I decide what fluids to purchase...based on my searching, I can see that there are many many schools of thought on this subject.


Eventually I am going to start on the brakes but I am having to soak the drivers/front drum in PB blaster while tapping on it from various directions... I can't get those three darn screws to release from the drum (so I can pull the hub/drum). I may tackle the rear end brakes (since those are free) if work/time/weather allows but we shall see what the weekend has in store.
 

Maverick1701

Well-known member
1,433
181
63
Location
Lubbock, TX
Well today I decided that I wanted to drive my Jeep before several events occured.
1. before Winter/Snow decides to roll in
2. before I get too far along in the project where I can't drive it for several months (ie tub removal, etc).


I still have not had a chance to work on the brakes. So this drive was done with no brakes..but I was in a field and wasn't worried about having to swerve to miss anything.


I slapped the wheels/tires back on the Jeep and putted around in the field next to my house. IT WAS AWESOME!!! It's nice when hard work pays off. I ran around in 2hi, 4hi, and 4lo. Everything performed flawlessly.


I did not re-install the windshield for my drive but I did install the hood...because the chicks dig it!


I know the rules: PICS OR IT DIDNT HAPPEN!!!! (pics below)

IMG-20141011-00015.jpgIMG-20141011-00016.jpg
 
Last edited:

Maverick1701

Well-known member
1,433
181
63
Location
Lubbock, TX
Today I drove the jeep a little. Once again I just piddled around in the field next to my house...it was still SUPER FUN!!! Unfortunately the rain decided to roll in and killed my fun.


Tomorrow I am considering pulling the grill, fenders, and body tub. I would like to start working on the chassis/frame with my needle scaler. After cleaning the frame and checking or rust I would like to eventually hit it with a coat of chassis saver/por15/whatever...but that is still a ways away.


I have been doing some pretty serious thinking about how far I want to take my Jeep in terms of my "rebuild". I put rebuild in quotes because I am not going to do anything like a "super authentic only used once per year mega meticulous" rebuild. However I did buy this Jeep to learn/enjoy and have the full intention of tearing this thing apart....just because (also it is mostly super easy because there are not much to these old Willys Jeeps).


At first I had been thinking that I would put everything on hold (outside of fixing the brakes) and wait until winter ended. Even though I am in Texas, I am in the panhandle and we get some pretty serious snow/ice up here. I do not really want to freeze my arse off working in my carport all winter. The downside to this plan is that I would not be making any progress on the Jeep whatsoever.....I didn't really like this idea.


I have been trying to think of plan that would allow me to complete at least SOME work on the Jeep throughout the winter....without loosing any body parts to gangrene.


Today I got the idea that my body tub MIGHT fit into my shop-room/enclosed garage. The room/shop is about 9ft wide and approximately 30ft long. I currently use it as a place to park/work on the motorbike. I also have tools, compressor, kayaks hanging on the walls, etc. I was not worried about the tub fitting interior of the room.... I was worried about the entrance (landlord installed a sliding glass door). So I measured the jeep and even with the sliding glass door...I will be able to fit the body into the room but just BARELY!!! (I will obviously have to have the tub on its side). This would allow me to complete some body work (rust removal, possibly apply bed liner to the floors/wheel wells/bed, some paint, and apply an undercoating). If I decide to follow this plan I would be MUCH further ahead of the game after winter clears out.


I still have not decided on a "game plan"....yet. Both plans have their pros/cons.
What I really need is to built a super awesome heated/cooled shop for my toys...all it takes is money!!!
 

Maverick1701

Well-known member
1,433
181
63
Location
Lubbock, TX
Well I have been spending the last few days working on my data plates.
I read A LOT of articles online. Some guys use electrolysis, some guys painted/sanded, etc.


This is how I did it:


1. clean everything with sponge/wd40
2. remove plates from master plate (after realizing I should have done this first) and clean both sides of plates.
3. soaked willys plate (painted) in brake fluid. soak other plates in vinegar. At this point the willys plate requires no more work. It is complete. (etched aluminum vs brass).


4. give the plates a good scrubbing of brasso.
5. paint using a semi-gloss black. sand using emory board to show the raised stampings/numbers/etc.
6. coat everything with a nice clear coat.
7. celebrate and post pics on FB!


I actually painted/sanded twice. the first attempt did not turn out as well as I had hoped. The 2nd attempt is not perfect but I am happy with how they turned out.


fresh off the Jeep:


after cleaning:


after vinegar soak:


result after first paint/sanding (no clear coat. this attempt was the failure):


2nd attempt was much better. This picture was taken while clear coat was drying:
 

Maverick1701

Well-known member
1,433
181
63
Location
Lubbock, TX
Excellent:

- Very Cool!
Thanks!!! I was pretty apprehensive at first but I really like how they turned out.


After work today, I removed both fenders, grill, and radiator.
the "coolant" in the radiator was greenish- brown...ugh. I am hoping this was caused by extended sitting in the field vs contamination from somewhere inside the motor.
 

Maverick1701

Well-known member
1,433
181
63
Location
Lubbock, TX
I have to put progress on hold for a couple of days. I am attending a wedding this weekend so I will be out of pocket from weds-sunday. I have also been working 10hr shifts (sat-tuesday) so I can still get in my 40hrs at the office....so that leaves almost no time to work on the Jeep.
I did however remove both fenders, hood, grill, and radiator.


Once I get back on monday, I will complete a compression test and then continue with the teardown. I am hoping to have the body off here pretty quickly.
 

wilfreeman

Active member
1,082
7
38
Location
Richburg, SC
Looks like you have an excellent starting point with your 'a1!
A few things that popped out at me:

1)Definitely need a game plan. Figure out how far you want to restore it before testing down. Trust me - it cost me about 13yrs when I tore mine down (because I wanted to sandblast the frame and underside of the tub)! Since yours is in such good shape, unless there is a bunch of rust to repair, I would consider doing a driving restore.

2) The blue smoke that cleared up after using sea foam and some running time was probably a stuck ring.

3) You can buy the waterproof plugs at your local parts place. They might have to order them, but they only cost $7 at O'Reilly, versus double that from the surplus parts dealers!

4) The Carter YF was used on the CJ2s and CJ5s, I think. As was mentioned, the 'a1 uses the Carter YS. It will be fine for now, but the farther you get on restoring the jeep, the more of will bug you! Consider buying one off eBay and revising it yourself (just keep your eyes open - they go pretty cheap sometimes).

5) The horn button is connected to a rod running down the column to a switch that is screwed into the bottom of the steering box. You can test the switch by removing the 2 wires and touching them together - horn should beep. If not, the switch is bad. If you remove the rod, you have to remove the switch and put the rod back in from the bottom - it's almost impossible to insert it from the top, trust me!

Good luck, and keep the update coming!
 
Last edited:

Maverick1701

Well-known member
1,433
181
63
Location
Lubbock, TX
Unfortunately no updates on my progress. I have three issues that I am working against here.


1. Sunset here is 540pm which totally sucks!!!. I get off at 6p. It sucks working at night in the freezing weather.


2. Usually during the winter months, it is below freezing by the time I get home. I am working under my carport. I do not have a fancy heated/cooled shop or anything fancy.


3. My Sheriff's Office is sending me to an EMT course. The course is also taking up a lot of my spare time.


This weekend we are forecasted for a high of 54. I am actually off of work too. I am planning on doing some more work to the Jeep over the weekend. I would like to get the tub pulled.
 

Maverick1701

Well-known member
1,433
181
63
Location
Lubbock, TX
Looks like you have an excellent starting point with your 'a1!
A few things that popped out at me:

1)Definitely need a game plan. Figure out how far you want to restore it before testing down. Trust me - it cost me about 13yrs when I tore mine down (because I wanted to sandblast the frame and underside of the tub)! Since yours is in such good shape, unless there is a bunch of rust to repair, I would consider doing a driving restore.

2) The blue smoke that cleared up after using sea foam and some running time was probably a stuck ring.

3) You can buy the waterproof plugs at your local parts place. They might have to order them, but they only cost $7 at O'Reilly, versus double that from the surplus parts dealers!

4) The Carter YF was used on the CJ2s and CJ5s, I think. As was mentioned, the 'a1 uses the Carter YS. It will be fine for now, but the farther you get on restoring the jeep, the more of will bug you! Consider buying one off eBay and revising it yourself (just keep your eyes open - they go pretty cheap sometimes).

5) The horn button is connected to a rod running down the column to a switch that is screwed into the bottom of the steering box. You can test the switch by removing the 2 wires and touching them together - horn should beep. If not, the switch is bad. If you remove the rod, you have to remove the switch and put the rod back in from the bottom - it's almost impossible to insert it from the top, trust me!

Good luck, and keep the update coming!
thanks for the tips. I will never turn down free advice.

1. I think I have decided on a rough game plan.

3. I purchased surplus plugs online several months ago. I will check the "local" (40miles away) orilleys before buying again...I LOVE to save money.

4. I am keeping an ear to the ground via ebay for a correct carb....it is a waiting game now.

5. Before I get to testing the stock switch, I am going to have to go through all of the POs wiring. They wired in a horn button that was mounted to the side of the steering column. It looks like they ran a 12v jumper from the battery for something....not really sure. Thankfully there are only a few bubba'd wiring problems. The majority of the wiring is still stock.
 

Maverick1701

Well-known member
1,433
181
63
Location
Lubbock, TX
Ordered a new water pump and driver cushion today.
The temp got up to 36* degrees today... a little too chilly to work on the jeep. I haven't forgotten about the old girl though.
 
Top
AdBlock Detected

We get it, advertisements are annoying!

Sure, ad-blocking software does a great job at blocking ads, but it also blocks useful features of our website like our supporting vendors. Their ads help keep Steel Soldiers going. Please consider disabling your ad blockers for the site. Thanks!

I've Disabled AdBlock
No Thanks