• Steel Soldiers now has a few new forums, read more about it at: New Munitions Forums!

  • Microsoft MSN, Live, Hotmail, Outlook email users may not be receiving emails. We are working to resolve this issue. Please add support@steelsoldiers.com to your trusted contacts.

M35A3 Rim Restoration and Tire Swap Project (Picture-Heavy)

ToddJK

Well-known member
1,321
4,518
113
Location
Sparta, MI
Wow, just read your whole post so far, you've been busier than 2 beavers in heat with all that work! Lol
I like the 395's myself, they are pretty good tire when comparing to the NDT's, not sure about winter yet as this will be my first, but way better off road and on road.
I also just wanted to say I appreciate you making this long and highly detailed post, as I have not even taken one of these tires off yet let alone work one of them so when that day comes, I know of a post to reference.

Keep up the hard work!
 

HDN

Well-known member
2,112
5,087
113
Location
Finger Lakes Region, NY
Wow, just read your whole post so far, you've been busier than 2 beavers in heat with all that work! Lol
I like the 395's myself, they are pretty good tire when comparing to the NDT's, not sure about winter yet as this will be my first, but way better off road and on road.
I also just wanted to say I appreciate you making this long and highly detailed post, as I have not even taken one of these tires off yet let alone work one of them so when that day comes, I know of a post to reference.

Keep up the hard work!
Thank you! One of the things that encouraged me to start this project aside from dry-rotted tires was seeing the documentation of others who did it before me. There was a lengthy thread from awhile ago showing that it was safe to switch from 14.5R20s to 395/85R20s with M35A3 rims, and another user made a PDF guide. I asked many questions myself, watched some YouTube videos of other Steel Soldiers members doing tire swaps with the bolt-together rims, and decided to take the plunge in doing this project.

I'm documenting this project here myself because I'm an engineer by trade and a total nerd and think that I might add some details and other touches that I believe would've been nice to know about when learning about doing this project. I am also doing this project mostly by hand; I don't have a tractor with a hoist and forks, or a hydraulic engine lift, or any equipment specifically for working on tires. I'm using the tools I listed in the first post, and a few additions that I'll have to try to remember to add when I'm all done with the tire swap. I'm probably going to print this topic to PDF when I'm done and save it on my computer, and print a hard copy to include with my truck documentation.

The main motivation for me to do this myself was to buy the appropriate tools to allow me to work on my truck instead of paying a shop to do the job and relying on them. The local tire shops wanted $100-$150 per wheel to just replace the tire on the rim ($600-$1000 total), but I also wanted to de-rust and re-paint the rims, and possibly restore the CTIS to working order. I'm not sure I could trust the tire shops here to do that correctly, or they didn't want to do it anyway. So I had a choice to make: Pay someone $1000 to do it, maybe to my satisfaction, and get it done in about a week, or use that money (ideally less than $1000!) to buy myself the tools to do it now and in the future. I went with the tool option :)

The downside of doing this all myself is that it has taken me months to do with whatever spare time I have, which is usually an hour and a half at most per day and maybe 3-6 hours on the weekend, although I am learning ways to do things more efficiently with each wheel I complete, speeding up the job as I go along. I hope to make up for this year's lost driving time starting in a couple weeks🤞 That said, this has been an amazing exercise, both physically and mentally. I'd rather tell my coworkers that I exercise by mounting and installing 400 lb 46" wheels on an Army truck instead of taking a half-hour walk up and down the road 😛 I'm also very happy to see that I can safely move and mount these heavy wheels unassisted - I just scooch the wheel onto the hub like I do with my daily drivers, using the hydraulic jack for fine adjustment. And I can say I've done it! :grd:
 

Mullaney

Well-known member
Steel Soldiers Supporter
Supporting Vendor
7,716
19,766
113
Location
Charlotte NC
Thank you! One of the things that encouraged me to start this project aside from dry-rotted tires was seeing the documentation of others who did it before me. There was a lengthy thread from awhile ago showing that it was safe to switch from 14.5R20s to 395/85R20s with M35A3 rims, and another user made a PDF guide. I asked many questions myself, watched some YouTube videos of other Steel Soldiers members doing tire swaps with the bolt-together rims, and decided to take the plunge in doing this project.

I'm documenting this project here myself because I'm an engineer by trade and a total nerd and think that I might add some details and other touches that I believe would've been nice to know about when learning about doing this project. I am also doing this project mostly by hand; I don't have a tractor with a hoist and forks, or a hydraulic engine lift, or any equipment specifically for working on tires. I'm using the tools I listed in the first post, and a few additions that I'll have to try to remember to add when I'm all done with the tire swap. I'm probably going to print this topic to PDF when I'm done and save it on my computer, and print a hard copy to include with my truck documentation.

The main motivation for me to do this myself was to buy the appropriate tools to allow me to work on my truck instead of paying a shop to do the job and relying on them. The local tire shops wanted $100-$150 per wheel to just replace the tire on the rim ($600-$1000 total), but I also wanted to de-rust and re-paint the rims, and possibly restore the CTIS to working order. I'm not sure I could trust the tire shops here to do that correctly, or they didn't want to do it anyway. So I had a choice to make: Pay someone $1000 to do it, maybe to my satisfaction, and get it done in about a week, or use that money (ideally less than $1000!) to buy myself the tools to do it now and in the future. I went with the tool option :)

The downside of doing this all myself is that it has taken me months to do with whatever spare time I have, which is usually an hour and a half at most per day and maybe 3-6 hours on the weekend, although I am learning ways to do things more efficiently with each wheel I complete, speeding up the job as I go along. I hope to make up for this year's lost driving time starting in a couple weeks🤞 That said, this has been an amazing exercise, both physically and mentally. I'd rather tell my coworkers that I exercise by mounting and installing 400 lb 46" wheels on an Army truck instead of taking a half-hour walk up and down the road 😛 I'm also very happy to see that I can safely move and mount these heavy wheels unassisted - I just scooch the wheel onto the hub like I do with my daily drivers, using the hydraulic jack for fine adjustment. And I can say I've done it! :grd:
.
@HDN , I have to agree with ToddJK 's thoughts. I have been reading along too and learning as you have done the work. I haven't been nearly as tired as you hustling tires and doing the manual labor, but one day soon I will need that learning.

You have done a heck of a write-up and I definitely appreciate it!
The workout with tools is definitely a lot better than walking around the neighborhood :)
 

cucvmule

collector of stuff
1,155
591
113
Location
Crystal City Mo
Detail is in your own personal effort.

There is nothing like Knowing that the job was done correctly and to your satisfaction. And that later knock on wood that when you need to fix or change a tire or rim that the job will be easier because of the effort done now.
 

ToddJK

Well-known member
1,321
4,518
113
Location
Sparta, MI
Thank you! One of the things that encouraged me to start this project aside from dry-rotted tires was seeing the documentation of others who did it before me. There was a lengthy thread from awhile ago showing that it was safe to switch from 14.5R20s to 395/85R20s with M35A3 rims, and another user made a PDF guide. I asked many questions myself, watched some YouTube videos of other Steel Soldiers members doing tire swaps with the bolt-together rims, and decided to take the plunge in doing this project.

I'm documenting this project here myself because I'm an engineer by trade and a total nerd and think that I might add some details and other touches that I believe would've been nice to know about when learning about doing this project. I am also doing this project mostly by hand; I don't have a tractor with a hoist and forks, or a hydraulic engine lift, or any equipment specifically for working on tires. I'm using the tools I listed in the first post, and a few additions that I'll have to try to remember to add when I'm all done with the tire swap. I'm probably going to print this topic to PDF when I'm done and save it on my computer, and print a hard copy to include with my truck documentation.

The main motivation for me to do this myself was to buy the appropriate tools to allow me to work on my truck instead of paying a shop to do the job and relying on them. The local tire shops wanted $100-$150 per wheel to just replace the tire on the rim ($600-$1000 total), but I also wanted to de-rust and re-paint the rims, and possibly restore the CTIS to working order. I'm not sure I could trust the tire shops here to do that correctly, or they didn't want to do it anyway. So I had a choice to make: Pay someone $1000 to do it, maybe to my satisfaction, and get it done in about a week, or use that money (ideally less than $1000!) to buy myself the tools to do it now and in the future. I went with the tool option :)

The downside of doing this all myself is that it has taken me months to do with whatever spare time I have, which is usually an hour and a half at most per day and maybe 3-6 hours on the weekend, although I am learning ways to do things more efficiently with each wheel I complete, speeding up the job as I go along. I hope to make up for this year's lost driving time starting in a couple weeks🤞 That said, this has been an amazing exercise, both physically and mentally. I'd rather tell my coworkers that I exercise by mounting and installing 400 lb 46" wheels on an Army truck instead of taking a half-hour walk up and down the road 😛 I'm also very happy to see that I can safely move and mount these heavy wheels unassisted - I just scooch the wheel onto the hub like I do with my daily drivers, using the hydraulic jack for fine adjustment. And I can say I've done it! :grd:
Yes, most definitely! The thought of having to remove and replace one of those tires can be intimidating and especially so to anyone who has never worked with big tires like that before. Another reason I'm glad to see a post like yours, I know if you can do it and how you've done it, it helps out others like myself to be more confident to do it. The only exception I have is the fuel injection pump, mine leaks like crazy and it's too much to be normal under any condition so that I will pay someone to do, only because the guy I know works on stuff like that on the regular.
 

HDN

Well-known member
2,112
5,087
113
Location
Finger Lakes Region, NY
So a couple things as I near road-worthiness:

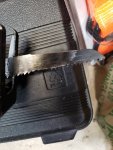
1) A Bauer wood/nails reciprocating saw blade from Harbor Freight will cut 160" of 14.5R20 XL sidewall before losing teeth.

20210920_113102.jpg

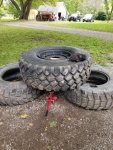
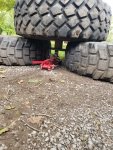
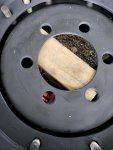
2) I revisited my clamp ring seating method using two takeoff tires to set my wheel on. This time I used a low-profile jack with a 4x4 and a couple 2x4s to lift the rim inside the tire to make installing the clamp ring quick and easy. It also reduces the work the impact wrench needs to do up to compressing the bead.

20210924_134914.jpg 20210924_134931.jpg 20210924_134922.jpg
 

Mullaney

Well-known member
Steel Soldiers Supporter
Supporting Vendor
7,716
19,766
113
Location
Charlotte NC
So a couple things as I near road-worthiness:

1) A Bauer wood/nails reciprocating saw blade from Harbor Freight will cut 160" of 14.5R20 XL sidewall before losing teeth.

View attachment 846298

2) I revisited my clamp ring seating method using two takeoff tires to set my wheel on. This time I used a low-profile jack with a 4x4 and a couple 2x4s to lift the rim inside the tire to make installing the clamp ring quick and easy. It also reduces the work the impact wrench needs to do up to compressing the bead.

View attachment 846295 View attachment 846296 View attachment 846297
.
There is a definite difference in the quality of the Harbor Freight sawzall blades and some other brands. A good example is the Diablo or Milwaukee or DeWalt blades. They will make your saw run circles (literally) around the HF brand. It will be like you bought a newer, bigger, and better saw. Yes sir, twice or three times the cost - but worth every dime!

Couple of years ago, I bought a portable bandsaw from HF for a specific project. Figured it would work, or I would break it and return it. Pleasantly surprised, I completed my project and added my new saw to the collection. Blade was shot so I took it with me to Lowes. Came home with three new blades. Just like the Sawzall, better blade made the saw even better.
 
  • Like
Reactions: HDN

HDN

Well-known member
2,112
5,087
113
Location
Finger Lakes Region, NY
Tires are all FINALLY mounted! I've identified a leak at one of my new brass fittings that I'm going to try and fix today. It has thread sealer on it and I tightened it as far as it will go, but it's still leaking a little bit.

The pre-loved tires themselves seem to be holding air and not leaking when going down the road. I've only driven on the tires for 10 minutes so far and they make the truck feel great :)

When I first saw pictures of 395s on a deuce, I didn't like how they looked a little big for the truck. In-person, though, they really look really nice!

20210926_143459.jpg

Here's a "before" pic too:

20200617_170434[5969].jpg

Next spring I'll plan on finishing painting the CTIS wheel covers and put them on the wheels as I like the look of them.
 
Last edited:

Mullaney

Well-known member
Steel Soldiers Supporter
Supporting Vendor
7,716
19,766
113
Location
Charlotte NC
Tires are all FINALLY mounted! I've identified a leak at one of my new brass fittings that I'm going to try and fix today. It has thread sealer on it and I tightened it as far as it will go, but it's still leaking a little bit.

The pre-loved tires themselves seem to be holding air and not leaking when going down the road. I've only driven on the tires for 10 minutes so far and they make the truck feel great :)

When I first saw pictures of 395s on a deuce, I didn't like how they looked a little big for the truck. In-person, though, they really look really nice!

View attachment 846434

Next spring I'll plan on finishing painting the CTIS wheel covers and put them on the wheels as I like the look of them.
.
Interesting comment about the CTIS wheel covers. I saw a brand new tractor pulling a brand new trailer in front of our building. I could see the CTIS fitting but everything else almost looked like a hubcap. The "look" was almost like they were trying to make the truck and trailer more aerodynamic. Should have snapped a picture :-(
 

HDN

Well-known member
2,112
5,087
113
Location
Finger Lakes Region, NY
.
Interesting comment about the CTIS wheel covers. I saw a brand new tractor pulling a brand new trailer in front of our building. I could see the CTIS fitting but everything else almost looked like a hubcap. The "look" was almost like they were trying to make the truck and trailer more aerodynamic. Should have snapped a picture :-(
I know what you're talking about:

1632747992857.png

Like the trailer skirts and super singles, they reduce fuel costs by a little percentage. But remember that even a little percentage of a big number like fuel costs is a big number!

Since your reply I added a "before" pic of the truck for comparison between the tires and wheels. I don't think the CTIS stone covers do much for fuel savings, but they're one of the things that make the M35A3 look different from other military trucks. I think the CTIS stone covers on some of the HEMTTs and MTVRs are also unique and neat-looking.
 

Mullaney

Well-known member
Steel Soldiers Supporter
Supporting Vendor
7,716
19,766
113
Location
Charlotte NC
I know what you're talking about:

View attachment 846438

Like the trailer skirts and super singles, they reduce fuel costs by a little percentage. But remember that even a little percentage of a big number like fuel costs is a big number!

Since your reply I added a "before" pic of the truck for comparison between the tires and wheels. I don't think the CTIS stone covers do much for fuel savings, but they're one of the things that make the M35A3 look different from other military trucks. I think the CTIS stone covers on some of the HEMTTs and MTVRs are also unique and neat-looking.
.
Yes sir! That's it for sure. It is amazing those skirts and smoother sides make up a lot of money in fuel savings over time. Like you said, a tiny bit better fuel efficiency might buy a new round of filters and oil. Every little bit helps!

I like those stone covers. It is amazing too what the 395's do for the look of the Deuce!
 
  • Like
Reactions: HDN

HDN

Well-known member
2,112
5,087
113
Location
Finger Lakes Region, NY
It's been almost two weeks and the tires are still holding air, though this has been true for longer for the front wheels than the rear wheels since they were mounted first. I think I'll call them good and return the tools to their lenders (and add them to my tools-to-get list!). It's been incredibly refreshing to not have to put air in the tires to drive the truck and not having to put the truck on wood blocks after I park it. Just let the truck warm up and go :driver:

I'm going to take a moment to review CSM Army Tires in Anniston, AL (https://csmarmytires.com/), the vendor from which I bought my pre-loved 395s. After much searching, they seemed to have the best deal on used 395/85R20 tires. I gave the number on their website a call, which is the owner's (Philip is his name) direct number. We talked about the size of tire I was looking for (Michelin XLZ) and tread condition (better than 50%) as well as my budget. From our conversation, I decided to buy six 395/85R20 Michelin XZL tires at 75% or better tread in good running condition. I asked him to e-mail me a quote so that I had something for my records, and made the purchase over the phone by credit card.

A week later, the tires showed up on an Estes van trailer with a lift gate (they delivered right to my home!) on two pallets of three tires each. They were enclosed in plastic wrap and bound with plastic straps. The driver had an electric-powered pallet jack that was able to move the 700-lb pallets up my gravel driveway to their resting spot. The shipping label referred to Gensco Tire, which is also located in Anniston, AL (I guess there's some relationship there). The tires sat under a tarp for almost two months as I was getting the rest of my project materials together and learning how to get the first wheel apart.


I finally unwrapped the tires and was pleased with what I saw: Michelin XZL+ 395/85R20 tires (the website didn't mention that these were "plus" tires with less tread, but that didn't bother me). They were mostly clean, with two of them having the tire grease/duck butter inside them, but that's no big deal. However, after I began mounting the second tire, I realized that two of the tires that were shipped had pre-existing damage: One had a gash in the sidewall similar to one I was replacing that looked like it would leak if it was rolled on. Another had a chunk missing out of the tire bead surface.

I contacted Philip and showed him pictures of the damage, and he agreed to send me two more tires at no charge (his website says: CSM Army Tire Guarantee: We work hard to ensure every tire is described accurately so you know exactly what you’re getting. However, if a tire ever fails to air up, will not balance, or is in generally poor condition, we WILL WARRANTY that tire. We do our absolute best to ensure a bad product is never sent out, but if for any reason, something slips through you have my word that it will be fixed. That’s a promise!). He certainly means it!

This time an XPO van trailer showed up, but without a lift gate. Fortunately this wasn't a problem for me because I was able to use two of my 14.5XL takeoffs as a step between the van's floor and the ground, where I was able to carefully roll and flip each 220-lb tire down off the truck. Fortunately the trucker agreed to help me with this.

The replacement tires had no damage beyond the wear and tear the FMTVs experience when going between pavement and the woods. Everything else mounted as well as possible as directed by the truck's manual and they hold air.

Final verdict about CSM Army Tires: I'd do business with them again. Philip was great to work with, and he stands by their tire warranty. Their pricing for tire condition is extremely competitive with those of other popular surplus dealers, made even better with their negotiated shipping rates (right to the door of my home no less!). If anyone needs tires for their trucks, consider CSM.
 

HDN

Well-known member
2,112
5,087
113
Location
Finger Lakes Region, NY
Spring update! I just got the truck out of hibernation and checked the tire pressure. All but two tires held air. Over five months, one lost 7 psi, and another lost 15 psi. They were all originally aired up to 45. So I have two tires losing 0.05-0.1 psi per day. I don't think that's terrible but I don't think it's ideal either considering the rest are fine. I'll have to chase those leaks down. I'm betting they're both from the brass fittings on the tire stem.
 

David.1000

New member
2
2
3
Location
Redmond, Washington
A Harbor-Freight Earthquake 3/4", 1,400 ft/lbs electric torque wrench took the rim nuts off. Lots of penetrating oil... back off the nuts about three turns... let that one cool down and move on to the next. The absolute hardest thing I've done on my M35A3... and that's compared to rebuilding the Allison 1545P automatic transmission... and I thought that was an accomplishment.
 

HDN

Well-known member
2,112
5,087
113
Location
Finger Lakes Region, NY
A Harbor-Freight Earthquake 3/4", 1,400 ft/lbs electric torque wrench took the rim nuts off. Lots of penetrating oil... back off the nuts about three turns... let that one cool down and move on to the next. The absolute hardest thing I've done on my M35A3... and that's compared to rebuilding the Allison 1545P automatic transmission... and I thought that was an accomplishment.
Last year I bought the $60 1/2" impact wrench from Harbor Freight. I haven't tried it on the rims yet, but it got the lug nuts off like they weren't there!

Whenever the wheels come up in conversation, I always tell people that the tire swap made me lose 10 lbs, which is true! :ROFLMAO: Though now I have more tools to help me do the job again more efficiently at some point. I still think the Sawzsall is the best way to remove junk tires from the rims. I think the hardest part about doing the tires was getting the rim seated in the tire and the beadlock insert at the point where I have to work the turret valve nut past the tire bead. I think that took a lot of pushing, maybe some kicking and bouncing the rim until I got it in there.

Everything else was just tedious, like setting torque on each of the clamp ring nuts. I still have that adapter I 3D printed to use the 1/4" torque wrench with the torque multiplier to set torque :) Chasing the clamp ring studs with a die was also tedious, especially as the die got quite hot in the socket I was using with it. I think next time I'm going to oil up those studs first.
 
  • Like
Reactions: rtk

cattlerepairman

Well-known member
Steel Soldiers Supporter
3,256
3,354
113
Location
NORTH (Canada)
Do you have slow leakers on your truck too?
I have random leakers on my truck. 11R20.00 on Canadian combat rims (similar to A3 rims). They hold air seemingly fine for a whole season. Then truck goes into storage. Almost guaranteed, a random tire is off the bead after 4 months. A few days ago, I noticed one rear tire off the rim. It had held air all winter and up to now. No damage. Blasted it back on, inflated, holding air ever since.

My truck is female.

On a more serious note, I think some rust buildup could occur between the rim and the tire, eventually causing a leak? As the tire is blasted back onto the bead, it scrapes enough rust off to seal? I refurbished my rims, so I know they were rust-free and primed and painted when the tires went on.
 

HDN

Well-known member
2,112
5,087
113
Location
Finger Lakes Region, NY
I have random leakers on my truck. 11R20.00 on Canadian combat rims (similar to A3 rims). They hold air seemingly fine for a whole season. Then truck goes into storage. Almost guaranteed, a random tire is off the bead after 4 months. A few days ago, I noticed one rear tire off the rim. It had held air all winter and up to now. No damage. Blasted it back on, inflated, holding air ever since.

My truck is female.

On a more serious note, I think some rust buildup could occur between the rim and the tire, eventually causing a leak? As the tire is blasted back onto the bead, it scrapes enough rust off to seal? I refurbished my rims, so I know they were rust-free and primed and painted when the tires went on.
My leaks have been pretty consistent since I've done this project. Three tires barely lose air over months of storage. Two lose a bit more air but not enough to go flat over that time frame. One tire loses all its air in a month and has a jack stand under the axle any time the vehicle isn't being driven to keep the tire from squishing flat. After two weeks the tire's pressure drops by about 15 PSI, at which point I re-inflate it to the pressure I want.

My tires don't come off the rim because I re-used the rubber bead lock inserts. Once I got the process down they aren't hard for me to install. Did the Canadian combat rims have bead lock inserts? I'm guessing not because the trucks weren't equipped with CTIS.

Also about the Canadian rims - what is the torque spec for the clamp ring nuts? I feel like the torque spec on the A3 rims is ridiculously high!
 
Top
AdBlock Detected

We get it, advertisements are annoying!

Sure, ad-blocking software does a great job at blocking ads, but it also blocks useful features of our website like our supporting vendors. Their ads help keep Steel Soldiers going. Please consider disabling your ad blockers for the site. Thanks!

I've Disabled AdBlock
No Thanks