• Steel Soldiers now has a few new forums, read more about it at: New Munitions Forums!

  • Microsoft MSN, Live, Hotmail, Outlook email users may not be receiving emails. We are working to resolve this issue. Please add support@steelsoldiers.com to your trusted contacts.

MEP-1030 Mouse Proofing & MEP-10XX WiFi Remote Start

kloppk

Well-known member
Steel Soldiers Supporter
2,145
3,526
113
Location
Pepperell, Massachusetts
Took the opportunity this week to mouse proof my new to me MEP-1030.
Here are some pictures of how I went about it using 1/4 galvanized rat wire, zip ties and a bit of RTV.

Popped the top off by removing all the perimeter bolts and the ones in the top of it. 10 mm wrench. All have captive nuts making the task easier. (y)
Comes off in one piece unlike the 802's and 803's.
Top Off.jpg


Cooling intake on the side of the set first. Cut the rat wire a bit wider and taller than the opening. Loosened the bolts around the opening and tucked the sides and bottom of the rat wire between the sheet metal and then tightened the bolts to pinch the rat wire in place. Put a few zip ties along the top edge to keep it tight against the grill.
Inside Radiator Inlet.jpg

Outside Radiator Inlet.jpg

Next up was one of the top grills. View of the rat wire installed under the top cover. Wire can be positioned to that the two outer bolts line up with the mesh. Used zip ties for the other parts of the perimeter where the bolts will not be pinching the wire.
Bottom View Other Inlet.jpg

Top View Other Inlet.jpg

There are two rectangular drains in the end that need some wire too. Used some construction adhesive to hold the wire in place.
Inside Drain Slot.jpg


Next was the radiator cap opening. Here I opted to use a piece of plexiglass and a single self-tapping screw. Allows cover to pivot open to get to the radiator cap.

Radiator Cap.jpg

The last piece of wire was cut and fitted for the cooling and exhaust openings. Used construction adhesive. Again, the bolts line up well with the wire openings.
Bottom View Exhaust.jpg

Once the top was put back on I then snipped just enough of the wire away to allow the exhaust flap to open and close.
Top View Exhaust.jpg

There are couple of openings I sealed with RTV. The slot for the battery "J" hooks and the lower outside corners.
:)
J Hooks.jpg

Unlike the 831A's, 802A's and 803A's there are no opening in the bottom of the unit.
 
Last edited:

peapvp

Well-known member
Steel Soldiers Supporter
1,115
1,235
113
Location
Basehor, KS
Looks like what they should have shipped from the factory.

Are you going to start building controller boards for the 1030 inquiring minds would like to know. ;-)
The Military, who these Genset's were designed for, is genuinely more concerned about flying Bullets, shrapnel, EMP and Radio Interference rather then rodents.
 

kloppk

Well-known member
Steel Soldiers Supporter
2,145
3,526
113
Location
Pepperell, Massachusetts
Are you going to start building controller boards for the 1030 inquiring minds would like to know. ;-)
Inquiring minds... Yes I am :)
The design is very similar in architecture and features as my 80X systems.
Hundreds of those in use across the US, it's territories and foreign countries.
The new Remote Starts will support all the MEP-10XX sets.
FEATURES
- 2-Wire Start/Stop of course, plus...

- Remote Start, Stop, Contactor Control, Aux Fuel Control over WiFi
Live parameter reporting over WiFi for:
- AC Voltage on L1, L2, L2
- Load Current on L1, L2, L3
- Output Power
- State of the Contactor (Open / Closed)
- AC Frequency
- Fuel Level %
- Oil Pressure PSI
- Coolant Temp degrees
- Battery Voltage
- Battery Current
- Ambient Temperature
- Number of Start/Stops
- Engine running hours
It will also track the above info and record the Min, Max and Average values for providing feedback on performance and maintenance.

Will be offered with direct WiFi connectivity (Access Point) and WiFi Station mode to connect to your wireless router.
WiFi connection not needed for 2-Wire operation.

Sensor connections are all be plug & play. No cutting or splicing of sensor wiring.

First batch of PCB's already out for fabrication. Here is a preview of the PCB.

Kurt
3D PCB Rev A 8-18-22.jpg
 

kloppk

Well-known member
Steel Soldiers Supporter
2,145
3,526
113
Location
Pepperell, Massachusetts
Thet day has come!
The new Wi-Fi and Remote Start system for the MEP-1030 and MEP-1040 is complete!
Starting to produce production systems now and will be shipping shortly.

Here is a video going over the features. Included are demonstrations of the Wi-Fi Remote Starting, Stopping and other features.
Of course there's a demo of the 2-Wire Start and Stop too.
Enjoy!
 

FarmingSmallKubota

Well-known member
Steel Soldiers Supporter
469
1,116
93
Location
Wapakoneta, Ohio
mouse proofing is great, but i will add an improvement that i have been doing to the gen sets that i send out. I use stainless zip ties as i worry about sun and cold temperatures degrading the plastic ties.
Took the opportunity this week to mouse proof my new to me MEP-1030.
Here are some pictures of how I went about it using 1/4 galvanized rat wire, zip ties and a bit of RTV.

Popped the top off by removing all the perimeter bolts and the ones in the top of it. 10 mm wrench. All have captive nuts making the task easier. (y)
Comes off in one piece unlike the 802's and 803's.
View attachment 873674


Cooling intake on the side of the set first. Cut the rat wire a bit wider and taller than the opening. Loosened the bolts around the opening and tucked the sides and bottom of the rat wire between the sheet metal and then tightened the bolts to pinch the rat wire in place. Put a few zip ties along the top edge to keep it tight against the grill.
View attachment 873675

View attachment 873676

Next up was one of the top grills. View of the rat wire installed under the top cover. Wire can be positioned to that the two outer bolts line up with the mesh. Used zip ties for the other parts of the perimeter where the bolts will not be pinching the wire.
View attachment 873677

View attachment 873678

There are two rectangular drains in the end that need some wire too. Used some construction adhesive to hold the wire in place.
View attachment 873679


Next was the radiator cap opening. Here I opted to use a piece of plexiglass and a single self-tapping screw. Allows cover to pivot open to get to the radiator cap.
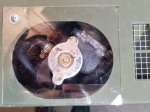
View attachment 873680

The last piece of wire was cut and fitted for the cooling and exhaust openings. Used construction adhesive. Again, the bolts line up well with the wire openings.
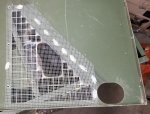
View attachment 873682

Once the top was put back on I then snipped just enough of the wire away to allow the exhaust flap to open and close.
View attachment 873683

There are couple of openings I sealed with RTV. The slot for the battery "J" hooks and the lower outside corners.
:)
View attachment 873685

Unlike the 831A's, 802A's and 803A's there are no opening in the bottom of the unit.
 

Light in the Dark

Well-known member
Steel Soldiers Supporter
3,829
5,949
113
Location
MA
Thet day has come!
The new Wi-Fi and Remote Start system for the MEP-1030 and MEP-1040 is complete!
Starting to produce production systems now and will be shipping shortly.

Here is a video going over the features. Included are demonstrations of the Wi-Fi Remote Starting, Stopping and other features.
Of course there's a demo of the 2-Wire Start and Stop too.
Enjoy!
Thats a real nice product Kurt... I think you are going to do very well with it!
 
Top
AdBlock Detected

We get it, advertisements are annoying!

Sure, ad-blocking software does a great job at blocking ads, but it also blocks useful features of our website like our supporting vendors. Their ads help keep Steel Soldiers going. Please consider disabling your ad blockers for the site. Thanks!

I've Disabled AdBlock
No Thanks