- 2,145
- 3,526
- 113
- Location
- Pepperell, Massachusetts
Took the opportunity this week to mouse proof my new to me MEP-1030.
Here are some pictures of how I went about it using 1/4 galvanized rat wire, zip ties and a bit of RTV.
Popped the top off by removing all the perimeter bolts and the ones in the top of it. 10 mm wrench. All have captive nuts making the task easier.
Comes off in one piece unlike the 802's and 803's.

Cooling intake on the side of the set first. Cut the rat wire a bit wider and taller than the opening. Loosened the bolts around the opening and tucked the sides and bottom of the rat wire between the sheet metal and then tightened the bolts to pinch the rat wire in place. Put a few zip ties along the top edge to keep it tight against the grill.


Next up was one of the top grills. View of the rat wire installed under the top cover. Wire can be positioned to that the two outer bolts line up with the mesh. Used zip ties for the other parts of the perimeter where the bolts will not be pinching the wire.


There are two rectangular drains in the end that need some wire too. Used some construction adhesive to hold the wire in place.

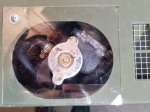
Next was the radiator cap opening. Here I opted to use a piece of plexiglass and a single self-tapping screw. Allows cover to pivot open to get to the radiator cap.

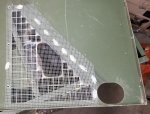
The last piece of wire was cut and fitted for the cooling and exhaust openings. Used construction adhesive. Again, the bolts line up well with the wire openings.

Once the top was put back on I then snipped just enough of the wire away to allow the exhaust flap to open and close.

There are couple of openings I sealed with RTV. The slot for the battery "J" hooks and the lower outside corners.


Unlike the 831A's, 802A's and 803A's there are no opening in the bottom of the unit.
Here are some pictures of how I went about it using 1/4 galvanized rat wire, zip ties and a bit of RTV.
Popped the top off by removing all the perimeter bolts and the ones in the top of it. 10 mm wrench. All have captive nuts making the task easier.
Comes off in one piece unlike the 802's and 803's.

Cooling intake on the side of the set first. Cut the rat wire a bit wider and taller than the opening. Loosened the bolts around the opening and tucked the sides and bottom of the rat wire between the sheet metal and then tightened the bolts to pinch the rat wire in place. Put a few zip ties along the top edge to keep it tight against the grill.


Next up was one of the top grills. View of the rat wire installed under the top cover. Wire can be positioned to that the two outer bolts line up with the mesh. Used zip ties for the other parts of the perimeter where the bolts will not be pinching the wire.


There are two rectangular drains in the end that need some wire too. Used some construction adhesive to hold the wire in place.

Next was the radiator cap opening. Here I opted to use a piece of plexiglass and a single self-tapping screw. Allows cover to pivot open to get to the radiator cap.

The last piece of wire was cut and fitted for the cooling and exhaust openings. Used construction adhesive. Again, the bolts line up well with the wire openings.

Once the top was put back on I then snipped just enough of the wire away to allow the exhaust flap to open and close.

There are couple of openings I sealed with RTV. The slot for the battery "J" hooks and the lower outside corners.

Unlike the 831A's, 802A's and 803A's there are no opening in the bottom of the unit.
Last edited:


