• Steel Soldiers now has a few new forums, read more about it at: New Munitions Forums!

  • Microsoft MSN, Live, Hotmail, Outlook email users may not be receiving emails. We are working to resolve this issue. Please add support@steelsoldiers.com to your trusted contacts.

My CUCV spin on fuel filter mod

engineman2

Member
118
2
18
Location
Enon, Virginia
That my friend is the fuel drain which is there in case you get water in the fuel or need to replace the sqaure filter and want to avoid getting diesel everywhere. If you turn it counter clockwise fuel will come out of it, and clockwise should tighten it if it is leaking. I would try tightening it first, see if that fixes it. Easier and much cheaper than a new base. 2cents
 

max1008

New member
337
3
0
Location
Blue Bell, PA
The fuel drain is clear and runs off that knob. Ive used that many times in order to get it started when air gets in the lines. There is also a larger, maybe 3/8" line straight out the bottom of the base and its a black line.
 

85CUCVtom

Active member
712
25
28
Location
Lakewood, Ohio
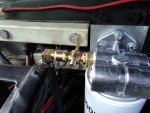
Well, here's my new setup. Still haven't gotten it to start though, ran down the batteries filling up the filter since I don't have any diesel laying around. I don't foresee any problems outside of possibly chasing down a leak from the fittings.

This is a Wix 33005 filter/water separator on a Wix 24770 base, with fittings to get from 1/2" NPT to 1/4" barb and 3/8" barb, plus the petcock. Still need some tubing for the petcock.
I'm having a little trouble finding the petcock valve for the WIX filter base. Were did you find one? I might be looking in the wrong places.
 

Sam27

New member
167
4
0
Location
Tucson
Either McMaster.com or at Ace Hardware. I think I got parts from both places. It's been a while so I can't remember exactly.
 

Screamin' Metal

New member
104
2
0
Location
SW Oklahoma
Am running the same type setup. For you thrifty guys out there, you can pick up a plain jane spin on base with filter at Tractor Supply for 40 someodd dollars. all you gotta do then is go to the fitting and reduce down to 3/8's npt. Quick, easy, simple. O'Reillys has them for about $40 or less....
If you also mount a electric lift pump, your priming problems are pratically non-existant....
 
Last edited:

Sam27

New member
167
4
0
Location
Tucson
It's been a while, but I think it's just the stock mount plus a piece of flat plate aluminum. Mount the plate to the original bracket and the new filter mount to the plate.
 

85CUCVtom

Active member
712
25
28
Location
Lakewood, Ohio
Awesome, thank you. I didn't even think of that. Off to the hardware store in the morning. I'm attempting this on Saturday. I'll try to post pictures through out and when it done.
 

Onestar

Member
57
2
6
Location
Leesburg, Virginia
So I did this mod last weekend and it works great even in the cold weather. If you are following the instrucions in the first post just a heads up. I am not sure if I am correct or not but where he says the in is on the right and the out is on the left I am pretty sure he accidently said it backwards. I may be wrong but just double check as you go the fuel filter base has an arrow in on the left and out on the right. I was also able to get all of the parts at NAPA. I worked with the guy behind the counter and he had the fittings, clamps, fuel line, base and filter, bolts and spacers. If you rummage through the fittings you should be able to get all the correct ones at NAPA.

I would also like to say thank you it was a very helful and detailed mod. It worked for me so far.
Thanks
 
Last edited:

85CUCVtom

Active member
712
25
28
Location
Lakewood, Ohio
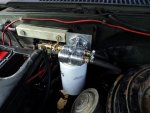
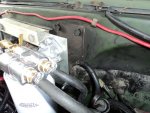
So here are some pictures from mine. I used the WIX base and the Wix fuel filter.
DSC04005.jpgDSC04004.jpg

I used maybe a foot of 1/4 inch hose and a foot of 3/8 fuel hose. Total parts, under $100.
 

85CUCVtom

Active member
712
25
28
Location
Lakewood, Ohio
Well I got it all bled out and didn't see any leaks. The ball valve I used for the bleeder worked out great. Test drove it and all seems to be good. I still need to figure out how to replace all of the 1/4" hose going into the IP. It looks like I'm going to have to remove the intake to do it.Thats a project for another day. If anybody knows any tricks on how to do this, please let me know. So for now I had to use a 1/4 to 1/4 barb splice.

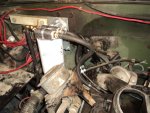
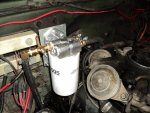
I used the OE bracket and added a piece of metal bring the base up higher (thanks for the idea Sam27). All I had was some galvanized 18g sheet so thats going to be replaced with a nice piece of aluminum as soon as I can get to the metal supply house. I used 1/4"-20 nuts and bolts with lock washers to secure everything together.

Overall this was really easy and only took a couple hours (including a trip for lunch). Hopefully this fixed my losing prime situatuion I have been having.

If anybody has any questions, just as or PM me. Now a few more pictures:
DSC04008.jpgDSC04007.jpgDSC04006.jpg
 

Sam27

New member
167
4
0
Location
Tucson
I almost gave up replacing the hose, but eventually was able to get it done by reaching in from behind. I can't remember all the details now, but it is possible without tearing everything apart. It may depend how big a guy you are and how flexible. ;)
 

MarcusOReallyus

Well-known member
4,524
816
113
Location
Virginia
I still need to figure out how to replace all of the 1/4" hose going into the IP. It looks like I'm going to have to remove the intake to do it.Thats a project for another day. If anybody knows any tricks on how to do this, please let me know.

I have not dug into mine yet, so this is an ignorant shot in the dark:

Can you fasten new tubing to the old and pull it through where it needs to go?

I've been able to do that a few times when the alternative was a painful dis-assembly. Doesn't always work, I know, but maybe it's worth a shot.
 

85CUCVtom

Active member
712
25
28
Location
Lakewood, Ohio
That's a good idea. I had to think about it for a second but I don't think it would work. There is a 1/4" barb fitting going into the IP right under the intake manifold. I can't get my hand in there to push the new hose on.
 

Sam27

New member
167
4
0
Location
Tucson
If you look in this thread starting around post #104 you'll see where I fought this same problem and asked for help.
 

Onestar

Member
57
2
6
Location
Leesburg, Virginia
It's pretty easy to replace the hose if you take off the intake and filter. You should place a light on the front of your truck shining right above the IP. Then go in between the intake manifold columns on the drivers side I think you should be able to see it behind the first one from the front of the truck. I used a socket and ratchet. You won't get many turns and it will take a bit. I then used long needle nose pliers to slide the old hose off. I would recommend installing from the IP first then to the filter I tried the other way and it is a little more challenging. Also the new hose I used was a little stiffer and it was easy to slid on when I pushed from behind the intake manifold. Just don't forget to put a hose clamp somewhat tightened on first its a pain to forget and also to have to tighten it completly when the hose is on. It should only take 15-20 minutes there isn't anything else to mess with or get tangled in under there.
 
Top
AdBlock Detected

We get it, advertisements are annoying!

Sure, ad-blocking software does a great job at blocking ads, but it also blocks useful features of our website like our supporting vendors. Their ads help keep Steel Soldiers going. Please consider disabling your ad blockers for the site. Thanks!

I've Disabled AdBlock
No Thanks