• Steel Soldiers now has a few new forums, read more about it at: New Munitions Forums!

  • Microsoft MSN, Live, Hotmail, Outlook email users may not be receiving emails. We are working to resolve this issue. Please add support@steelsoldiers.com to your trusted contacts.

My new 1992 M998 Avenger

springer1981

Well-known member
844
1,150
93
Location
Maine
Moving on, as I mentioned in a previous post I was having a difficult time getting the fan clutch to line up the bolts holes to remove the clutch from the water pump pulley. I applied 150 PSI and the clutch wouldn't release. I made a puller of sorts to release the clutch and that didn't work, it only damaged the threads rendering the fan clutch useless. I did manage to get the clutch off.

I found a "good working" used pull for $200. I guess schools don't teach the meaning of words like "good" and "working" anymore. As soon as I took it out of the box and spun it I could feel a bad bearing. Since the one I took off was in clean and good physical looking condition except what I damaged I figured I could use the good part in the one I just bought to fix mine now that I have it off the engine.

I have never taken one apart before but I know there is a heavy spring under pressure and care must be taken. At this point I would NOT recommend doing this if you are not certain exactly what you are doing. Even though I used bolts to hold the spring tension, not know where the spring applies force, I removed the bearing cir-clips and the spring released out the bottom and luckily I had it pointed at the metal table. The bolts did NOTHING to make it safer for me.

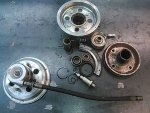
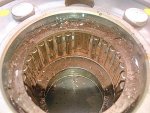
Spring removed, cir-clips off, everything apart except the 2 main pieces all I had to do was take them apart. Here in lies the entire problem with this particular clutch. After pounding the two piece apart her is what I found !!!!!!!!!
clutch1.jpg

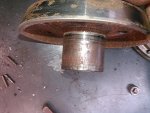
That bearing has never seen a drop of grease. I suspect it was assembled the Friday before a long weekend 4:55 PM. All the rust dust is parts of the cage in the bearing. It took some serious hammering to get this apart. This is the reason I was never able to get the clutch to release or move.


The mating surface ...
clutch2.jpg
 

springer1981

Well-known member
844
1,150
93
Location
Maine
Then I took the "good working" used pull apart and found the same caged roller bearing was not pressed in far enough and the seal was doing nothing. But at least it had been greased and was in good condition.. I was able to seat the bearing correctly. Then cleaned and regreased the caged roller bearing and use the seal since it was never put on correctly it was almost new. Cleaned up the shaft, swapped the other bearings from mine over and reassembled. Good as new ... well actually better since it has grease on the bearing now!

Here is the reassembled clutch and the left over pieces.

clutch3.jpg
 

Bulldogger

Well-known member
Steel Soldiers Supporter
1,330
586
113
Location
Quantico VA
Interesting finds Springer1981, and these give some further background to claims others have made about getting more than one bad fan clutch in a row. Apparently this situation of bad bearings is not all that uncommon!
BDGR
 

Milcommoguy

Well-known member
Supporting Vendor
1,710
2,265
113
Location
Rosamond, CA
Title change. My New Clutches ... All Busted, Bent, Rusted

That's a hard lesson to learn $$ Think we all been there with HmuV parts.

Add the QC to the clutch for the time one needs to work some belts on / off.

So did it ever work? I am thinking it was locked up for sometime.

Feeling the Ouch, CAMO
 

springer1981

Well-known member
844
1,150
93
Location
Maine
Interesting finds Springer1981, and these give some further background to claims others have made about getting more than one bad fan clutch in a row. Apparently this situation of bad bearings is not all that uncommon!
BDGR
There are 3 bearings. 2 are sealed bearings and 1 caged bearing. The sealed bearings are the ones that were bad in the "good working" used clutch. The original clutch had great sealed bearing but the caged bearing was toast as you can see in the photo. Luckily I was able to use the sealed bearings from the original to fix the "good" one. The caged bearings would likely never go bad unless someone NEVER puts grease on them, EVER. LOL
 

springer1981

Well-known member
844
1,150
93
Location
Maine
That's a hard lesson to learn $$ Think we all been there with HmuV parts.

Add the QC to the clutch for the time one needs to work some belts on / off.

So did it ever work? I am thinking it was locked up for sometime.

Feeling the Ouch, CAMO
Money wise it's not too bad really. I thought I messed up the original clutch and I did damage the shaft but it turns out that it was beyond repair no mater what I did to it so I had to fix it regardless. Spending $200 on a used "good" clutch was going to happen anyway. I was lucky I had enough parts between them to get 1 good working clutch out of them. Essentially rebuilt now and the total cost of only $200.

I'm sure it worked when installed on the engine since the bolt holes have to line up to install it. And what I couldn't do was line up the bolt holes to remove it. Without grease the bearing just rusted and seized. This kept the engine fan on ALL the time. I never noticed the fan ran all the time because I never went looking. In hind sight and now fully understanding how the system works, I would know immediately now.
 

Milcommoguy

Well-known member
Supporting Vendor
1,710
2,265
113
Location
Rosamond, CA
Money wise it's not too bad really. I thought I messed up the original clutch and I did damage the shaft but it turns out that it was beyond repair no mater what I did to it so I had to fix it regardless. Spending $200 on a used "good" clutch was going to happen anyway. I was lucky I had enough parts between them to get 1 good working clutch out of them. Essentially rebuilt now and the total cost of only $200.

I'm sure it worked when installed on the engine since the bolt holes have to line up to install it. And what I couldn't do was line up the bolt holes to remove it. Without grease the bearing just rusted and seized. This kept the engine fan on ALL the time. I never noticed the fan ran all the time because I never went looking. In hind sight and now fully understanding how the system works, I would know immediately now.
When you said couldn't turn or the air didn't work... I said to self... rusted busted. Fun to guess, then the old crystal ball starts to flicker out. You'll get your money back with the fuel savings of the fan working right.

How 's the air con clutch pulley going?

Bet donuts there's a lot of fan's running "lock-up", CAMO
 
Last edited:

springer1981

Well-known member
844
1,150
93
Location
Maine
How the air clutch pulley going?
The update on that starts on page 7 post 138. I'm ready to bolt it on and continue. I think I have everything to put it all back together now. Except the actual AC lines and well the rest of the AC install. More on that to come. Moving on to the rear half doors next. I have about 5 different things going with the hmmwv right now. I just keep plugging away at whatever is convenient at the time.
 

springer1981

Well-known member
844
1,150
93
Location
Maine
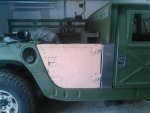
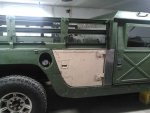
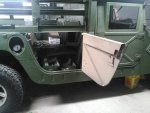
About 2 years ago (page 5) I started mounting rear half doors. I prefer to call them cargo access doors. The cargo doors only have door latches that release from the outside. I suspect the reason they are shorter is to prevent them from being used as man doors since you can't open them from the inside.

Anyway I finally had extension panels made and today I fitted them and mounted the cargo doors. I have to clean up the adhesive on the edge, sand and paint the doors and extensions.

doors1.jpg


doors2.jpg


doors3.jpg
 

Action

Well-known member
3,576
1,557
113
Location
East Tennessee
About 2 years ago (page 5) I started mounting rear half doors. I prefer to call them cargo access doors. The cargo doors only have door latches that release from the outside. I suspect the reason they are shorter is to prevent them from being used as man doors since you can't open them from the inside.

Anyway I finally had extension panels made and today I fitted them and mounted the cargo doors. I have to clean up the adhesive on the edge, sand and paint the doors and extensions.

View attachment 829423


View attachment 829424


View attachment 829425
Those short doors ate standard on the armored 2-man trucks.
 

springer1981

Well-known member
844
1,150
93
Location
Maine
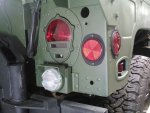
Finished the lights on the rear today. New light buckets for the side marker and tail lights. Added the reverse lights, not functional yet, I have to wire them still. Also replace the reflectors. Not sure if I want to leave the black or paint them green to match. I'm thinking green.


taillight2.jpg
 

springer1981

Well-known member
844
1,150
93
Location
Maine
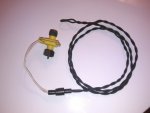
Made a pigtail for the tach. I'm using a signal generator from a different military truck that uses a mechanical tach (I believe). This will allow me to retain the original one to later be used for a TCM for a 4L80 upgrade without needing to splice wire.

tach1.jpg
 

springer1981

Well-known member
844
1,150
93
Location
Maine
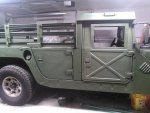
Checking another project off the list. I'm very happy with the way they came out. I'm glad I had to make the panels because I like the way they fill the entire area between the doors and are the same height as the rear doors. The originals are about 3" shorter overall and leave a large gap at the bottom.

Ok, so not entirely done, I'm going to put the door limiting straps on also.


doors4.jpg
 

springer1981

Well-known member
844
1,150
93
Location
Maine
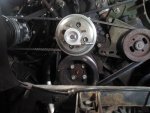
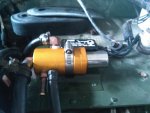
Finally got the fan clutch installed. I decided to put the quick connect on it.

clutch4.jpg


I also replaced the Cadillac Valve. I don't know if there was anything wrong with mine but it was pretty rusty on the solenoid and I can't see going through all this to leave it there. Previously replaced the delay timer as well. So at this point the only thing left not replaced will be temperature switch.

cadillac.jpg
 

TOBASH

Father, Surgeon, Cantankerous Grouch
Steel Soldiers Supporter
Supporting Vendor
3,582
3,489
113
Location
Brooklyn, NY
Others have had issues with leaking quick release.

Others have wrapped the Cadillac valve with silicone mat to diminish whistle.
 

springer1981

Well-known member
844
1,150
93
Location
Maine
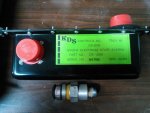
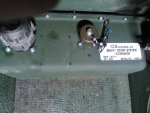
Out with the OLD, in with the NEW. Nothing wrong with the old, works great, but the new has new features so it doesn't pulse the electrical system after start as well as additional benefits. The green label KDS will sit on the shelf as a backup.


Old
kds1.jpg


New
kds2.jpg
 

springer1981

Well-known member
844
1,150
93
Location
Maine
When I took out the radiator a month or so ago (post 127) I mentioned radiator had a couple of corner brackets that have come desoldered. I said I would get that taken care of which I did or so I thought. I looked up a local radiator shop (only 1 in a 30 mile radius) and checked him out online, all good reviews. Looks like hes been in business for years so I felt pretty good about bringing him the radiator. Turns out the national guard brought him HMMWV radiators in the past when they couldn't get the parts for some reason.

So when I dropped it off I told him I would like it gone through to fix any desoldered brackets and anything else he found that needed to be addressed. He told me it would be a couple weeks and I didn't have any issue with that. About 1.5 weeks later he called and said it was done. $150 out the door. I loaded it up and brought it home.

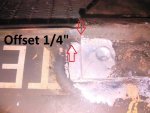
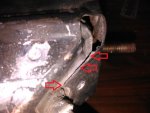
So today it was time to get it ready to be reinstalled. Clean it up a little and paint the freshly soldered areas etc. As soon as I put it up on the table to check the repaired area I immediately noticed it wasn't in the correct location. Picture below. You can see where is was previously soldered. The bracket isn't straight on the side either.

rad5.jpg

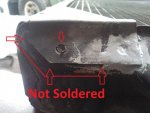
Here you can see the same bracket as above still not soldered to the side. It will have to be fixed and the bracket moved about 1/4"
rad4.jpg
 
Last edited:

springer1981

Well-known member
844
1,150
93
Location
Maine
After seeing the above I checked checking over the rest of the radiator. It needs a LOT of work to fix it correctly.

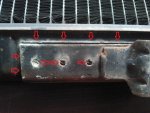
Here is another corner bracket that only a little of it was resoldered the rest is still separated and needs to be fixed
rad6.jpg

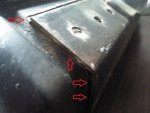
The worst part is the lower radiator mount. It is attached on 3 sides of the lower tank. 2 of the sides are detached and desoldered completely. To fix it correctly I will likely have to remove the bracket and resolder it.

rad7.jpg

Side view showing 2 sides detached.
rad8.jpg


So that's what $150 gets you. I figured I would bring it to a professional and get it back in ready to bolt in condition. Instead now I will be rebuilding it and it will be even harder than when I dropped it off since I have to undo what the "professional" shop did to fix it right!!
 
Last edited:
Top
AdBlock Detected

We get it, advertisements are annoying!

Sure, ad-blocking software does a great job at blocking ads, but it also blocks useful features of our website like our supporting vendors. Their ads help keep Steel Soldiers going. Please consider disabling your ad blockers for the site. Thanks!

I've Disabled AdBlock
No Thanks