• Steel Soldiers now has a few new forums, read more about it at: New Munitions Forums!

  • Microsoft MSN, Live, Hotmail, Outlook email users may not be receiving emails. We are working to resolve this issue. Please add support@steelsoldiers.com to your trusted contacts.

Replaced Battery Cable Installed Non GI Battery Clamps Now No Power?

Crapgame

Well-known member
635
329
63
Location
Navarre, FL
Replaced Battery Cables: Short in Negative SubHarness to Starter & Engine
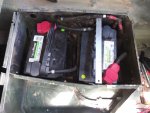
Imp Battery Bars.jpg

Edit: The buyer stopped by yesterday to test drive it again, and we found the electrical problem by accident. After I had checked the voltage on the starter switch I guess I crossed the two hot Packard connectors. Kevin was under the battery box tracing the sub harness assembly of black nylon mesh sheathed cables, about 4 ea 16ga black wires that enters the battery box from transmission hump, below the STC/IC Shunt, when the starter began cranking the engine by itself.
Apparently, when I moved the red 1/0 cable to the alternator lug over top the shunt and bolted it back onto the insulated Positive anchor point, that somehow I may have rotated the positive anchor point, maybe some aluminum oxide build up was causing some voltage loss, or wear on that 4 wire sub bundle to the starter to the engine developed some kind of short.

So it looks like I should replace the A0 engine harness or at least that sub assembly to the starter then goes under the air horn over top the engine then splits at a T under the transmission cover.

I knew it would be something stupid simple, but invisible to me due to pain-inflicted tunnel vision.


My 1987 A0 truck came with 2 Walmart 12v batteries bungied to the battery box floor. I removed the bungees, pop riveted two L brackets with holes to use aftermarket J bolts/wing nuts and the GI battery hold down, but the GI hold down would fit right with the civilian batteries. I made a new, longer 2/0 cable to connect the two Walmart batteries to work with the GI hold down but it still wasn't enough room. So I cut two pieces of 1" wide 0.125" thick aluminum flat bar with holes in the ends to work with the J bolts and wing nuts. I started the truck and ran it for awhile before final installation of the improvised hold down parts.

But once I installed the aluminum flat bars across the battery handles, etc, I got the Wait and Brake lights on for about half a second then they went out, no power to the starter switch now. Two 1" flat bars like on the right battery in the above photo.

Did I toast the glow plug controller with an arc in the battery compartment?

I tried manipulating the gear shifter to make sure the Neutral switch wasn't off but no lights still.

I'm getting 24v on the multimeter touching the - terminal and the red marked shunt bolts on the battery box side
 
Last edited:

NDT

Well-known member
Steel Soldiers Supporter
10,458
6,532
113
Location
Camp Wood/LC, TX
Sounds like the cable between the negative post and the shunt is faulty. They can get corrosion between the wire strands and the cable lug resulting in your situation.
 

Coug

Well-known member
Steel Soldiers Supporter
2,975
4,356
113
Location
Olympia/WA
I'm assuming by "red marked shunt" you mean the positive connection on the side of the battery box. I may be wrong with terminology but the shunt is where the negative cable connects then ha a bunch of bars to connect it to the vehicle ground.

Do you show voltage when you check the negative shunt to the positive post on the battery box wall. Measure on both sides of the shunt to positive. If you are still reading 24V then issue might be elsewhere on the truck.

To me it sounds like an issue between the - terminal on the battery and ground shunt, as it's unlikely that a grounding wire somewhere else on the truck picked this exact moment to fail and this is the area you've been working on, but there's always that chance.
 

papakb

Well-known member
2,285
1,185
113
Location
San Jose, Ca
I installed Duracell 24F batteries in my HMMWV because every 6T* I ever installed didn't outlast their warranty period and I can change them out locally instead of having to seek out a specialized battery distributor. The 24Fs fit into the original battery tray and use the original battery hold down bracket. It doesn't get much better than that! There are two versions of the 24F and you want the one with the flat top, not the one with the raised filler caps.

Duracell 24F batteries.JPG
 

Crapgame

Well-known member
635
329
63
Location
Navarre, FL
I'm assuming by "red marked shunt" you mean the positive connection on the side of the battery box. I may be wrong with terminology but the shunt is where the negative cable connects then ha a bunch of bars to connect it to the vehicle ground.

Do you show voltage when you check the negative shunt to the positive post on the battery box wall. Measure on both sides of the shunt to positive. If you are still reading 24V then issue might be elsewhere on the truck.

To me it sounds like an issue between the - terminal on the battery and ground shunt, as it's unlikely that a grounding wire somewhere else on the truck picked this exact moment to fail and this is the area you've been working on, but there's always that chance.
Maybe that's the issue, I think I might have routed the dables with a positive to the red lug, my terminal insulators are Red for Positive, Black for Negative, afterall, right?
 

Coug

Well-known member
Steel Soldiers Supporter
2,975
4,356
113
Location
Olympia/WA
Yes, still red for positive and black for negative (I went out and double checked my truck just to be sure)

Positive to the red connector on the wall of the battery box towards the front of the vehicle, in the center of the box is a DC shunt where the negative attaches. It looks like in your picture you have it routed correctly going by the colors on the cables.
I'm just saying use the multimeter from where the negative cable connects to the DC shunt and the red isolator stud where the positive cable attaches and make sure you have over 24 volts between those two points. If you do, then have someone flip the switch to "run" while holding the multimeter there and see what happens. If when the switch is flipped "on" you don't see a drop in voltage, then the problem is somewhere else in the truck, if the voltage drops or disappears, you know it's in your batteries and wiring. Easy enough way to check if the work you just did is the problem or not.
 

papakb

Well-known member
2,285
1,185
113
Location
San Jose, Ca
A simple check of your wiring would be to test for 24 volts on the large stud on the alternator measured to vehicle ground. You didn't mention which alternator you have but it's always a good idea to remove the negative lead from your batteries before removing or refitting any covers on the alternators because the spacing is tight and you don't want to draw and arcs there. If you have 24 volts there your battery compartment wiring is correct and your next step is the control box. Doesn't matter whether you have an original PCB or one of the newer ESS boxes all your starting power gets switched there.
 

Crapgame

Well-known member
635
329
63
Location
Navarre, FL
I have the 14/28v 200amp alternator installed, put a replacement voltage regulator on it last month, its run since then before I removed the batteries to clean, prime and coat the battery box. The priming and coating I didn't even do yet because of the rain. So all I did was get a piece of #2/0 cable from Napa to make a longer jumper cable that would work with the issue battery hold down.

I double checked everything, the cables on the right marked in red shrink wrap are positive, hooked to the battery. I re did the cabling using the original short jumper cable, I used acetone to clean the tar on the negative cables that anchor to the left hand copper bolt on the shunt. I had one cable that was had some electrical tape built up around on end. I thought it felt oxidized inside thought that might be the problem aggravated by handling the cable. I left that one off, used the longer #2/0 cable I made from Napa parts instead.

Still no Wait or Brake lights.

I put the multimeter contacts on the red covered lug on the 200amp alternator, grounded to the braided ground strap on the engine right there, 0.

I unplugged the M-series light selector switch box to get to the starter switch, I'm getting about 6.5v from each hot leg to the 3rd neutral leg.

I don't know its got to be something simple-stupid.

When I first got it I kept having similar trouble got stuck in a Taco Bell drive thru had to be pushed out of the lane. A USAF Spectre mechanic stopped to help, he found the battery was arcing to a black 14ga wire that passes under the shunt because the batteries were only held down by black rubber bungee cords hooked to holes in the battery box floor.

He moved things around until I got good enough separation to start the truck and get home. When I got home I wrapped the 14ga wire with UL black tape and slipped a piece of 1/2" ID black rubber hose over it for even more insulation, it ran fine for awhile. I trimmed the issue battery hold down, the two pieces of 3/4" aluminum angle iron, to be even with the U shaped parts of the hold down. I figured I would drill two holes in the cut off aluminum angle iron, pop rivet two to the battery box inside to use off the shelf threaded J rods and wing nuts through the holes in the issue hold down but No Joy. I removed the issue hold down bracket, cut two pieces of aluminum flat bar drilled 1/4" ID holes near the tips for the threaded J rods to pass through to lock down with the wing nuts.

And the truck started and ran for about 5 min before I shut it off for the final assembly, to set the aluminum flat bars across the plastic battery handles to lock down with the wing nuts.

Its got to be something simple-stupid or stupid-simple.

Compression, diesel, air and current is all it takes, right? So easy a caveman can do it.
 

juanprado

Well-known member
Steel Soldiers Supporter
5,614
2,922
113
Location
Metairie/La (N'awlins)
just a crazy thought but loosen the hold down bar to make sure the battery (s) is not internally cracked and the hold down is distorting the battery.

Also check the wires underneath going to the starter and the pass through bolt in the body.
 

papakb

Well-known member
2,285
1,185
113
Location
San Jose, Ca
As you can see in the diagram below the power runs from the battery to the stud on the battery box wall and from there directly to the bolt on the starter. From there it's a straight shot to the stud on the alternator. Since you haven't got 24 volts at the alternator your problem is somewhere in that red line.

Just for reference the shunt is on the negative side of the battery and is only used to measure current for the STE/ICE diagnostic box. Now if that negative line breaks there's no battery reference for the electrical system and it can also cause your problem. You need a full current path for things to operate and it's one of the reasons the HMMWV wiring harnesses have ground wires included in them. The HMMWV body is not electrically bonded well enough to use it as the ground return path.

Ambulance battery system.jpg
 

Crapgame

Well-known member
635
329
63
Location
Navarre, FL
with the negative ground cable and the positive to body anchor cables left installed, I'm getting 24.5v volts from terminal to terminal.
 

kzeyus

Active member
141
30
28
Location
Rogers, AR
I'm no expert, but as you say this should be something simple and overlooked - unless control box is fried.

OK, so batteries properly connected together. How about Front positive battery terminal to a body ground - some bare metal on body. If 24.5 there then ground is probably OK.

Then start working positive lead of VOM out connection by connection - from positive terminal on front battery to positive stud in battery box while grounding to body with negative VOM lead, then on to starter etc and see if lose power somewhere along the way.

Not seeing 24.5 at slave connector would seem to point to problem with battery connections to studs in battery box assuming slave connected properly. Test positive side of slave connector to body ground and negative side of slave to front batt positive. If one or other don't give 24.5 would be a big clue. The low voltage at slave would leave me to think at this point bad cabling from front bat positive or rear bat negative to studs on batt box or poor connection there. Assuming of course slave wired properly.

Don't remember seeing what generator you have. I think I remember the 60amp goes through the control box, so fried control box could keep voltage from appearing at generator.
 

Coug

Well-known member
Steel Soldiers Supporter
2,975
4,356
113
Location
Olympia/WA
If you have 24 at the batteries and a lot less than that at the slave receptacle, then you definitely have a bad connection or bad wire somewhere in the box. Most likely having to do with the ground wire from the rear battery to shunt.
Slave cable connects to the same posts as the battery does in the battery box, the shunt and the positive isolator post. What voltage are you showing at those two locations inside the battery box? If it's below 24 then we're back to a bad connection inside the box.

You can also try going from a good frame/engine ground to the positive terminal on the battery, if you show good voltage then the wiring for the ground side of things is most likely good, and the issue is with the positive side. Alternately, you can go from the positive post on the alternator to the negative battery post (if your meter leads are long enough) and see if the positive side is correct.

From there whichever side isn't showing voltage, you just keep going backwards until you find the spot that DOES have good voltage, and narrow down where in the system the problem is. My guess would be it's somewhere in the ground cable connection, either at the battery or at the shunt connection, because if it's all good then you'd be showing battery voltage at the slave receptacle.
Either that or maybe the shunt lost it's connection to ground on the other side from the battery cable when you bumped it while working in the box, but that wouldn't explain the slave connection being low voltage.

If you had corrosion inside the battery cable, there's always the chance there is corrosion inside the other cables inside the battery box as well, so if it's not one of the connections I mentioned above it might be inside the cables themselves.

There is a chance something I said might not be correct for on the HMMWV, if so someone will hopefully be along to correct me.

EDIT: Looks like kzeyus beat me to it while I was typing. I'm a little slow at the keyboard sometimes. But hey, this just means we're both thinking the same things to check or fix. :)
 
Last edited:

REF

Active member
Steel Soldiers Supporter
117
127
43
Location
Porterville Calif
The way I check this type of problem on the trail, may be applicable here is. take your jumper cables hook the red clamp to the positive post on your front battery - take the other end and hook it to the positive post on the starter and try it (your simply bypassing that section of wiring). if it works you know the problem is between these 2 points. If not hook the black clamp to the negative post of the back battery and the other end to the neg post on the starter ( your simply bypassing that section of wiring) if it works then you know the problem is between those 2 points and you get to go home. If it doesn't make a difference your not working in the right area and move on into the vehicle. assuming both batteries are good and charged.
hope it helps
 

Crapgame

Well-known member
635
329
63
Location
Navarre, FL
The new jumper cable, Napa didn't have #0 but had next larger #1 sized cable. I used flux core solder to attach the copper eyes.

The only cable leaving the battery box from the Positive anchor lug is Cable tagged #6 and it goes directly to the big lug on the 200amp alternator.

Edit: Correction the #6 tagged cable has the asphalt coated cotton sheathing on it so it should be this cable from positive anchor lug to the 200amp Alternator big lug 78" long:
78" BATTERY CABLE 19207-12460498-3
PART OF ALTERNATOR KIT 57K0273 (2920014651096)
USED ON: HMMWV, M998, M1025, M1037, M1042, M1036A1, M1045A1, M1097A1

 
Last edited:

REF

Active member
Steel Soldiers Supporter
117
127
43
Location
Porterville Calif
I am sorry, I meant automotive jumper cables used for jumping cars with dead batteries. 2 cables with quick clamps on both ends. I always have a set with me on the trail and have come in handy in many situations. In this case to jump around a section of cable that may have a bad connection in it.
 

Crapgame

Well-known member
635
329
63
Location
Navarre, FL
The #6 cable is the one I moved when pop riveted the L angle aluminum pieces on the outboard side to use J bolts and flat bars for hold downs. It was routed under the shunt, I unbolted it from the Positive anchor bolt, re routed it over top the shunt to make room for the J bolt and wing nut. I wonder if the cable was oxidized inside where the eyelet is soldered on, flexing the cable, bending into a J broke some of the wire strands?

But that cable connected to the Positive anchor bolt, I should have been able to measure 24v at the alternator lug and braided ground strap if the cable was still good. I wonder if I can cut the eyelet off, solder a new one on and reuse? I would have to check the cable to conductivity or Ohms resistance to make sure it is still good.

The truck is a 1987 A0, I'm a firm believer in Motorpool Gremlins. Sweep the trackline and empty the #10 drip cans on Fri 1700, get called up 1500 on Sunday because an M106A3 or M577A2 has a puddle of oil past its tracks. Some seal or hose burst over the 48hrs of the weekend.
 
Top
AdBlock Detected

We get it, advertisements are annoying!

Sure, ad-blocking software does a great job at blocking ads, but it also blocks useful features of our website like our supporting vendors. Their ads help keep Steel Soldiers going. Please consider disabling your ad blockers for the site. Thanks!

I've Disabled AdBlock
No Thanks