-
Steel Soldiers now has a few new forums, read more about it at: New Munitions Forums!
Seems like this is turning into a build thread.
- Thread starter CARC686
- Start date

More options
Who Replied?CARC686
Well-known member
- 335
- 600
- 93
- Location
- Las Cruces, New Mexico
Got 'em. They're on closeout on RockAuto, but there's only one left now.
CARC686
Well-known member
- 335
- 600
- 93
- Location
- Las Cruces, New Mexico
Exhaust donuts done on both sides. Driver's side was a breeze. The studs stayed put and the nuts came right off. Installed the new stainless springs and the zinc plated nuts on the original studs and moved on to the other side. Passenger side, I had one stud break free before the nut, which gave me the space I needed to slide the pipe out of the way, but I still had to cut the upper shackle bolt to get it out. Once that was done, I replaced the last suspension bushing I had left to do in the front end. The rubber was worn all the way through on the outboard side. Metal to metal. Went back together without much drama. No exhaust fumes in the cabin for the first time this year, and the front spring job is finally 100%.
Still got motor mounts, harmonic balancer, and front and rear main engine seals in my to-do box. New hood release cable is on the way, along with some other odds and ends.
Still got motor mounts, harmonic balancer, and front and rear main engine seals in my to-do box. New hood release cable is on the way, along with some other odds and ends.
Motor mounts are not bad but it's 2 of us doing them...me holding or installing stuff from up top and the kiddo under. He's really good at it. We found lifting just the drivers side of the engine with a cherry picker gets both sides up evenly to do both at the same time. Look out for the fuel lines as if they're weak, one can pop or crack. We've done 3 in the last couple of months, and 2 had fuel line issues after. So, in a way, it found weak lines, which is good. The balancer and front seal are not to bad but you'll need a puller and installer tool. I used a socket and glued the seal to it to install that. It is a big one...I'll look for that socket and give you a size it is.Exhaust donuts done on both sides. Driver's side was a breeze. The studs stayed put and the nuts came right off. Installed the new stainless springs and the zinc plated nuts on the original studs and moved on to the other side. Passenger side, I had one stud break free before the nut, which gave me the space I needed to slide the pipe out of the way, but I still had to cut the upper shackle bolt to get it out. Once that was done, I replaced the last suspension bushing I had left to do in the front end. The rubber was worn all the way through on the outboard side. Metal to metal. Went back together without much drama. No exhaust fumes in the cabin for the first time this year, and the front spring job is finally 100%.
Still got motor mounts, harmonic balancer, and front and rear main engine seals in my to-do box. New hood release cable is on the way, along with some other odds and ends.
Sent from my SM-S906U using Tapatalk
CARC686
Well-known member
- 335
- 600
- 93
- Location
- Las Cruces, New Mexico
24mm
CARC686
Well-known member
- 335
- 600
- 93
- Location
- Las Cruces, New Mexico
Maybe I'll wait on the mounts 'til I get the picker. I was gonna get a cherry picker to install the rear bumper, since it weighs 149 LBS unloaded, so having more than one use for it out of the gate is a good thing. Don't suppose you know the fuel hose diameter off the top of your head? I haven't replaced any of the fuel hose on the bottom of the truck yet. Was noticing rubber line in a couple places while I was under there this morning. Old and crusty.
Yeah I used 3/8 and 1/4 inch mostly. Used the fuel injection style clamps too. The new screw style clamps are so cheap now I don't trust them. Went out to the garage and found that socket I used to put in front seals. It's a axle nut socket for something but can't remember...go to many. I'd definitely want a cherry picker to do the mounts. I've seen people attempt to use a floor jack with a block of wood on the oil pan. They often wonder why their oil light is on after!Maybe I'll wait on the mounts 'til I get the picker. I was gonna get a cherry picker to install the rear bumper, since it weighs 149 LBS unloaded, so having more than one use for it out of the gate is a good thing. Don't suppose you know the fuel hose diameter off the top of your head? I haven't replaced any of the fuel hose on the bottom of the truck yet. Was noticing rubber line in a couple places while I was under there this morning. Old and crusty.


Sent from my SM-S906U using Tapatalk
CARC686
Well-known member
- 335
- 600
- 93
- Location
- Las Cruces, New Mexico
I wasn't even thinking about the seal driver. Good frame of reference. Thank you. Will figure something out when the time comes. Mostly, I was just nervous about potentially hurting the radiator core while I'm messing with the pulley puller.
I doubt you'll hit the rad with anything...it is really far from the crank snout...pop a double layer of card board in front of it, though, just in case. I'll hunt my puller installer out...I own mine but I think advance auto rents them or others. I think I used a steering wheel puller to get the last one off.I wasn't even thinking about the seal driver. Good frame of reference. Thank you. Will figure something out when the time comes. Mostly, I was just nervous about potentially hurting the radiator core while I'm messing with the pulley puller.
Sent from my SM-S906U using Tapatalk
- 8,070
- 20,467
- 113
- Location
- Charlotte NC
.I doubt you'll hit the rad with anything...it is really far from the crank snout...pop a double layer of card board in front of it, though, just in case. I'll hunt my puller installer out...I own mine but I think advance auto rents them or others. I think I used a steering wheel puller to get the last one off.
Sent from my SM-S906U using Tapatalk
@CARC686
You will have plenty of space - without barking your knuckles on the radiator - using a standard balancer puller. Even using a half inch ratchet... And room to tap the new one into place (after you replace the seal).
CARC686
Well-known member
- 335
- 600
- 93
- Location
- Las Cruces, New Mexico
Starter bolts:
ARP 430-3511 GM 2-LONG M10 4.470" 12PT STARTER BK UPC 672036046637
Installed, confirmed fit on Delco 27MT.
ARP 430-3511 GM 2-LONG M10 4.470" 12PT STARTER BK UPC 672036046637
Installed, confirmed fit on Delco 27MT.
CARC686
Well-known member
- 335
- 600
- 93
- Location
- Las Cruces, New Mexico
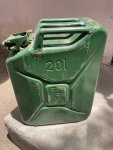
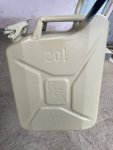
These are for my upcoming bumper carrier. Korea-era milsurp jerry cans. Looked like red primer under Vietnam-era OD sprayed over with something else. Doesn't look like military green to me. Anyway, today I added rattle can Rapco 33446, CARC 686 substitute. New cans have a powerful spray with a wide pattern. I had some nozzle clog and a little splatter, but probably because I didn't shake it up enough. Good stuff IMO.
Before:

After:

Before:

After:

I have one of those that is very nice but I can't find a good nozzle for it...or I'm doing it wrong...it leaks out everywhere, I even put my finger over the breather hole while I tip it in. Put new gaskets on it. I've got at least 10 of the round screw in style that I use donkey dongs or screw in caps to fill with and they always work first time. Which one do you have?These are for my upcoming bumper carrier. Korea-era milsurp jerry cans. Looked like red primer under Vietnam-era OD sprayed over with something else. Doesn't look like military green to me. Anyway, today I added rattle can Rapco 33446, CARC 686 substitute. New cans have a powerful spray with a wide pattern. I had some nozzle clog and a little splatter, but probably because I didn't shake it up enough. Good stuff IMO.
Before:
View attachment 926157
After:
View attachment 926158
Sent from my SM-S906U using Tapatalk
CARC686
Well-known member
- 335
- 600
- 93
- Location
- Las Cruces, New Mexico
What you see is what you get. I keep a long plastic funnel with a giant taper in the truck. Dex/Merc goes in the can because I can pour that in my fuel tank if I have to, but I can't pour diesel in my transmission or Hydroboost.
M1009_SPAIN
Active member
- 73
- 161
- 33
- Location
- Spain
What is the size of the rim screws for an M1009? I need a new tire.I've got a bunch of rims plus one brand new one...I get them whenever I can. Since I have 3 it's good to have spares. Look on marketplace for a 1009 part out. That's where I get mine.
Sent from my SM-S906U using Tapatalk
cucvrus
Well-known member
- 11,475
- 10,467
- 113
- Location
- Jonestown Pennsylvania
Lug nuts? Are 1/2” x 20 on the 4x4 1/2 ton models M1009
I could be wrong they may be 7/16” fine thread studs.
I could be wrong they may be 7/16” fine thread studs.
Last edited:
CARC686
Well-known member
- 335
- 600
- 93
- Location
- Las Cruces, New Mexico
CARC686
Well-known member
- 335
- 600
- 93
- Location
- Las Cruces, New Mexico
Oil and mechanical violence is the only thing that'll get Rapco off your boots. You've been warned.
CARC686
Well-known member
- 335
- 600
- 93
- Location
- Las Cruces, New Mexico
Ordered some Dash Designs seat covers and after installing them, my advice is don't buy them. They may be made to order, but their installation instructions are based upon some fundamental misunderstandings of how the OE seats are built, and they cannot be installed properly without cutting holes in your upholstery and fiddling with some custom nonsense under the seat bottoms. That said, they do stiffen up the seats to match the new springs and u-joint steering shaft. It all comes together to feel like a modern vehicle.
The old hood release cable was about 3/4" longer than the new one. The pull is short and crisp now, but I had expected the hood to pop up without having to strike it, and it still does not. Is it possible? I've actually never had an old Chevy with a hood that popped without being stricken with my palm or fist.
The old hood release cable was about 3/4" longer than the new one. The pull is short and crisp now, but I had expected the hood to pop up without having to strike it, and it still does not. Is it possible? I've actually never had an old Chevy with a hood that popped without being stricken with my palm or fist.
cucvrus
Well-known member
- 11,475
- 10,467
- 113
- Location
- Jonestown Pennsylvania
Lube up everything really well in the latch and hinges. The hinges can be tricky since they are under the cowl. Real motor oil in a squirt can works best. Spray lubes are a waste of time. Good Luck.
- 112,579members
- 166,181threads
- 2,340,597posts
- 831online users


