• Steel Soldiers now has a few new forums, read more about it at: New Munitions Forums!

  • Microsoft MSN, Live, Hotmail, Outlook email users may not be receiving emails. We are working to resolve this issue. Please add support@steelsoldiers.com to your trusted contacts.

The next Project an ASMH

WillWagner

The Person You Were Warned About As A Child
Super Moderator
Steel Soldiers Supporter
8,566
2,831
113
Location
Monrovia, Ca.
I am 61 this year, the BLK Hummer guy is the eldest of our clan now. His calling in life is an electrician, mine is a wrench bender. The other two are a self employed general contractor, although he has moved on from our neck o the woods to a state or 2 away, maybe 3 if you count the small part of Az you go thru to get to his house, and now is employed by the state. The other is a master of fabrication, owns his own business. He can look at something and just see what needs to be done in his head then goes and knocks it out and it is exactly what was needed. And our departed friend was also a self employed general contractor. We all have learned from each other. I am a metal guy, mess that up, weld it up and start over. I couldn't do wood to save myself. I now can do most things. I have learned how to be an electrician, when I screw up, the hummer comes and guides me through things. If I need an input on a fab project, our other brother comes into play. I have hopefully helped all the others with my skill, passion, choice in life, whatever it is, in some of their life adventures. We all have swung multiple engines, upgraded vehicles, modified jeeps, sorted out bugs in vehicles, built things, wired things, made bad azz one off contraptions, played with fire, really, those were good times! We take off for 4 days out in the desert and explore mines, old mining camps, old cabins in the middle of nowhere, We need to get on that, it has been a year since we ventured out, life is getting in the way.

People that have been around since the days of the Dirtbag gatherings would most likely remember these guys.

Funny thing, one of the guys used to live in my town, we share a name, his wife's name was the same as mine....my wife's, not my name....as is my cousin's wife's name that lives 3 miles from me. We all knew where all the girls shopped. To this day, when both of us are together and introduce ourselves, the confused look on peoples faces are priceless

The group of guys that I call my friends are truly friends, the kind of persons that one meets once in their lifetime and create a bond. They are really "brothers from another Mother". If someone needs something, we are there for one another.

Enough.

To keep things on topic with the wrecker, We have another wrecker body out in the back 40. Not an Austin Western, a newer type, the one the hydraulic tank mounted on the boom and the boom winch spool under the boom. We still need the cable end clevis for the 45k Garwood in the bed of the M62. I asked Craig to take a look at the bed to see if what we need is there. Sure enough it is!

However, it has also been pulled up into the fairlead rollers very hard.

So, still looking for the cable end as well as a filter to put on the tapered bung in the tank.
 

WillWagner

The Person You Were Warned About As A Child
Super Moderator
Steel Soldiers Supporter
8,566
2,831
113
Location
Monrovia, Ca.
OK, so it's been a bit since an update. Everything is going well, EXCEPT for finding a rear winch clevis. We are holding out to see if we can find a used one or a NOS from one of the vendors and I am hunting around in all of the parts scattered around to see if there might be one on hand.

The hydraulic tank was a bit dirty, so, over the last couple of weeks, maybe a week, time seems to blur from 1 day to the next, the tank was given a treatment of B'laster parts cleaner, elbow grease and a bit of a power wash. Today I looked inside and I don't feel good about the condition, no rust, just crap, so, I stopped at the local home improvement store on the way home and picked up a big bag of painters rags. Tomorrow I will open the drain, try to push the crap out the bottom, maybe spray some parts cleaner into the tank with an air operated sprayer I have, give it a good wipe down and see how it looks.

Since Nothing was done with the tank, I didn't take pics of the in tank filter, but I will do that when I put it in, hopefully tomorrow. I decided to work on the vent. It was/is crushed. If one looked up through the vent, all it is is an valve cover vent from an old GM engine, the vent hole at the top was blocked off. Those of you that are old know what I am talking about.

The only thing available any more is a chrome thing. I know, if it don't go, chrome it. However, this don't go...very fast, but sorry, no chrome! So I took it upon myself to try and disassemble the thing. It was assembled, so, it MUST be able to be dis-assembled, right? Turned out to be pretty easy, the metal was soft. I just used some light persuasion with a screwdriver and small channel locks to un crimp things. A bit of working with some brass/bronze drifts, a ball peen and wood and things came out OK. Gave it a cleaning and primer/paint. It will be functional!

Last thing, still looking for boom cable. I have a relative that works in the elevator industry. We chatted, he has been replacing cable for the last year in the Vegas area. After showing him pics of the cable, the strands, etc. it was decided to not use the used cable he is taking out because it is different from what is used on this. I believe this should have 6-19 with a wire rope core of the same 6-19, right lay. The stuff he is taking out is mostly metric stuff. BUT, I was walking back to the shop area from the tire area and saw wire rope spools under a trailer. Went and investigated and found it was what is needed! The outside layer is a bit discolored, but not all rust bloomed like the cable on the truck is now. It still has cosmoline, vapowrap, whatever on it. I peeled back the wrap and the cable looks like new! I think I read that the truck takes 50 feet or so for the boom. The spools have 200 feet, so, we most likely can get what is needed from one of the spools! No pics, but I will get some.

The following images are of the PVC adapter I will use to attach a suction side/in tank filter, inside the tank and the tapered spud that I THINK there is supposed to be a filter on and don't remember if I posted a pic of it, the repaired vent, a new gasket for the hyd filler and some other stuff.

OH! We wanted to do some painting on the boom that didn't get done so when the final coat goes on, it looks even. To do this, as seen in past pics, the boom was supported by a strap and overhead crane. Well, after all of the lines were on the body, I let the crane down. It stopped and held the boom in place for a week! I removed all of the rigging and the boom went down, stopping when I released the lever. So it looks like things are plumbed correct, for the boom down at least, we shall see about the other circuits in a couple of weeks!

Also did a bit of painting on the bumper marker rods, came out good, nice and bright and we masked off the new hoses to get some paint on the exposed new fittings as well as the welded on pipes to prevent rust.
tank vent.jpgtank vent 1.jpgtank vent 2.jpgtank vent 3.jpgtank vent4.jpgtank vent 5.jpgmore paint.jpgmore paint 1.jpgmore paint 2.jpg
I am excited, I like working on this stuff but it is getting harder to do these big projects.
 

WillWagner

The Person You Were Warned About As A Child
Super Moderator
Steel Soldiers Supporter
8,566
2,831
113
Location
Monrovia, Ca.
I forgot some other little tidbits!

In one of the posts above, I showed a picture of some parts for the clutch release used by the rear winch operators area. Well, After 2 1/2 hours of my life trying to get the keyed arm back on the cross shaft, it looked as though that the arm was too close/far forward on the cross shaft. This means that when the clutch pedal is depressed in the cab, the rotopack actuator arm looked too close to the bellhousing and would contact the housing before releasing the clutch.

I got frustrated after I got it on the cross shaft and saw where it was located.

Today, I had someone get in the cab and depress the clutch. It SEEMS that the clutch releases but the rotopack arm just touches the bellhousing bolt face. I might not be able to tell if the arm is correct until we re fire the engine and see if it will go into gear with the rotopack arm installed.

For anyone out there that has an M62, don't know if 543 is the same, can you take a picture of the fixed arm on the trans cross shaft so that I can see if ours is correct or might have incorrect parts installed?
 

WillWagner

The Person You Were Warned About As A Child
Super Moderator
Steel Soldiers Supporter
8,566
2,831
113
Location
Monrovia, Ca.
Today, I got the hydraulic tank cleaned out, the filter adapter installed and the filter installed. It was decided to use some pressure washer water to clean the goo from the tank and it was done last week. I let my feelings be known. Still happened. Yesterday when I went in and started the tank stuff, I did not like what I saw. Water, oil, goo, metal. It looked worse than when it was emptied. I could not, in good conscience, start to assemble anything in the tank. Yesterday, I stopped at the local improvement store and got a giant bag of painters rags on the way home.
I closed the drain, covered the PTO inlet and dumped 1/2 gallon of B'laster parts washer fluid in the tank, swished it around, tried to push it back behind the baffle, but realized the truck was tilted to the right about 3 inches. That, 1, let the water stay in the tank, 2, let all of the solvent I installed run to the pas. side of the tank. I got to use my noggin. I used the pax side, front out rigger to raise the truck up as to get the crap in the tank to run to the drivers side toward the drain. Got things swished around, opened the drain, let things drain, wiped the tank out, used an air nozzle to get back behind the baffle and blow the junk out the bottom corners. Had to do this 3 times. Was finally good with the results, no more chunks, metal shavings, goo, water, cloudy oil, nothing.

Two hours.

The PVC adapter in the following pictures, fit tight, however, I wanted to make sure things wouldn't suck around the sides, so, I used a bit of #1 permatex on the outside of the PVC, threaded the new, in than filter onto the adapter and then pushed with a bit of a twist, the adapter into the spud in the tank. This should hold the adapter in the fitting and allow the removal of the filter, if it ever happens or needs to be done, without the PVC spinning.

I installed the lid with the new gasket and refurbished oil cap/vent.

Also got to do some more light painting and fixing of things I didn't get right. One thing was the ring I made that secures the travel bars to the boom. I eyeballed when I did the thru hole that secures the ring to the boom. Missed it by THAT much. Apx 1/16 inch. Put it in position and drilled the hole where it should be.

Gave some other pieces some color. I would like to paint the lips of the wheels yellow, think UPS, but yellow the wheels showed that they were yellow on the lips, and the axle flanges, yellow, they also showed yellow under the layers. But not my decision.

Something else on this that I can not seem to find anything on, there are 2 rings bolted to the frame, midway between the axles. Anyone know what these are for?hyd.jpghyd 1.jpghyd 2.jpghyd 3.jpghyd 4.jpgpaint.jpgring.jpg
 

BLK HMMWV

Well-known member
1,593
525
113
Location
Pasadena California
I would guess something goes into those holes in the upper ring on the jack. Maybe it's a cheater bar with a pin or something that engages with the hole in the upper ring. I bet that you need something pretty long to be able to raise the truck up to level it.
 

WillWagner

The Person You Were Warned About As A Child
Super Moderator
Steel Soldiers Supporter
8,566
2,831
113
Location
Monrovia, Ca.
Maybe the rings are for stowage of some kind. What do they normally use to lower the leg on the outrigger jacks?
That's what they most likely were for, but we have no idea what. They did make some staves that slip into the bow pockets to stow the long support bars.

There are no anchor points on either side of the ring , from the cab to the rear of the frame, so that if something was stowed there, it could be secured and not flop around. No chains, cables, places for a pin. If something was stowed there, one would think it would need to be secured so it didn't get into the tires.
 

WillWagner

The Person You Were Warned About As A Child
Super Moderator
Steel Soldiers Supporter
8,566
2,831
113
Location
Monrovia, Ca.
I'm not quite sure on that. I thought I had some more pictures but can't find them. I believe some of the WWII heavy wreckers had them stored in the same spot so the idea was probably borrowed from those.
My original thought was that the spades would go there, but I saw no place the make sure things stayed in place at the back of the truck. It would make things easier to remove and put in place from these spots rather than over the bed rails.
 

WillWagner

The Person You Were Warned About As A Child
Super Moderator
Steel Soldiers Supporter
8,566
2,831
113
Location
Monrovia, Ca.
Update! we got oil back in it last week. Fired it off and gave things a try, nuttin! Oil level is at the full mark on the stick, PTO engaged, trans in 4th for the first try, I got nothing, no hydraulic pump noise, no load on the engine.

I rolled under it and started looking around. The ball valve doesn't look like it has ever been touched, but, the cast in line on the valve was positioned so it was across the opening. Now if one thinks gas or water valve, when the valve is positioned 90 degrees from how the flow is supposed to be going, the valve is off. I asked and there is no recollection of the valve being turned off. After an hour of laying on my back pulling and pushing, I finally got the valve to move.

There is another mark on the valve, a groove at 90 degrees to the cast in line, starting at the cast line towards the outside of the valve. I am assuming that since this valve has 2 outlets, one is plugged, that the groove should point at the side of the valve intended to be open. So, with the cast line in line with the way the flow should go, the groove should point at the port that is open. Anyway, I turned that valve 2 full revolutions and tried the controls each time, still nothing.

I then started thinking that maybe I got plumbing mixed up, GOD, please no! I broke the connections loose at the swivel and have no oil there. The PTO does work, when I fired it, the levers for the rear winch were set for low, wind and the rear winch was indeed winding.

I think it might be a pump or drive issue because, 1, the tank had a bunch of chunks in it and no filter, so the vanes or rotor could be FUBAR, OR, 2, the key has sheared or the coupling, if there is one, has split. I say this because when I first moved the truck from it's resting place I didn't bother to check things and the PTO was engaged. This should have made the hydraulic pump run so maybe with the greater than 1000 RPM it was turning, something in the drive broke?

HOWEVER, I am missing a piece of the puzzle. In the TM we have for the wrecker body, there is a reference to another TM to troubleshoot/adjust some things. One is the linkage, I think. It is a detent style shaft in the PTO for all 3 shafts, hyd pump, rear winch in/out and rear winch fwd/rev. I did check the shaft position for the hyd pump by disconnecting the linkage and the shift rod was in it's detent. The other check is the governor located on the PTO directly behind the output shaft for the pump.

The TM missing is TM 9-837. It references this manual to adjust the 3 way valve if the pump speed is erratic. I do not know how the valve works, there is no mention of it's operation in the TM, or for that matter, the ball valve on the bottom of the tank or IF there was originally a filter in the oil tank, gotta love .gov materials! I am hoping that it COULD be an adjustment, there are air lines going to the valve mounted to the PTO and from a valve attached to the rear winch controls to the valve on the PTO.

This truck leaks air so bad, it cannot unload the governor.

Does anyone know if in order for this valve on the PTO to engage the hydraulic pump, if that is what it does, does it need a full head of air? I have tried moving the lever that attaches to the rear winch and nothing seems to happen.

Anyone have a copy of TM 9-837 I can borrow? Yes, I did google-fu the TM and can't find a PDF or real manual to buy.

And, I did loosen the bolts on the pump outlet, there is oil there, I let it run for a bit and tightened things back up, It is well below the level in the tank, so I think oil is at least that high in the system but no pumpie pump pump. So before I go draining the tank again, at least there is a drain valve now, I would like to find out if the governor goddie on the PTO has anything to do with a pump not turning.

First pic is the valve on the PTO that is mounted directly behind/in line with the hyd pump drive, 2nd is the valve usually attached to the rear winch controls and the last is where the wrecker body TM references TM 9-837 for adjustment procedures. ANd, BTW, the last sentence is the FIRST time I have ever seen a mention of the supply valve!

pto.jpgpto 1.jpgPTO 2.jpg
 

Guyfang

Moderator
Staff member
Moderator
17,091
25,071
113
Location
Burgkunstadt, Germany

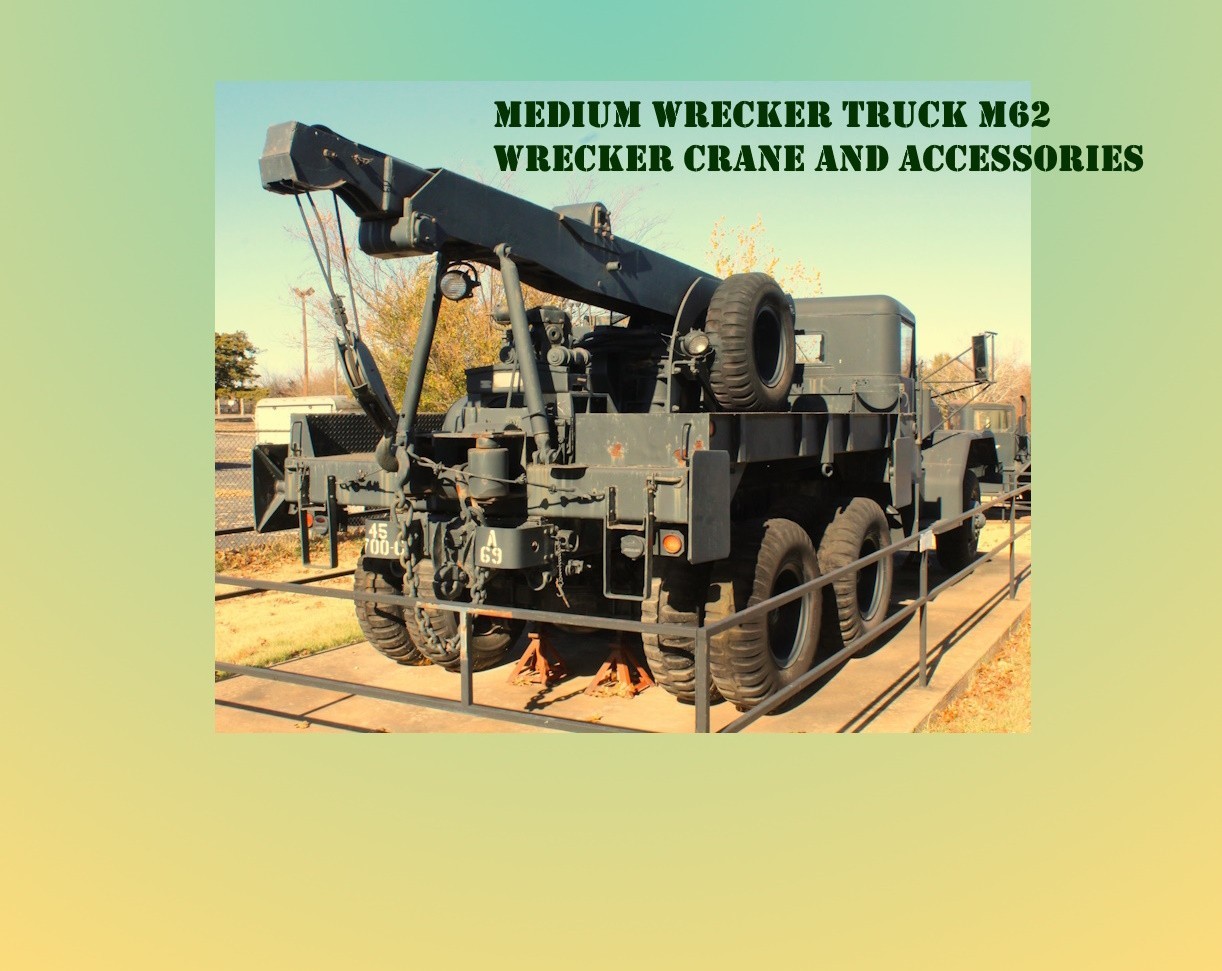
This M62 is on display at the 45th Infantry Division Museum in Oklahoma City. ( https://www.okngmuseum.com/ )

This place has a wrecker on display. See if you can send them a mail and ask for the TM 9-837, and any other thing you might need. Cant hurt.
 

chucky

Well-known member
Steel Soldiers Supporter
6,664
19,078
113
Location
TN .

This M62 is on display at the 45th Infantry Division Museum in Oklahoma City. ( https://www.okngmuseum.com/ )

This place has a wrecker on display. See if you can send them a mail and ask for the TM 9-837, and any other thing you might need. Cant hurt.
They ought to have you on display ! Some where !!!! Maybe a zoo !
 
Top
AdBlock Detected

We get it, advertisements are annoying!

Sure, ad-blocking software does a great job at blocking ads, but it also blocks useful features of our website like our supporting vendors. Their ads help keep Steel Soldiers going. Please consider disabling your ad blockers for the site. Thanks!

I've Disabled AdBlock
No Thanks