• Steel Soldiers now has a few new forums, read more about it at: New Munitions Forums!

  • Microsoft MSN, Live, Hotmail, Outlook email users may not be receiving emails. We are working to resolve this issue. Please add support@steelsoldiers.com to your trusted contacts.

tim292stro's M1009 (formerly math1960's)

tim292stro

Well-known member
2,118
41
48
Location
S.F. Bay Area/California
Thanks to the moderator Warthog for moving this thread to the "correct" forum at my request.

...Finally I replaced the entire fuel filter and added a hand "priming" pump because I was so used to having to bleed air from the fuel lines. As it turned out the priming pump worked great for the initial "bleed" but have never had to use it again, but by gosh I have it now if I need it, LOL...
Thanks for the suggestion - Wally had already done a spin-on modification when I bought the truck. I do know that I have a leak at the lift pump that I have yet to get at - but for the morning in question, the sheetmetal of the door was uncomfortably cold (very near freezing - frost on the hood was a dead giveaway it wasn't going to be a normal morning), and when I hit the glow switch for some afterglow pulses, the sound of cylinders hitting improved with every pulse. By about the fifth or sixth pulse it sounded like it was firing on all eight. I'm really happy that it started and ran that morning, it tells me that the rings and cylinder compression are probably in really good shape.

As the the fuel filter mod, I do plan on changing the Napa filter and base to a Racor marine filter unit (RAC 445MAM10) which does have a priming pump, but will add back the missing WIF sensor and give me a fuel filter heater. Since I do go up to the Sierra Nevada mountains a lot in the winter for "fun" I do actually see some very cold mornings (5,000 ft elevation or more with highs in the 25 to 30°F/-4 to -1°C range). I had a block heater and battery warmer in my Toyota before I got rid of it that helped on mornings that dipped to 10 to 15°F (-12 to -9.5°C).

Before I go up to the mountains this year, an El Niño year, I will need to make sure I have the cold weather modifications done: engine oil and transmission fluid pan heaters, fuel filter heater, fuel tank heater, circulating coolant heater, battery warmers - engine compartment noise/heat insulation. All of these removable for return-to-stock-ability. First automating the glow plugs again.

And this morning the transmission was noticeably slipping a bit, so I want to check the fluid levels tomorrow.
 
Last edited:

tim292stro

Well-known member
2,118
41
48
Location
S.F. Bay Area/California
So today I didn't get to completing the glow plug controller fix today but...

I found a leak (class 3) on the transmission cooler line where it meets the transmission with the engine running - I tightened the fitting to spec but it was still dripping at one drop to ground per 30 seconds. That seems pretty fast to me, so I'll be taking it to the mechanic to have the hard lines replaced. Tranny fluid was just a hair below the "Add" line so I added a pint, I'll watch the level until I can get a mechanic's time slot. I also found a neon green wet spot (class 2) at the front of the engine block while I was under there tracing it back up, it looks like it's time for a new water pump gasket. While the engine was running doing the transmission fluid level check, I noticed the bolt holding the lower portion of the power steering bracket was spinning loosely back and forth - tightened that to spec too. Not too bad considering roughly two months of use.

The 27MT starter has no motor bracket, just a bare bolt, and the cable for the starter motor is routed in a way I don't like (too close to the engine mounts and frame). I'm going to be pulling in the 24V restoration effort schedule after looking at some of the Roscommon mod stuff today. It's easier to address it all at once. I picked up a new engine temperature sensor for the glow controller, and do some basic continuity checks on wires - they look good, so I'm guessing the old card is just fried.

Sorry no pictures today, one hand on a flashlight, one on a tool.
 

emeralcove

Member
Steel Soldiers Supporter
134
15
18
Location
Battle Ground/WA
Sounds like good progress, lots of small things that really add up a more enjoyable driving experience are often more satisfying than a major item like rebuilding an engine, not to mention less costly!
 

tim292stro

Well-known member
2,118
41
48
Location
S.F. Bay Area/California
Instead of the Cibie's, I've purchased a set of AutoPal 200mm (H6054) assemblies to drop into the M1009 - also bought the parts for my own headlight harness. I built one for a friend who had a Subaru Impreza WRX "bug-eye", after I had done an HID kit for him things were behaving weird and I noticed the voltage at the bulbs under load was <9V :shock:. I'll be using the same design for that:


  • Ceramic headlight extension - for preventing melting when using halogen bulbs with OEM plastic connectors. Has both a male/female plug on a 12" cable.
  • Relays - the coils of the relays will replace the coils of the filaments in the OEM circuits. Simple!!
  • Relay sockets - makes this a bit easier to service should a relay die during my care of this truck
  • 24V bulbs - OSRAM TruckStar Pro, I'm moving all of the big chassis loads off the 12V system I can - the only one I can think of I can't move is the wiper motor and heater fan...
  • Fuse holders - yes, plural. In my bus and other trucks I've seen, as well as many Japanese cars and trucks I've worked on over the years I see a left and right fuse. This is a brilliant (ha, pun) idea, since fusing both together would leave you blind should THE fuse blow...

I'm also preparing to install Hella Micro DE fog lights I had for my Toyota that I never had the time to put in. The relays will bet set up so that the power goes to:
  • High beam relay controlled by high beam circuit - the high beam filament (ON), or the low beam relay (OFF)
    • Low beam relay controlled by low beam circuit - the fog light relay (ON), or the city light relay (OFF)
      • Fog light relay controlled by fog light switch - the fog light filament and low beam resistor (ON), or the low beam filament (OFF)
      • City light relay controlled by parking light circuit - the city light filament (ON), or dead-end/nothing (OFF)

Based on where I pull the fused power that feeds the daisy-chain of relays, this can be either 24V or 12V - the relay coils are 12V to match the OEM power. By daisy-chaining and wiring the relays this way, I ensure that high beam gets the highest priority, fog lights only run with low beams as required by law, when fog lights are on I can drop a resistor that dims the low beam filament outputs 60% of its rating to reduce back-reflection from the higher mounted headlights, and finally the city lights will only run with the parking lights. I'll be recycling the switch location for the manual glow plugs since it's there - but I'll be changing the switch to a military M-type on/off lever switch.

So the only connection to the truck will be the plug that goes into the factory light plug, and power from the batteries. Totally reversible [thumbzup]

I ordered a spare GP card from antennaclimber as well as new sockets for the rest of the lights (turn signals, markers, backup lights), and topped fluids in the truck - everything I could do to avoid going into a physical store this weekend... I plan to do the lighting wiring retrofit and socket/wire clean-up at the same time I do the 24V restoration - still digging through what in the wiring was abandoned, seems like a lot. I've found a few bad wires between the GP card socket and the end-points, and it looks like the factory card that was installed when the truck arrived is toast (thus the first antennaclimber card). Much more to do - and work is nuts. I wish I could step out to the parking garage and work on the truck when I have stalled moments at work, but at least I'm getting some time to answer questions and PMs :beer:
 
Last edited:

emeralcove

Member
Steel Soldiers Supporter
134
15
18
Location
Battle Ground/WA
I really like this idea, especially since this morning I had to get out of the truck and do the headlight "smack" on the passenger side to get it to turn on, kind of obvious there is an issue with good contact with the headlight plug to the lamp. Since I need to work on it anyway, I really appreciate your ideas that allows a nice upgrade instead of just a repair to restore 30 year technology. Don't stop sharing!!
 

tim292stro

Well-known member
2,118
41
48
Location
S.F. Bay Area/California
Almost all of the parts have arrived - just waiting on the ceramic extensions.

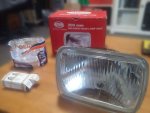
Auto-Pal HL-109 fixtures ($44 for the pair shipped), OSRAM TruckStar Pro H4 24V ($20 shipped from the UK), and a set of common 24V/10W halogen BA9 bulbs ($14 shipped). Bulbs are installed in the fixtures, and stored away again. When I install these, I'll do a before and after of the beam pattern in the dark.
lights.jpg

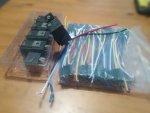
Relays and holders came also ($28 for 10x sets shipped).
relays_and_harnesses.jpg

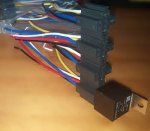
I got the type of harnesses that interlock:
relay_harness_interlocking.jpg

Which will keep the clusters neater and more uniform when installed.
relay_array.jpg

Here's the wiring diagram for one side of the headlight harness - the only difference between both sides is the length of the wire going back to the battery. :beer:
View attachment SS_Headlight-Harness_1-1.pdf
 
Last edited:

tim292stro

Well-known member
2,118
41
48
Location
S.F. Bay Area/California
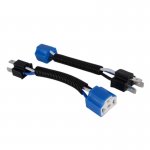
To avoid cutting into the factory harness (to retain reversibility), these are what I picked up for the headlight plug and socket:
ceramic_H4.jpg
I just cut these in the middle instead - the plug with the spades in it (black plug) plugs into the factory headlight plugs, and I wire the relays into the middle of this harness to supply separate power to each side. This will reduce the headlight circuit load from 110/130Watts (low/high respectively), down to 1.8/1.8Watts (low/high respectively). That drops the factory headlight fuse load by about 98.36/98.62% (low/high respectively), or 8.15/9.63Amps on the 30Amp headlight fuse...

To get the parking light power, I have to pull power from the front turn signal wiring - and to avoid cutting wires there, we can use a "fix-it solution" of a male 1157 plug:
1157_plug.jpg
These I wire up to a replacement bulb socket (Dorman 85830) which comes as a pig-tail. Again, I don't modify the original wiring to tap power, a simple twist and the bulb can be swapped back into the factory socket and returned to original - I just need to cast a boot for the socket to keep it dry (which I'll do with casting silicone). [thumbzup]
 

tim292stro

Well-known member
2,118
41
48
Location
S.F. Bay Area/California
Got some good rain today (~1" in one hour) - seems that despite the excessive silicone caulking job around the rear cap windows the whole thing leaks like a screen door... :shrugs:

There was a pool of water in the forward footwell that had run from the rear of the M1009 to the front (parked nose down-hill). I'm going to see if I can do anything to seal the cap and glass without pulling the cap and glass now - that's more work than I have good weather and parts for...
 

tim292stro

Well-known member
2,118
41
48
Location
S.F. Bay Area/California
Looking into the last of the current glow plug system state, I found that I have a thermal switch where there should be a thermal sensor for the GP controller. The civilian controllers used a glow plug inhibit (On/Off - and seems to be the bane of that system), while the CUCV controller has a variable resistance temperature sensor that lets the GP controller decide how much glow to give the engine. Better design - but it looks like the wrong part got installed in the past, that probably made the GP system do funny things.

Correct new AC Delco 213-52 coolant sensor is $25 from Walmart and comes with the new plug for the modern sensor (the two spade type sensor is long out of production).

Late add: the two sets of pigtails came this weekend too. So I'll be starting the construction of the Headlight Harness.
 

tim292stro

Well-known member
2,118
41
48
Location
S.F. Bay Area/California
Fluids changed, transmission cooler line replaced (leak stopped). Shifts better too now. [thumbzup] Only other leak I have to deal with is the fuel lift pump. I'll be doing this over Christmas break (parts in-hand). I'll also do a bit more documentation on the headlight harness construction as it moves along since I have all the parts. Two sick kids slowed me down this week.
 

Another Ahab

Well-known member
17,996
4,549
113
Location
Alexandria, VA
Fluids changed, transmission cooler line replaced (leak stopped). Shifts better too now. [thumbzup] Only other leak I have to deal with is the fuel lift pump. I'll be doing this over Christmas break (parts in-hand). I'll also do a bit more documentation on the headlight harness construction as it moves along since I have all the parts. Two sick kids slowed me down this week.
I'm sorry the kids are under the weather.

That's no fun for them, and I can remember:

- NO fun for Mom-and Dad.

The kids probably need their fluids changed; check the TM.
 

tim292stro

Well-known member
2,118
41
48
Location
S.F. Bay Area/California
Indeed, got a text last night:
Screenshot_2015-12-18-12-47-02.jpg
Urp definition. Now everyone at home is sick except me - thinking of getting a hotel, or sleeping in the truck...

Truck is running really solid since the hard line was replaced, nice not having a pool of tranny fluid under the truck in the morning.
 

tim292stro

Well-known member
2,118
41
48
Location
S.F. Bay Area/California
Also bit the bullet and forked over the cash ($$:shock:$$) for the whole truck's weather seals...
And they arrived just in time for Christmas. :jumpin: Remaining of the weather seal stuff to buy, I'm going to get the door handle gaskets (driver's/passenger's doors), the door window runners and vent glass seals, and the kick panel fresh air intake gaskets. Once I have those I'll do a free-for all sealing up this sucker. [thumbzup] This'll include digging into the cowl drainage situation that is flooding my floorboards.
1224151234.jpg

Speaking of which, Merry Christmas all!!
 

tim292stro

Well-known member
2,118
41
48
Location
S.F. Bay Area/California
Bought few nick-knacks, door pin bushings, new striker bolts and bushings, and some lock knob-pulls. Tired of chewing up my fingers on locking the door on the way out.

I priced out the balance of the gaskets and window runner parts ($$:shock:$$). May have to split that buy in two.

All of the headlight harness parts are here, I'll be building and documenting the construction of them this New Years weekend.

She has been starting well when cold in the mornings and running like a champ!!
 

latvius

Member
64
13
8
Location
Ariton Alabama
When you do the door pin bushings can you show how you do it? I have bought some bushings as well but I don't see an easy way to change them nor have I found any youtube videos with my style hinges. I am trying to do it without taking the door off the vehicle as it's just me but I am out of ideas..

Bought few nick-knacks, door pin bushings, new striker bolts and bushings, and some lock knob-pulls. Tired of chewing up my fingers on locking the door on the way out.

I priced out the balance of the gaskets and window runner parts ($$:shock:$$). May have to split that buy in two.

All of the headlight harness parts are here, I'll be building and documenting the construction of them this New Years weekend.

She has been starting well when cold in the mornings and running like a champ!!
 

emeralcove

Member
Steel Soldiers Supporter
134
15
18
Location
Battle Ground/WA
I think the reason there are no instructions with the pin and bushing kit is the simple fact that doing it right is not easy and a lot of potential customers would not purchase the kit to begin with. Not only should you remove the door but the front fender as well. it has been several years since I have done a door pin replacement but after trying so many shortcuts to make it a quick and easy job I realized there is nothing quick and easy about it. The original hinge used plastic bushings that normally are long gone which makes it even harder to understand how to replace them. Removing the hinge from the door completely is best as the original pin needs to be cut to get it out. I seem to remember the hole for the bushing needs to be enlarged as the brass/bronze replacement requires a larger diameter hole to be driven into. The serrated sides dig into the steel so the bushing remains stationary and the bearing surface is between the hinge pin and the I.D. of the bushing, the bushing I.D. will require reaming after installation as it tends to be reduced by the interference fit in the steel part of the hinge. I also recall the pin is also too long and needs to be trimmed to fit. I did not have a ream to size the bushing but found using a drill bit worked well enough to put it together again, not ideal but it works. The use of white grease works very well on hinges The hinges can now be reattached to the door and the door mounted on the vehicle and aligned to the opening after which the fender is aligned to the door, if this being done on a 4 door truck align the back door first and work forward to the frond door and then the fender. Trying to short cut this process does not save time and very often creates years of frustration due to the poor seal and fit of the doors and appearance of the gaps between panels. If anyone has time saving tips I would love to hear them but when it comes to doors/fenders on these square body GM trucks taking the time to just do it right seems to be the fastest way to accomplish the repair and put the ordeal behind you. The good news is the after-market hinge pin and bushing kit is quite reasonable cost wise. The next time I do a GM door, I will do them one at a time because it spreads out the cost of seals, window tracks, misc. parts and labor so there is a far better chance of finishing the entire door project in a weekend with no parts sitting around "waiting" to be used. I myself is way too guilty of this of this practice, LOL
Sorry it sounds like a pain to replace hinge bushings, but the good news is the fact it is worth the effort. Taking the time to correct all the problems with the doors is something that is satisfying every time you open and close the door. Think about how often the operation of an automotive door is used to illustrate the workmanship of high end German cars. Accomplishing similar results on a CUCV really adds to the mystique of their construction; The truth is they are nothing more than a GM truck, but taking a bit of extra care in repairs makes it appear to be so much more, Good luck with your project. I am an old guy and tend to ramble, LOL
 

tim292stro

Well-known member
2,118
41
48
Location
S.F. Bay Area/California
Indeed, what emeralcove said - it's not going to be easy, but it's worth it to get it right. Since this truck is a daily driver, I'm going through the things that bother me the most as I repair wear and service items.


  • Starts with getting it road legal (lights/wipers working, registration, tires, locks, idiot lights, etc...)
  • Run it.
  • Then safer to drive (add/change mirrors)
  • Run it.
  • Then weather tight (weather seals/gaskets, window runners) <-- as part of this it occurred to me that making certain the doors were closing properly will extend the life of the door seals.
  • Run it.
  • Start fixing/adding convenience systems and infrastructure (Glow plug controller, return to 24V, install headlight harness, solargizer, rear battery for CarPuter, repair/replace aged wire harness portions)
  • Run it.
  • Start making it pretty (paint and interior panels, repair seats, replace switches that are starting to show wear, replace gauges that are not 100%)
  • Run it.
  • Add toys and make it quiet (carputer, fog lights, tool-kit and jack, SOUND TREATMENT [this one takes a lot of planning to get right])
  • Run it.
  • Keep it running
  • Run it.

On the topic of Germans getting the doors right, you will only be able appreciate the gentle solid "thud" a car door makes when it has proper sound dampening - and it's most obvious it's right when the door closes. On my Toyota, I had at one time only treated one door of the two (time constraint), and quite literally you could hear the difference between inserting the key in the door - the treated door, you could hear the individual pins clicking into the key right from where the key was entering the lock, the untreated door every time the key hit another pin the whole door would echo.

I am also guilty of collecting parts for future stages of projects. Trouble for me is that I get to work on projects in bursts only, and some project time bursts are longer/shorter than others - so I've given up forecasting which chunk of project I get to do on given day. I also make errors in estimating part lead times so I'll get a part well before I need it. My wife tolerates my projects, probably only because I show forward progress on them, but she doesn't get the warm and cozies about my piles of $tuff...
 
Last edited:
Top
AdBlock Detected

We get it, advertisements are annoying!

Sure, ad-blocking software does a great job at blocking ads, but it also blocks useful features of our website like our supporting vendors. Their ads help keep Steel Soldiers going. Please consider disabling your ad blockers for the site. Thanks!

I've Disabled AdBlock
No Thanks