-
Steel Soldiers now has a few new forums, read more about it at: New Munitions Forums!
Want to put A/C in a M925A1... anyone got pictures of their install?
- Thread starter scootertrs
- Start date

More options
Who Replied?So today I was buttoning up the truck ready to head to the desert and I went to install the Drivers Side Rubber Inner Fender Well Rock Guard deal and there was a small conflict w/ it hitting the A/C compressor. I pulled the brackets that the Fender Well slips into and put in 4- 1" long spacers to give me some room. It worked but now one of the 2 brackets for the Fender Well just barely touches the steering shaft. I went and got some 3/4" 1/2" ands 1/8" spacers so I can experiment and shorten the spacers up down from 1" first to 3/4" then 5/8" then 1/2" if necessary. The hood closed w/ 1" spacers, a minor deal but I wanted to let others know about it so heads up... I will have some pics maybe next week. I want to hit the dirt roads! This will entail removing the rock guad for the steering box. I like it better w/o that thing anyways because there is a grease zert in there that gets neglected. I am sure it could be modified w/o much issue to go back on as well.
Last edited:
goldneagle
Well-known member
- 4,510
- 1,007
- 113
- Location
- Slidell, LA
Pictures would be nice....So today I was buttoning up the truck ready to head to the desert and I went to install the Drivers Side Rubber Inner Fender Well Rock Guard deal and there was a small conflict w/ it hitting the A/C compressor. I pulled the brackets that the Fender Well slips into and put in 4- 1" long spacers to give me some room. It worked but now one of the 2 brackets for the Fender Well just barely touches the steering shaft. I went and got some 3/4" 1/2" ands 1/8" spacers so I can experiment and shorten the spacers up down from 1" first to 3/4" then 5/8" then 1/2" if necessary. The hood closed w/ 1" spacers, a minor deal but I wanted to let others know about it so heads up... I will have some pics maybe next week. I want to hit the dirt roads! This will entail removing the rock guad for the steering box. I like it better w/o that thing anyways because there is a grease zert in there that gets neglected. I am sure it could be modified w/o much issue to go back on as well.
Sure, when I get some time I will pull the 1" spacers and shorten them up as much as possible and let everyone know what I did. I am betting a 3/4" spacer will do it... I also ground off the THICK PAINT on the inner rubber fender well tangs and they go in and come out a lot easier now.Pictures would be nice....
LONDOGGY
New member
- 10
- 0
- 1
- Location
- HUNTINGTON BEACH CALIFORNIA
Look up the member Artisan. He has the knowledge and has AC on his M925A1.
Londoggy
M934A2
92647
Londoggy
M934A2
92647
- 364
- 16
- 18
- Location
- Orlando, Fl
Probably not much help, but I just finished installing an A/C unit in my deuce. The unit I installed was designed for the newer military FMTV unit. I am not as far south as you, I'm in Orlando, wouldn't be without it!
My truck gets HOT inside it, and I always have to drive home INTO the sun living on the west coast. I get COOKED. I want a MASSIVE unit, as big as my compressor will push to just bombard me w/ cooooolllllllll airrrrrrrrrrrrrrrrrrrrrrrrr..............................Ahhhhhhhhhhhhhhhhhhhhhhhhhhhhhhhh
LONDOGGY
New member
- 10
- 0
- 1
- Location
- HUNTINGTON BEACH CALIFORNIA
Artisan, I am less than an hour away from you here in Huntington Beach. Let me know what you come up with. I want it to be so cold in mine that it can freeze meat.
Thanks
Londoggy
Thanks
Londoggy
madcroc1
New member
- 85
- 0
- 0
- Location
- deerfield beach, FL
Air Compressor Bracket
I am interested in Air condition my new M923A2 and I found this company that builds air compressor bracket for Red Dot. Kenway Engineering. I have attached the Instructions. You can see that this bracket is for M939 series trucks with Cummins 6CTA8.3 engine. It should work on M925A2 and M923A2 trucks with that engine. I spoke with Ken who was very knowledgeable and friendly on the phone. The list price just for the air compressor bracket is $1400 although he says that a discounted price for that bracket can be had but he didn't have the authority to give me the discount yet. If the discount isnt significant I think I'll make my own. I'll let you know
I am interested in Air condition my new M923A2 and I found this company that builds air compressor bracket for Red Dot. Kenway Engineering. I have attached the Instructions. You can see that this bracket is for M939 series trucks with Cummins 6CTA8.3 engine. It should work on M925A2 and M923A2 trucks with that engine. I spoke with Ken who was very knowledgeable and friendly on the phone. The list price just for the air compressor bracket is $1400 although he says that a discounted price for that bracket can be had but he didn't have the authority to give me the discount yet. If the discount isnt significant I think I'll make my own. I'll let you know
Attachments
-
426 KB Views: 149
LONDOGGY
New member
- 10
- 0
- 1
- Location
- HUNTINGTON BEACH CALIFORNIA
Let me know and keep me posted. I need one for my Cummins in my M934A2. Keep up the great work.
Londoggy
M934A2
92647
Londoggy
M934A2
92647
madcroc1
New member
- 85
- 0
- 0
- Location
- deerfield beach, FL
I have a M923A2. I am planning on putting in Air Conditioning. I Figured I would explain my plan and as I work on it and I will post pictures. I'm a little surprised no one had thought about adding the evaporator coil to the existing heater system. This should make the install simple and there will not be any ugly additional interior evaporator and fan box added inside the cab.
Step 1 - Create a new bracket holding top of alternator adding bracket for SD7 24V A/C Compressor. Adding a new back pulley and moving the serpentine belt tentioner. Install Compressor. Add larger serpentine belt.
Step 2 - Place Condenser in front of the existing radiator next to the power steering fluid cooler. Add Dryer Tank.
Step 3 - I am planning to rebuild the heater box that exists now under the hood. I am going to enlarge it and add the evaporator coil and air filter. This way there is noting needed to be done inside the cab except a dirverter flap lever and a compressor toggle switch..
Step 4 - I am planning on replacing the defroster direction tabs with a new metal dirverter flap to deflect the air backward toward the driver and passengers This means that the defrost lever will need to be pulled to direct the air up and out. If the lever is in, the cool air will go down toward my feet.
Step 5 - Add compressor toggle switch, hoses, charging and finishing touches..
Last edited:
Farmallmilitary
Member
- 238
- 0
- 16
- Location
- Las cruces nm
Yesterday I recieved the bracket from artisan and it was just as described. I got the hardware today and I put it on. The only thing I had to change was the length of the return line for the power steering. I was going to take pictures but it was dark when I finished. Even revving it up to 2000 rpm and was still good. Now I can start electrical and hooking up the a/c lines. Now I am one step closer to CCCCCCCCCCCOOOOOOOOOOOOLLLLLLLLLLLLLLLDDDDDDDDDDDDDD!!!!!!!!!! Do you think I used enough letters? I think 52 was enough!

I have extended both my power steering pump lines. I took the pressure line and had it duplicated but extended 3" . I bought a 3' section of 1/2" ID return hose I have yet to replace as well. I also pulled the 1" spacers on the rubber fender well brackets I added, the jury is still out on my final for that.
Here is a pic of the power steering pressure line that is 3" longer then stock. I also extended the 1/2" ID return hose, I did not measure its additional length, I just bought a 3' section and connected it at the bottom w/ 2 clamps where they like to leak and laid it parallel to the pressure hose and telephone tied it all up. WAY better IMO clearancing the compressor. 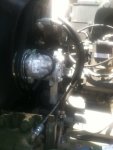 I removed the 1" spacers and have none at the rear and 1=3/8" spacer at the front of which I might even now be able to remove it (the spacers I spoke of so the rubber inner fender well will clearance the compressor. )
 I removed the 1" spacers and have none at the rear and 1=3/8" spacer at the front of which I might even now be able to remove it (the spacers I spoke of so the rubber inner fender well will clearance the compressor. )
madcroc1
New member
- 85
- 0
- 0
- Location
- deerfield beach, FL
Step 1 Completed - Compressor Bracket installed
Well after a serious think, I have decided to buy and install the Kenway Engineering RED DOT AC compressor bracket as opposed to reinventing the wheel on this. Here are some pictures of the new bracket going in. You can see that the kit called for a spacer to move the cooling fan forward. As you can see I had to hold the H-Balancer with a ratchet strap to loosen remove and and tighten down the new ones. The copper tube from the compressor had to be bend a little to fit the support arm, no problem though. The last picture is the defrost deflector that I am going to modify. All look goods, so far... Remember the goal is to put in an A/C unit without installing a huge evaporator BOX and retaining as much of the original look as possible..
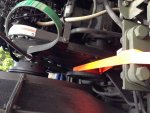
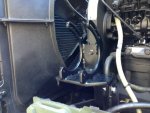
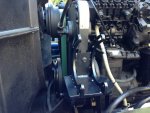
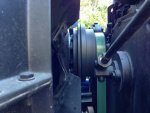
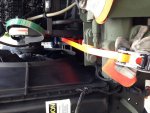
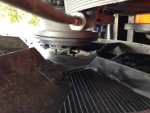
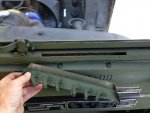
Well after a serious think, I have decided to buy and install the Kenway Engineering RED DOT AC compressor bracket as opposed to reinventing the wheel on this. Here are some pictures of the new bracket going in. You can see that the kit called for a spacer to move the cooling fan forward. As you can see I had to hold the H-Balancer with a ratchet strap to loosen remove and and tighten down the new ones. The copper tube from the compressor had to be bend a little to fit the support arm, no problem though. The last picture is the defrost deflector that I am going to modify. All look goods, so far... Remember the goal is to put in an A/C unit without installing a huge evaporator BOX and retaining as much of the original look as possible..


SsgtFoster
New member
- 8
- 0
- 1
- Location
- Central Illinois
Very interested in this for a 923. I am subscribed and will be along for the ride.
- 110,897members
- 165,315threads
- 2,326,256posts
- 1,446online users

