• Steel Soldiers now has a few new forums, read more about it at: New Munitions Forums!

  • Microsoft MSN, Live, Hotmail, Outlook email users may not be receiving emails. We are working to resolve this issue. Please add support@steelsoldiers.com to your trusted contacts.

What did you do to your deuce this week?

Valence

Well-known member
Steel Soldiers Supporter
2,112
555
113
Location
Davis County, UT
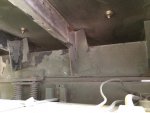
Not all that interesting of an update, but I would like to say, with the tool box being so large, it was very easy to reach the nuts on the bottom side of the bed. They were outside the frame rails, above the back side of the fuel tank and pioneer tool rack.

Used 1/2" grade 8 bolts (1 1/2" long) . Didn't even need a "Soldier B", as a couple strips of masking tape in an 'X' over the bolt head made the wrench very snug and the foot of the box stopped it from turning. But one does have to climb back inside and move the wrench for each bolt though, unless you happen to have four 3/4" wrenches ;)
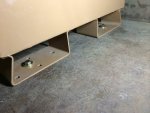
ImageUploadedByTapatalk1401335451.797416.jpgImageUploadedByTapatalk1401335627.296553.jpg

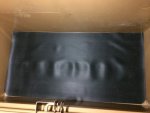
Also threw in some cheap rubber mat from Lowes (cut to size) because I could.
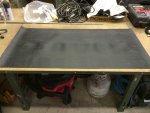
ImageUploadedByTapatalk1401335669.352844.jpgImageUploadedByTapatalk1401335675.679061.jpg
 
Last edited:

ralph3162

New member
164
2
0
Location
Pleasanton / Texas
Well lets see. I installed the VIC-1 intercom system and got it all working. Installed the Ipod into the VIC-1 system so now I have intercom and music. Installed all the new door, window, and vent rubbers so now my cab is sealed. Installed the heater diverter so now I have heater and defroster working. Installed new window frames. Installed new West Coast Mirror brackets. installed new window channel kits. Tomorrow I will start working on the front end new bearings, wheel cylinders, brakes, seals, brake lines, and zipper boots. After that I will take all my new stencils and put all the outer labeling on the truck.
 

whatadeuce

Active member
Steel Soldiers Supporter
959
38
28
Location
Loxahatchee, Florida
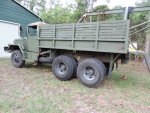
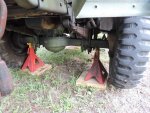
Today I commenced brake adjustment procedures for my M35A2, I made platforms for my jack stands using 2X8's screwed side by side, so that the jack stands don't sink in the dirt. Using a 12 ton bottle jack for the front axle was rather straight forward, but attempting the rear axles jacked up is more effortful because I ain't got room to maneuver the hydraulic bottle jack. First I tried the 20 ton but it takes forever, then I used the 12 ton but it is really stressed but it moves faster, so tomorrow I shall continue til all wheels are off the ground. tonight I read how to adjust properly...
 

mhatfield

New member
20
0
0
Location
cabool missourri
I did what most Deuce owners seem to spend insane amounts of time , energy, and money doing. I worked on it. ALOT.
pulled the fuel sending unit for a quick trip to the carb boilout can to de-crud it
all new oil and filters
all new fuel filters
flushed lines
drain and changed all axle diffs, tranny, and tc gear oil
pressure wash and drip check, thereby confirming that I did not in fact actually fix one :)
 

mjcdetroit

Member
57
0
6
Location
Detroit
uploadfromtaptalk1401510448144.jpg

Insane amount of time, you ask. I spent an insane amount of time getting a stuck & stripped male pipe plug at the rear of the block out a few weeks ago.
 
Last edited:

whatadeuce

Active member
Steel Soldiers Supporter
959
38
28
Location
Loxahatchee, Florida
With ruined threads, I am recalling the term HELI-COIL where the original thread is drilled out and re taped to a larger size and then this heli-coil is like a bushing where once installed you can use the original size fastener for reassembly.
 

m715mike

Well-known member
2,797
3,823
113
Location
Montgomery, Texas
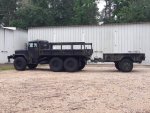
I made my Deuce very happy this week. This morning was my first opportunity to hitch-up the newly acquired M105A2. She just looked happy with the trailer back there.

IMG_0441.jpg

Now it's time for a game of Follow the Leader!


Oh, and I also learned that a M35A2 with/winch and a M105A2 trailer will fit in a 12' by 35' storage unit (albeit a tight fit). It's a dang good thing, because I would not have a happy wife if I told her I needed another storage unit. :grin:
IMG_0444.jpg
 

RobM36A2

Member
302
9
18
Location
The Netherlands
I was planning to take my M36a2 out for a ride, to a car meet.
So I called the guy where I store it.. He was not at home, so asked if he had the key in the secret hiding place outside..
Also a negative response on that.. So no driving the Deuce, took my M1028 instead.
 

whatadeuce

Active member
Steel Soldiers Supporter
959
38
28
Location
Loxahatchee, Florida
WEll I finally got all the wheels off the ground, so I can start my brake adjustment. The rear axles are so tight I cant move them by hand, I shall check my emergency brake adjustment also...
 

whatadeuce

Active member
Steel Soldiers Supporter
959
38
28
Location
Loxahatchee, Florida
Toady I read the instruction for adjusting the M35A2 emergency brake , in TM9-2320-209-3-2, beginning on Page 13-43. I began by adjusting the cab brake handle all the way loose, then attempting to loosen the 11/16 shoe-adjustment jam nut. Wow was it tight! Turning a box end wrench was to difficult, so I finally assembled my 3/8 drive flex head long handled ratchet with a 11/16 deep socket enabling me to loosen the jam nut with less effort. I am now up to loosening the 5/8 shoe adjusting adjusting nut which determines the distance between the brake shoe and drum which calls for .015" clearance. Right now the clearance is too tight and the adjusting nut , which I cant see but can only feel, is frozen! So I am applying that miracle anti seize mixture of 50% Acetone and 50% transmission fluid and I hope to adjust the .015"shoe clearance tomorrow.
 

Valence

Well-known member
Steel Soldiers Supporter
2,112
555
113
Location
Davis County, UT
How well does this work on bumpy roads?
I'd like to report that the springer seat shock upgrade is AWESOME! I seriously only feel the bumps from the rest of the truck moving or my seat slapping my back. I have still bottomed my seat out but it's NOTHING like before. I highly recommend it.

I do sit slightly lower than I did before but I'm quickly getting used to it.

Now I just need a re-padded springer seat lol :D

Bravo ThoseMilitaryGuys. Bravo!
 
Last edited:

212sparky

Well-known member
1,822
38
48
Location
Monroe/ Ohio
I'd like to report that the springer seat shock upgrade is AWESOME! I seriously only feel the bumps from the rest of the truck moving or my back of my seat slapping my back. I have still bottomed my seat out but it's NOTHING like before. I highly recommend it.

I do sit slightly lower than I did before but I'm quickly getting used to it.

Now I just need a re-padded springer seat lol :D

Bravo ThoseMilitaryGuys. Bravo!
What shock did you use? I have 2 that need replaced
 

nnero

Member
30
1
6
Location
New York
Put down the troop seats, loaded the bed with coolers full of frosty beverages and food, and drove some of our family members through the pasture to our cabin for a picnic. The dog sat up front.
 

FloridaAKM

Well-known member
2,699
392
83
Location
Gainesville, Florida
I was checking out the batteries, since some AF mechanic made a battery holder out of a piece of pallet wood & found a loose (+) wire going to the truck. The batteries that came with it were good, but they were swapped with two Interstate batteries of a larger CCA capacity. Anyway, during the changeover, after finding the connector that bridges the two batteries together had one lug burned half off making it a spade connector, it had to be replaced, probably the same AF mechanic put two washers on either side of the burned lug & called it all good. This chaps me so I replaced the burned connector with a spare cable of equal wire size & fabbed up a fiberglass hold down plate to stabilize the batteries. Now it is all good to good for today!
 

whatadeuce

Active member
Steel Soldiers Supporter
959
38
28
Location
Loxahatchee, Florida
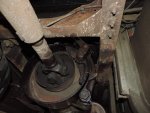
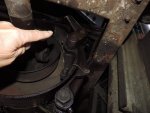
Today I continued the M35A2 emergency brake adjustment work . In spite of applications of that 50% tranny-acetone mix, the 5/8 adjusting nut for the outboard shoe wont move. I even used a 5/8 flare nut wrench (SNAP-ON) but to no avail. Out with the oxy-acetylene! I heated the nut and the stationary plate into which it threads, nice and red. After cooling period, I succeeded in adjusting clockwise so as to increase the shoe to drum clearance. IN the pictures you can see how I put my jack stands on a 2" thick base plate so that the stands wont sink. In The picture of the emergency brake assembly I am pointing to where the outer shoe adjusting nut is.ts tight work.To be continued...
 

Attachments

Top
AdBlock Detected

We get it, advertisements are annoying!

Sure, ad-blocking software does a great job at blocking ads, but it also blocks useful features of our website like our supporting vendors. Their ads help keep Steel Soldiers going. Please consider disabling your ad blockers for the site. Thanks!

I've Disabled AdBlock
No Thanks