• Steel Soldiers now has a few new forums, read more about it at: New Munitions Forums!

  • Microsoft MSN, Live, Hotmail, Outlook email users may not be receiving emails. We are working to resolve this issue. Please add support@steelsoldiers.com to your trusted contacts.

What have you done to your CUCV today/lately - Part 2

Baer

Member
66
1
6
Location
Weatherford, Tx
Installed and adjusted fan belts, now the Gen 2 light no longer flickers on and off (note to self replace Gen 1 light that never goes on). Also I must get my cig lighter housing out of the box and installed.
 

unaffiliated

Member
394
11
18
Location
Coosa, Georgia
I have finally gotten back on the engine project started a little over a year ago. I was going to join procrastinators anonymous, but I figure I will wait till later.

You may recall I had to pull the engine to drill out three sheared off bolts where the trans bolts to the engine. I did that a long time ago and the engine has been sitting in the driveway in front of the truck for quite some time.

Since the engine was already out I decided to do some other needed repairs. Last week, I replaced the rear main seal, oil pan gasket, harmonic balancer and front crank seal. I tried to get the top portion of the rear main seal out as described in the CUCV Wiki but it wasn't working. I loosened all the main bearings and let the crank drop down a hair and fished it out finally. What a pain that was. I am glad the engine was out of the truck hanging on the hoist. It made that job 1000 times easier. I also installed a block heater that I got a year or so ago from a fellow SS member. I replaced the engine mounts too. I got a set from Rock Auto. They were ordered per application but were incorrect for the truck. The bolt holes would not line up to the cross member. I ground out the rivets on the old and new brackets and installed the rubber inserts from the new mounts into my original brackets. They still weren't exactly right but I managed to make them work.

The other day, I set the engine in the hole and with a lot of cursing and prying, managed to get it lined up to the trans. Today I started getting everything reconnected. I have been able to figure most of the stuff out but was having trouble with some of the wiring. It started raining so I gave up. Like I said, I took the engine out a long time ago so it is no longer fresh in my mind. I spent several hours on SS and in the TM's today researching the wiring and I think I have it figured out on paper. I just need to have a rain free day to try and hook the rest up.

I hope to get it running in the next few days. I need to go pick up a couple cars on my trailer so it needs to puff some smoke soon. I will let you know how it goes.
 
Last edited:

Keith_J

Well-known member
3,657
1,319
113
Location
Schertz TX
Fixed the idle speed issue on the 1031 SECM. The governor linkage point was acting as the idle speed stop, crashing out on the injector pump housing and causing a 900+ RPM idle. I covered the intake manifold with tape, then using a Dremel with abrasive wheel, pared down the offending corner of metal. Now it idles at 630 RPM, close enough.
 

Keith_J

Well-known member
3,657
1,319
113
Location
Schertz TX
Today I tackled the M1031 SECM governor issue. It never worked quite right from when it was recovered at Ft. McCoy. Instead of brute force troubleshooting, I went with the basics. It is a 12 volt powered device so it needs 12 volts, only thing was it was only getting barely 10 volts and sometimes as low as 8. Well, there's the problem!!!

I traced down the circuit diagram and found the fuse in the control panel to have about 3/4 volt of voltage drop. Not enough to matter but every bit counts. I cleaned it up, eliminating measurable loss. But still a problem...it is getting 14.4 volts at the fuse block...wait, is that ANOTHER inline fuse? Whiskey tango foxtrot? Well, that is where it needs to be but could it also be bad? Sure enough, it was the culprit. Measured over 1 ohm of resistance and had a solder blob leaking from one end :cookoo:. Not having antique fuses, it was desoldered on the bad end, then put back together for a temp fix.

Like magic, the governor works like a CHARM!!!!! Still need a fine tune under load but it is all functional.

Needless to say, that meant the truck was running a bit and so I noticed an oil leak, from the oil cooler fittings on the left side by the radiator and AOAP sampling port. Son of a gun, hydraulic fittings... I got wrenches and discovered it was a bum o-ring, twisted from day one install. No problem, I have a complete set of Viton rings as this is the contact truck. Got that fixed easily. This troubled me as I never saw a leak at idle but noticed excessive oil consumption. I have been coating Texas in 15W40 for almost two years. Nevermore...

Still need to test the alternator outputs as they seem weak with my 24 volt air conditioning upgrade. The motor driving compressor is rated at 70 amps doing 3000 RPM, I am getting 2950 RPM on it so it isn't overloaded too much. Voltmeter barely stays in the green when doing 55 MPH so I know they are NOT putting out 100 amps. Probably aging rectifiers.
 

irishvin

New member
183
0
0
Location
Wappingers Falls, NY
today i put in the upper king pins in my m1008a1 also did a oil change, fuel filter. broke down the tries and sealed the bead because there was a slow leak from the bead. then painted the rims black and were all good now ! took all day and was fun lol never get tried of this old truck
 

Mainsail

Well-known member
Steel Soldiers Supporter
1,487
1,640
113
Location
Puget Sound, WA
After the new glow plugs it was starting great...for TWO days. Suddenly it wouldn't start at all. Lots of unburned diesel blowing out the pipes too. Today I got out the meter and opened the troubleshooting guide....again. I pulled the GP card out and put the meter on the wires- everything checked out. I put the card back in, all the while wondering if it really just needed to be reset, and it fired up fast on the first try.
 

RobM36A2

Member
302
9
18
Location
The Netherlands
This week:
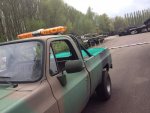
Mounted a lightbar, just to be different from the rest.
Set out on a trip to get 4 near new tires with wheels, for my M36. And succeeded.
Hooked up the power to the lightbar and siren, so now I can really piss off the neighbours and any other idiot on the road. :tank:

Reomie.jpg
 

C15TA

Member
67
1
8
Location
Castleton ON
Hoi Rob
I recognized Reomie in your photo. What a great spot to make your wallet lighter. My buddy Dirk takes me there every time I visit him in Noord Holland.
mvg,
Barry
 

Camkillers

Member
68
1
6
Location
California
Replaced my glow plug card with the BMI and I love it had to do the glow plug temp sensor as my glow plugs wouldn't stop circulating .. To find out my old glow plug card still works but glad I replaced previous owner repaired it and it's a little sketch but hey I gotta back up . Also did a snorkel ImageUploadedByTapatalk1397307056.263748.jpg ImageUploadedByTapatalk1397306750.751554.jpgImageUploadedByTapatalk1397306761.191833.jpgImageUploadedByTapatalk1397306771.330362.jpgImageUploadedByTapatalk1397306785.302389.jpg
 

Shackelford R

Member
139
1
18
Location
Lima/Ohio
Yesterday I went to auto craft center and did oil change and checked all fluids all good everybody had to see the CUCV and swapped a lot of stories from the 80's and Iraq. It was cool to here the memories everyone had of these trucks.

And today I did my hood release cable, and adjusted the hood and removed the horn diode. Getting her done.
 

Subdood

New member
12
0
0
Location
Anniston, AL
Fixed the votlmeter. Thanks to the many threads I searched and pieced together the final solution. It has been without one for a long time. New relay, new (to me) voltmeter, new IGN 20a fuse and we have a working voltmeter. As an added benefit, my wait light and water in fuel lights started working again. I had looked at the fuse before, and it LOOKS fine. But ohmmeters don't lie! Knew better, got sloppy. Lesson (re)learned.
 
Last edited:

Mainsail

Well-known member
Steel Soldiers Supporter
1,487
1,640
113
Location
Puget Sound, WA
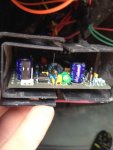
The glow plug system is still causing grief. I needed to move the truck out from in front of the garage to get the Liberty out and it fired up on the GP's second cycle- no problem. I left it in the neighbor's driveway (currently vacant) for about 15 minutes and tried to restart it but it wasn't happening. I figured since re-seating the module helped last time I'd try it again but I ended up breaking one of the capacitor legs, so now it really doesn't want to work.

Time for Plan B....
I put a jumpered the top post of the GP relay (now 12V after doing the bypass) to the small post and cycled it a few times, then while it was still jumpered I twisted the key and it fired up straight away. I got it moved out of the neighbor's driveway and parked. I ordered a new module (or card, whatever) from antennaclimber so I'll be driving the Liberty or the Grand Cherokee until it arrives.
 

Keith_J

Well-known member
3,657
1,319
113
Location
Schertz TX
Got the starter fixed. Broken nose cone due to MISSING parts, namely 16 and 15 in the -34P. These keep the starter gear from going off the shaft, they were GONE. Meaning the starter gear was crashing out on the nose cone of the starter, eventually it broke. Causing starter run-on and much concern as I disconnected the batteries. You see, the solenoid contactor goes over-center, preventing it from retracting under spring force since the spring force goes to nothing when the mechanism toggles over. All because of TWO missing parts.

Now, ain't no body has time for these parts, right? So I fashioned the circlip from 1/16" ER70S2 GTAW filler wire, using a 3/8" extension as the mandrel and then heat treating it from bright red under flowing water. This made it nearly knife hard, plenty tough and springy. The washer was just a grinder turn-down.

The nose cone was more of a challenge. 4043 filler rod and 65% electrode negative at 180 amperes and 130 Hz were the essentials on the GTAW machine. This offered adequate penetration and good cleaning action from the EP phase, the small part was a plus. Still had a few pores and lots of pepper flakes. Lots of popping too.

The 4043 rod is a decent match for the die casting alloy, it is just far weaker than base metal so generous weld metal reinforcement was left inside and out. Yes, INSIDE welding, not for the faint of heart. I had to use some old 3/32" stubby electrodes with the stubby back cap for that. Even then, there were areas that I fudged off-angle and while they looked like hammered manure, they were sound. I drilled out all major pores and reflashed them.
 

TechnoWeenie

Well-known member
Steel Soldiers Supporter
1,653
1,669
113
Location
Nova Laboratories, WA
The glow plug system is still causing grief. I needed to move the truck out from in front of the garage to get the Liberty out and it fired up on the GP's second cycle- no problem. I left it in the neighbor's driveway (currently vacant) for about 15 minutes and tried to restart it but it wasn't happening. I figured since re-seating the module helped last time I'd try it again but I ended up breaking one of the capacitor legs, so now it really doesn't want to work.

Time for Plan B....
I put a jumpered the top post of the GP relay (now 12V after doing the bypass) to the small post and cycled it a few times, then while it was still jumpered I twisted the key and it fired up straight away. I got it moved out of the neighbor's driveway and parked. I ordered a new module (or card, whatever) from antennaclimber so I'll be driving the Liberty or the Grand Cherokee until it arrives.
remove the card and add a momentary switch for the glow plugs.
 
Top
AdBlock Detected

We get it, advertisements are annoying!

Sure, ad-blocking software does a great job at blocking ads, but it also blocks useful features of our website like our supporting vendors. Their ads help keep Steel Soldiers going. Please consider disabling your ad blockers for the site. Thanks!

I've Disabled AdBlock
No Thanks