• Steel Soldiers now has a few new forums, read more about it at: New Munitions Forums!

  • Microsoft MSN, Live, Hotmail, Outlook email users may not be receiving emails. We are working to resolve this issue. Please add support@steelsoldiers.com to your trusted contacts.

What have you done to your CUCV today/lately - Part 2

cucvrus

Well-known member
11,473
10,433
113
Location
Jonestown Pennsylvania
CUCV 1 gets my vote. The other ones not very resilient to off road use, abuse and hard use. It is just a civilian built Tahoe that was upfitted by GM Military. Good Luck. Be Safe.
 

hrbergeron

Well-known member
Steel Soldiers Supporter
302
391
63
Location
Geographical Center of Virginia
CUCV 1 gets my vote. The other ones not very resilient to off road use, abuse and hard use. It is just a civilian built Tahoe that was upfitted by GM Military. Good Luck. Be Safe.
I wanted something that was more designed for interstate speeds. My m1009 does 65-70 alright, but the cucv ii is obviously better. The cucv ii also has AC that works...
 

48cj2a

Active member
311
34
28
Location
Central, IL
Just returned from a 7 m deployment and ordered what I believe is an MTVR - Parker Racor 660R-OTC-01 3268850 Fuel Filter Fuel/Water Separator assembly NSN 4334-01-479-4561 off eBay for $25 (a real bargain) to do a CUCV Fuel Filter upgrade. It has a built in Heater as well. In researching the filter base it is supposed to have two 3/8" -18 NPT input and output ports so I also ordered a 3/8" NPT 3/8" & 1/4" barb fittings and port plugs to have everything needed except the actual bulk fuel line.

Uses Parker Racor Replacement Filter S3232. (10 Micron)

Upon trying to install the barb and plugs fittings they do not thread and just fall into the ports and a random 1/2" NPT pipe nipple to way to large.

Anyone know if this may be some obscure port size?

Could not find a TM online to review.


CUCV Filter.JPG
 

Sharecropper

Well-known member
Steel Soldiers Supporter
1,836
987
113
Location
Paris KY

48cj2a

Active member
311
34
28
Location
Central, IL
I just now looked on Parker Racor's website and confirmed that the 660 ports are 3/8"-18 NPT. You might want to verify that the fittings you have are actually 3/8" NPT and that the female orfices have not been opened/rethreaded by somebody else. If it were me I would try a hardware store fitting which is confirmed to be 3/8" NPT to verify the threads in the filter.

A little further investigation...

660R-OTC-1 is SAE ORB-8 Fittings 3/4 x 16 Thread
660R-RAC is 3/8"-16

If anyone can school me on AN Fittings it appears the inner ports are tapered flare similar to natural gas fittings so should I use the typical -8AN male or a -8 SAE 3/4-16 o-ring?

Wish I could find the correct MTVR TM to see if it shows factory oil line information.

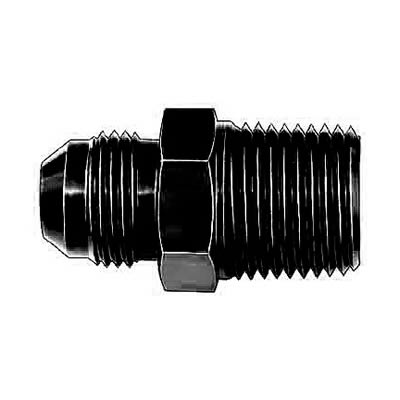
This is the -8 AN Male to 3/8" Male NPT Male Adapter:


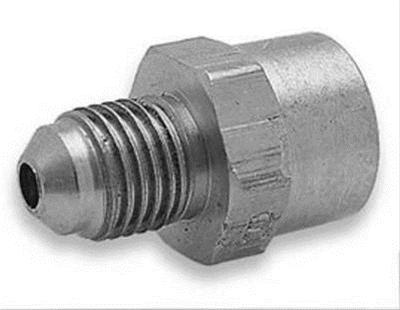
3/4-16" SAE Male to 3/8" NPT Female


Parker 8-3/8 F5OG-S SAE Adapter 3/4-16 ORB Male X 3/8 NPTF Female Stl


Miah

Member
90
29
18
Location
Kansas City-ish, MO
Got in a HW glowplug card tonight, so slapped it in. No more humming/buzzing underdash, but i do kinda wish i had set it to solid wait light vs flashing. Not sure i care enough to weasel under the dash again for it though. Also got in an Ebay suburban jack setup, so i have a passably stock looking mechanical bottle jack now.

Only downside is the newer trucks must use much larger sized lugnuts than the older chevys. ahh well.
 
Last edited:

Cory1337

Member
29
28
18
Location
Terre Haute, IN
Step 1: Read all 437 pages of this post. Wanted to get through it all before I posted something. I'd get off work at 5, work on the M1010 until 6:30 or so, eat supper real quick and get back out after until 9 or so. Then I'd come in and read read read. I mostly read this post, but I'd take a break and read the TPMs.

First off, thanks everyone for this great post I have learned a lot.

Over the past 3 months I've done the following:
The first thing I did was changed the factory fuel filter for a spin on type. I has having some air getting in and loosing prime. I had read about fixing the filter, put decided to go with a FM100 type with the primer pump on top. Works Great.

The very next thing was the dog head relay. While I was in the dash area I took the gauges out, cleaned everything, replaced bulbs, etc. It's nice to have turn signal indicators again(can't hear the clicker over the clatter).

The next big thing was swapping the 24volt alternators for 2 isolated ground 12volt alternators. The DUVAC was already removed when I received the truck. I replaced the belts while I was at it. Put in all new wiring between alternators, batteries and bus bars. Someone along the way had replaced the factory wiring with stiff 2/0 wires that were either way too long or just barely long enough. I went with 4g for alternators to batteries and 2g between batteries and to bus bars. I think cleaning the bus bar and new tight connections have made it start much better. When I first got the old girl, she'd turned over for 2-3 seconds and fire up, now she starts before you have a chance to let go of the key.

I changed the oil and greased everything. Started removing all the wasp nests I could see, I'm sure there are more....

I removed the rubber floor covering and insulation, have some surface rust in places, but luckily it's solid I removed the door panels and used a hot air gun to bring the color back. Not perfect but a big improvement. Cleaned lubed the window mechanism. I need a lot of rubber parts replaced in the doors. I'm hopeful to work on that this winter when I'll have more time to take apart the vent windows.

Next step is get some new tires and start driving her more. Tires are over 20 years old, figure it's probably time for some new ones. Looking forward to driving her on some longer errands.
 

chevymike

Well-known member
597
463
63
Location
San Diego, CA
Step 1: Read all 437 pages of this post. Wanted to get through it all before I posted something. I'd get off work at 5, work on the M1010 until 6:30 or so, eat supper real quick and get back out after until 9 or so. Then I'd come in and read read read. I mostly read this post, but I'd take a break and read the TPMs.

First off, thanks everyone for this great post I have learned a lot.

Over the past 3 months I've done the following:
The first thing I did was changed the factory fuel filter for a spin on type. I has having some air getting in and loosing prime. I had read about fixing the filter, put decided to go with a FM100 type with the primer pump on top. Works Great.

The very next thing was the dog head relay. While I was in the dash area I took the gauges out, cleaned everything, replaced bulbs, etc. It's nice to have turn signal indicators again(can't hear the clicker over the clatter).

The next big thing was swapping the 24volt alternators for 2 isolated ground 12volt alternators. The DUVAC was already removed when I received the truck. I replaced the belts while I was at it. Put in all new wiring between alternators, batteries and bus bars. Someone along the way had replaced the factory wiring with stiff 2/0 wires that were either way too long or just barely long enough. I went with 4g for alternators to batteries and 2g between batteries and to bus bars. I think cleaning the bus bar and new tight connections have made it start much better. When I first got the old girl, she'd turned over for 2-3 seconds and fire up, now she starts before you have a chance to let go of the key.

I changed the oil and greased everything. Started removing all the wasp nests I could see, I'm sure there are more....

I removed the rubber floor covering and insulation, have some surface rust in places, but luckily it's solid I removed the door panels and used a hot air gun to bring the color back. Not perfect but a big improvement. Cleaned lubed the window mechanism. I need a lot of rubber parts replaced in the doors. I'm hopeful to work on that this winter when I'll have more time to take apart the vent windows.

Next step is get some new tires and start driving her more. Tires are over 20 years old, figure it's probably time for some new ones. Looking forward to driving her on some longer errands.
Welcome to the M1010 club. Sounds like you are going through systems and bringing them up to snuff. I have been doing the same, little by little. If you're on FB, check out my M1010 page in my signature.
 

joshuak

Active member
747
214
43
Location
Slower shore, DE
Step 1: Read all 437 pages of this post. Wanted to get through it all before I posted something. I'd get off work at 5, work on the M1010 until 6:30 or so, eat supper real quick and get back out after until 9 or so. Then I'd come in and read read read. I mostly read this post, but I'd take a break and read the TPMs.
Lucky you! Now, only thing left is to read the 18,XXX threads in the CUCV section and the 761 threads in the CUCV Hot Rodding and Modification section and you'll be all caught up! Well, then there is the matter of the TM's.... :-D

Joking aside, sounds like you've put a lot of work into your rig and would be fun to see some pictures. Start a thread if you have time, would be fun to follow along.
 

Cory1337

Member
29
28
18
Location
Terre Haute, IN
Lucky you! Now, only thing left is to read the 18,XXX threads in the CUCV section and the 761 threads in the CUCV Hot Rodding and Modification section and you'll be all caught up! Well, then there is the matter of the TM's.... :-D

Joking aside, sounds like you've put a lot of work into your rig and would be fun to see some pictures. Start a thread if you have time, would be fun to follow along.
I'm working on reading them all. At least a quick skim of the threads. haha
 

joshuak

Active member
747
214
43
Location
Slower shore, DE

Rutjes

Well-known member
Steel Soldiers Supporter
359
272
63
Location
Amersfoort, The Netherlands
Cleaned up the workshop, got the frame back inside. Some rust forming on the epoxy coating... not sure what to do. Was going to paint it next weekend. Think I'll have to sand it down and apply another layer of epoxy primer.

Last night I power washed the front axle shell. Got some more grinding and wire wheeling to do.

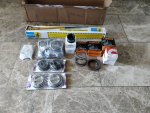
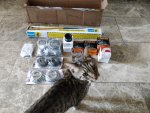
Received all parts for the front axle in (5 days from the USA to the Netherlands! While my package from Leroy has been "in transit" for 76 days now... FedEx vs USPS). New inner/outer seals, wheel bearing kits, kingpin rebuild kits and I treated myself to a Bilstein steering damper to match the shocks that came with my lift kit and Yukon locking hubs. Got the OK from the inspector checking out the parts.

IMG_20200623_145408.jpg IMG_20200623_145404.jpg
 
Last edited:

Rutjes

Well-known member
Steel Soldiers Supporter
359
272
63
Location
Amersfoort, The Netherlands
Wow, 2nd time I had to skip pages to find this thread. Nobody working on their trucks anymore? :(

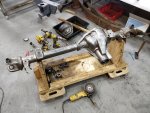
Last evening I spent a couple hours wire wheeling the D60. A bit more detailing and it's ready for epoxy primer.

IMG_20200629_203634.jpg

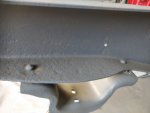
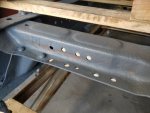
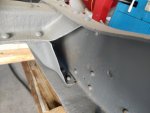
And here's the rust forming on the frame I was talking about before:

IMG_20200623_184907.jpg IMG_20200623_184911.jpg IMG_20200623_184916.jpg

It's supposed to be epoxy primer. Maybe I should've painted it earlier. I expected some to form around hard to reach nooks and crannies, but not on pretty much flat surfaces. Anyway, what would you guys do? Sand the rusty spots away and apply another coat?
 

cucvrus

Well-known member
11,473
10,433
113
Location
Jonestown Pennsylvania
Wow, 2nd time I had to skip pages to find this thread. Nobody working on their trucks anymore? :(

Last evening I spent a couple hours wire wheeling the D60. A bit more detailing and it's ready for epoxy primer.

View attachment 804703

And here's the rust forming on the frame I was talking about before:

View attachment 804700 View attachment 804701 View attachment 804702

It's supposed to be epoxy primer. Maybe I should've painted it earlier. I expected some to form around hard to reach nooks and crannies, but not on pretty much flat surfaces. Anyway, what would you guys do? Sand the rusty spots away and apply another coat?
From looking at the pictures you have used an aerosol spray can to apply the primer. You do not have enough mil's https://nitcnrcsbase-www.nrcs.usda.gov/Internet/FSE_DOCUMENTS/nrcs142p2_040198.pdf
Aerosol cans are not the correct way to apply a epoxy primer on a bare metal frame. Unless you apply the correct coat in the correct uniform thickness you will always have rust bleed thru. You went thru a lot of work. Like I always say. The paint and finish is only 1% of the end result. It is a very important 1% and you must use the proper finish and sealers to achieve the desired finish. I would scuff and get a HVLP cup gun and get a thicker coat of epoxy sealer on that frame. Good Luck. The humidity will rust blast3ed bare metal in a few hours.
 

chevymike

Well-known member
597
463
63
Location
San Diego, CA
I have been doing some different projects on my M1010. Installed some Jeep JK Wrangler seats on custom built brackets I made. Also installed a Gear Vendors OD and waiting for the driveshaft to be built. Need to wire that up. Hopefully will have that done this weekend.

0530201530_HDR.jpg

0620201636a_HDR.jpg

0627201213_HDR.jpg
 

Rutjes

Well-known member
Steel Soldiers Supporter
359
272
63
Location
Amersfoort, The Netherlands
From looking at the pictures you have used an aerosol spray can to apply the primer. You do not have enough mil's https://nitcnrcsbase-www.nrcs.usda.gov/Internet/FSE_DOCUMENTS/nrcs142p2_040198.pdf
Aerosol cans are not the correct way to apply a epoxy primer on a bare metal frame. Unless you apply the correct coat in the correct uniform thickness you will always have rust bleed thru. You went thru a lot of work. Like I always say. The paint and finish is only 1% of the end result. It is a very important 1% and you must use the proper finish and sealers to achieve the desired finish. I would scuff and get a HVLP cup gun and get a thicker coat of epoxy sealer on that frame. Good Luck. The humidity will rust blast3ed bare metal in a few hours.
Actually, I had it sandblasted and primed by a coating company. It's been a while, I doubt they'd "warranty" it by now...
 
Top
AdBlock Detected

We get it, advertisements are annoying!

Sure, ad-blocking software does a great job at blocking ads, but it also blocks useful features of our website like our supporting vendors. Their ads help keep Steel Soldiers going. Please consider disabling your ad blockers for the site. Thanks!

I've Disabled AdBlock
No Thanks