• Steel Soldiers now has a few new forums, read more about it at: New Munitions Forums!

  • Microsoft MSN, Live, Hotmail, Outlook email users may not be receiving emails. We are working to resolve this issue. Please add support@steelsoldiers.com to your trusted contacts.

What have you done to your HMMWV today/lately

Mainsail

Well-known member
Steel Soldiers Supporter
1,505
1,676
113
Location
Puget Sound, WA
Sun! Started around 10am when the sun was on the driveway - the new tires are going on today, and possibly tomorrow. Three of the tires from Yermo are 2007s and one is a 2014. The three old ones have cracks, the right front has a disturbing crack. I think these are original to the vehicle.

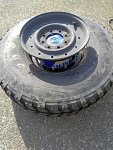
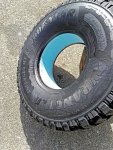
As luck would have it I started on the 2014 tire, and what a nightmare. Nothing seemed to want to break the bead, I even drove my jeep on it. It took an hour to get the small half of the wheel off. The big half took another hour. Using two prybars I did a full circuit around the wheel until I realized the bead was finally broke - so what's holding it on? My guess is the grease (and there was a lot of it) had turned to glue because it was stuck fast to the run-flat. I used the handle of the sledgehammer to beat it out. New tire went on with little drama.

If the other wheels take this long I might need three days... check the weather ... If I skip church on Sunday I can work on them Sunday morning because the rain returns Sunday evening.

The next one was one of the OE tires and it popped right off the rim no problem. :D No grease. The new tire went on easy until the final torque. Once I had the wheel halves together, but prior to torque, I put 20psi in to make sure the o-ring had stayed in the groove. With no hissing sound and the gauge holding steady at 20psi I went ahead and did the two-stage torque. But now it won't take any air.... so it had to come apart. I realized the PVC beadlock valve-hole was off by less than five degrees, and the air valve pressed into the beadlock and blocked the air. Fixed that drama and on to wheel number three.

Third wheel was like the other OE wheel, bead broke with little effort and the new wheel went on without drama. But by now I'm beat - like so totally exhausted I'm not walking right. I have to decide whether to press on the number four or clean up the huge mess this whole thing has created. There's a busted up pallet hanging out of the M1101 trailer where the new tires were stored, all the plastic wrap and binding straps, big cardboard boxes that need to be cut into 12" pieces to fit in the recycle bin, etc.

So I decided to call it a day and get the mess cleaned up.

I'll attack #4 tomorrow.

EDIT to add: I was VERY happy not to have 24 bolt rims today.
 
Last edited:

Coug

Well-known member
Steel Soldiers Supporter
2,975
4,355
113
Location
Olympia/WA
No pics for this repair, my hands were too dirty for most of it to want to touch my phone.

So my right rear caliper was sticking when the parking brake was applied. Also the bracket that hold the caliper and mounts to the diff had loose bolts (this makes the third caliper bracket on this truck that the bolts came loose on)
I had ordered all the parts I'd need a year ago just to have on hand as spares. Caliper seal kit, nordlock washers for the bracket bolts, diff output seal and star seal washer thingy.

Got the brake caliper off without too much issue. Followed the directions I found here to disassemble it
http://www.hummerknowledgebase.com/brakes/rebuilding_rear_calipers.pdf


Draining the brake fluid from it, had a lot of water come out as well.
Piston unthreaded all the way, then the piston just jammed in the bore. Couldn't twist it or make it move.
Finally gave up and got a chunk of aluminum bar stock I use as a drift punch. Aimed it at a 45 degree angle under the upper lip of the piston and piston started rocking in the bore. A few minutes of this hitting and tapping it with various amounts of strength, and it finally came loose.
Having a bench vise to hold the caliper in certainly helps a LOT.

Got it all apart. Cleaned it with paper towels, and for the parking brake area a wire brush to get the corrosion off.
Installed all new seals and new slide pins.

Removed the diff output flange to access the caliper bracket bolts. Removed the bolts one at a time, added nordlocks, and reinstalled. When torquing down, the lower bolt gave me that not so good feeling like it was starting to strip, but the upper bolt tightened down properly so I decided to just reassemble everything for now.

Pulled the old diff output seal, and installed new one with the seal driver from the HMMWV tool kit.
Seal refused to drive in straight.
Ended up pulling the first one out, and installing a different one (first one was a little bent)
Still didn't want to go in straight, so used a wide drift punch and slowly went around tapping the rim down a little at a time. Once it was almost all the way in, I finished with the seal driver again.


Installed output flange, then brake caliper and rotor, then halfshaft. Reused my bolts since they are the BlueHummer locking bolt set. They've been on there for a couple years, and the chrome plating is rusting off of them a little bit. Might have to replace them in the future, but still plenty good for now.

Bled the brakes. Did the single person method of a small hole in the fluid bottle and bottle upside down in the reservoir, and the brake bleeder valve out a little bit with a long tube going down to a small bottle with brake fluid. Only took a couple of minutes to get all the air out and clean brake fluid out the bleeder. Tightened up and then took her for a test drive. Brakes work great, and so does the parking brake.

For just the caliper rebuild, since I had all the tools I needed to do it, cost about $50 for parts. Probably an hour of actual rebuild time if you don't count the jammed piston, or two hours if you do.
 

frauhansen

Well-known member
Steel Soldiers Supporter
276
538
93
Location
switzerland
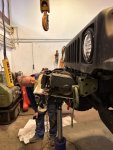
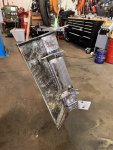
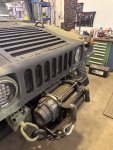
buid a winch mounting plate and install it in the front.
warn Seris 18.jpg
IMG_9562.jpeg
at first... find the right place for this monster. It did not will fit between the frame. But if i mount ist direktctlyon the frond plate, it will be the easyes way, then it would stick out ridiculously far to the front. So.. find a way to bring this as mutch as i can back between the frame without hiting the water line from the radiator.
IMG_9631.jpeg
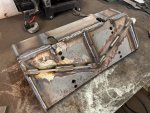
Inide, where the wintch will be sitting. Mounings from the back and the bottom.
IMG_9618.jpeg
Just to be sure... some reinforcing in the bottom.

IMG_9655.jpeg
IMG_9657.jpeg

It was not easy to bring the winch so far back. The water cooler hose is quickly in the way.
But moving it all the way to the front on the original carrier plate was also an option. Then it sticks out ridiculously to the front.
So slightly tilted to help the slope angle a bit and a good 8cm in the back.
Did not simplify the construction of the winch carrier, of course.

And, because I just had some sidekick work, a montage in motion picture.
[youtube]
 

Coug

Well-known member
Steel Soldiers Supporter
2,975
4,355
113
Location
Olympia/WA
The new ammo cans arrived....

OK, what's wrong with this picture? I buy a three 40mm ammo can holder and three 40mm ammo cans and it looks like maybe a 4th will fit in there? What am I missing?

View attachment 893459
I have a couple of that holder.
There is a larger 40mm ammo can that fits 3 wide on it, or 4 of the smaller 40mm cans
 

Mainsail

Well-known member
Steel Soldiers Supporter
1,505
1,676
113
Location
Puget Sound, WA
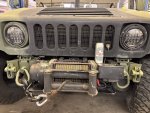
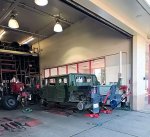
The last wheel finished. The PVC was giving me fits, not wanting to get into position, but in the end I prevailed. The centramatics did an OK at balancing, but I took it to Discount Tire. The tire guy drove it into the bay and all work stopped as the whole workforce gathered around to gawk.

They used a lot of weight but it's very smooth now. The best part is the piece of mind getting the 16 year old tires out from under me.

NewTires1.jpgNewTires2.jpgNewTires3.jpg
 
Last edited:

Mainsail

Well-known member
Steel Soldiers Supporter
1,505
1,676
113
Location
Puget Sound, WA
The last wheel finished. The PVC was giving me fits, not wanting to get into position, but in the end I prevailed. The centramatics did an OK at balancing, but I took it to Discount Tire. The tire guy drove it into the bay and all work stopped as the whole workforce gathered around to gawk.

They used a lot of weight but it's very smooth now. The best part is the piece of mind getting the 16 year old tires out from under me.
I guess I'm not finished yet....

Left rear has a slow leak, lost 10 psi overnight. The valve/valve -stem appear to be OK so maybe the o-ring didn't get seated properly.
 

Coug

Well-known member
Steel Soldiers Supporter
2,975
4,355
113
Location
Olympia/WA
I guess I'm not finished yet....

Left rear has a slow leak, lost 10 psi overnight. The valve/valve -stem appear to be OK so maybe the o-ring didn't get seated properly.
spray some soapy water to find out. Even a slow leak will generate bubbles.

Better to verify that it actually is the O-ring leaking than do all the work only to find a pinhole in the tire or rim (unlikely, but not impossible)
 

Mainsail

Well-known member
Steel Soldiers Supporter
1,505
1,676
113
Location
Puget Sound, WA
spray some soapy water to find out. Even a slow leak will generate bubbles.

Better to verify that it actually is the O-ring leaking than do all the work only to find a pinhole in the tire or rim (unlikely, but not impossible)
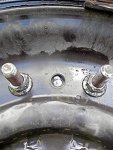
Pulled the wheel after work, soaped the valve, the bead on both sides, and bubbles appeared in the hole there, whatever that's called. I tried to re-torque the bolts but it didn't change. I popped the small half off and the o-ring looked OK, but replaced it with my spare (ordered five just in case). No bubbles now. I put exactly 35psi in and I'll check it tomorrow to be sure.

NewTires4.jpg

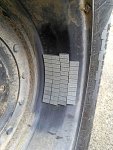
The tire guy said he had a lot of trouble with two of the wheels, and he put those two on the rear. This is the weights on that wheel - 46 1/4 oz weights. I'll keep my eyes out for one or two more 12-bolt wheels locally. The other back wheel looks to be the same.

NewTires5.jpg
 
Top