• Steel Soldiers now has a few new forums, read more about it at: New Munitions Forums!

  • Microsoft MSN, Live, Hotmail, Outlook email users may not be receiving emails. We are working to resolve this issue. Please add support@steelsoldiers.com to your trusted contacts.

What have you done to your JEEP today

HoveringHMMWV

Well-known member
Steel Soldiers Supporter
524
1,244
93
Location
AL
Test drove the M38 and must have done an ok job on the brake adjustment. The pedal felt good and no pulling to either side during a stop. Hub temps stayed quite cool according to the laser temp gauge thingy. Couldn’t pass up on a photo op with a newer generation truck. It was also great weather for riding around in an open cockpit.

IMG_1291.jpeg
 

HoveringHMMWV

Well-known member
Steel Soldiers Supporter
524
1,244
93
Location
AL
Officially started a full restoration by stripping off ancillary items to allow tub removal. This is gonna take a few months.
Found white paint underneath components. Any idea what organization/department/branch would’ve painted their M38’s white? Second pic shows an indication of the original green paint too. The third pic shows evidence of some red primer and I’m assuming that was not original.

IMG_1647.jpeg IMG_1623.jpeg IMG_1622.jpeg
 
Last edited:

Mullaney

Well-known member
Steel Soldiers Supporter
Supporting Vendor
7,954
20,297
113
Location
Charlotte NC
Officially started a full restoration by stripping off ancillary items to allow tub removal. This is gonna take a few months.
Found white paint underneath components. Any idea what organization/department/branch would’ve painted their M38’s white? Second pic shows an indication of the original green paint too. The third pic shows evidence of some red primer and I’m assuming that was not original.

View attachment 937359 View attachment 937360 View attachment 937361
.
Could be UN painted...
White was their choice of color.
 

flyfishtrailer

Well-known member
Steel Soldiers Supporter
574
1,101
93
Location
Cool, CA
Officially started a full restoration by stripping off ancillary items to allow tub removal. This is gonna take a few months.
Found white paint underneath components. Any idea what organization/department/branch would’ve painted their M38’s white? Second pic shows an indication of the original green paint too. The third pic shows evidence of some red primer and I’m assuming that was not original.

View attachment 937359 View attachment 937360 View attachment 937361
Red zinc oxide primer was used on all the military vehicles. All of them also started out OD green. If a unit was in a branch with a different color scheme, the green would get painted over (like strata blue jeeps used by the Air Force). Not sure about white, but I think others above have addressed that.
 

JEB

Active member
130
144
43
Location
Colbert, WA
My GUESS is white means a past Civil Defense assignment.
I'm not sure if U.S. Army vehicles were painted for UN work. Often times, the UN peacekeepers were from countries like Canada or Sweden, not the U.S. (for political..to look more "independent" .) Now if it were a Canadian M38A1, that could be a real possibility.

Also, it could be from a post Federal government ownership...given to a county or city. Police, sheriff...I've even seen white fire trucks.

Blue would probably mean Air Force or later Civil Air Patrol use. My guess is the CAP possibly utilized more Jeeps than the active duty Air Force ever did, getting them from Army or National Guard (as well as Air Force) surplus.
 

HoveringHMMWV

Well-known member
Steel Soldiers Supporter
524
1,244
93
Location
AL
Made some progress over the last few weeks on disassembly of the M38. Successfully pulled both the tub and engine. After restoring the chassis, my plan is to learn a new skill set and do the body repairs myself. The engine, however, will be sent off for rebuild by others more qualified than me.

IMG_1786.jpg IMG_1787.jpg IMG_1811.jpg
 

flyfishtrailer

Well-known member
Steel Soldiers Supporter
574
1,101
93
Location
Cool, CA

HoveringHMMWV

Well-known member
Steel Soldiers Supporter
524
1,244
93
Location
AL
The M38 is now broken down into major components. Lead based paint is a major concern of mine. I want to do all of the part restorations myself but don't want lead dust from sanding or sandblasting around the house for years to come. So, I decided to test a gel paint remover that would provide a suitable means of containment. Jasco Paint Remover was carried at my local big box store and seemed to be the best suited.

IMG_1983 3.JPG

I tried a test section on the rear bumper and adjacent frame sections. The first coat was able to remove over 75% +/- of the old paint layer(s) and primer. Remembering to shake the can and then applying a thick coat are the two most important points. The bumper received the thickest coat and the bubbled paint was easily removed with a metal putty spreader after the prescribed 15 mins. The gel will also be suitable once I start working on the diffs, transmission, and transfer cases. This process seems to be the best option for allowing a safe removal and disposal. The mess involved can be limited by working in sections over a period of several days.

What I believe to be the original OD 2430 paint can be seen on the vertical face of the bumper.
 

DeetFreek

Well-known member
222
361
63
Location
New Sharon IA
If you can get your hands on a decent power washer, those can strip paint as well. Granted, that old single stage paint can be more stubborn than today's thinner paints.
 

Maverick1701

Well-known member
1,438
195
63
Location
Lubbock, TX
I have a few days of work crammed into one post here.
Day 1:

Video idling w/the new plugs: https://www.youtube.com/shorts/VgonXwM1AL8
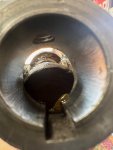
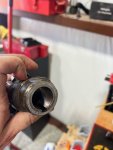
Since the military plugs are getting wildly expensive, I wanted to test some of those spark plug adapters that allow the use of modern (and SIGNIFICANTLY less expensive) NGK spark plugs.
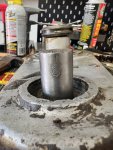
I got them installed and no spark at first...of course, right? After some digging, I discovered the little nub that opens/closes my points was worn so low it couldn't do its job. I installed a new set of points and everything runs well.
I also used an existing hole made by the firefighters and installed an extra ram mount I had lying around (so my phone wouldn't bounce around inside the glove box).
Then I used an old canteen pouch attached to the grab bar as my new water bottle holder. It holds either two water bottles or one bottle and two clementines perfectly.
IMG_8580.JPG
I also installed a 1941 plaque from a much newer Jeep. I originally bought it when I first bought my jeep out of the farmer's field (back in 2013-ish) and told myself I would put it on when it was driveable. Better late than never, right?

IMG_8632.JPG
IMG_8633.JPG

After all that I took it out for a 2hr drive w/the new plugs. It worked well. Zero issues.

IMG_8597.JPG
IMG_8599.JPG


Day 2:
Today’s project started trying to find a way to install some larger batteries in the engine bay (for more CCAs). Then I decided to use some metal and brackets I had laying around to move my current batteries into the engine bay.
This would allow me to use the current cowl area for storage and let me actually secure my batteries…..I haven’t had my batteries secured inside the cowl battery box (super safe, I know). Also, it would be a fun project just to see if I could do it with the stuff I had on hand.

This is what I came up with. Three supports: one in the fan shroud, one chunky L bracket attached to the fender, and another chunky L bracket attached to the alternator adjustment arm. It’s in there pretty solid (I can rock the entire jeep just from pushing on the base). The base is a random equipment mount out of a HMMWV
Now I just need to buy either some all-thread or some of those J hooks to attach the top hold-down piece and I’ll be done.
I should probably clean up some wiring, too.....the dual battery monitor wiring looks a bit messy (but it does all work)

IMG_8636.jpg
IMG_8637.JPG
IMG_8638.JPG
 

Maverick1701

Well-known member
1,438
195
63
Location
Lubbock, TX
I was able to get a little more done today before I left for work.

I grabbed one of those battery hold-down kits from oreillys and surprisingly the thread pitch/size matched perfectly with the military knobs and hold-down bar which originally came on the equipmnent bracket I'm using as a battery base. it was a nice surprise.
I got it installed and it holds both 51R batteries perfectly.

After that I decided to clean-up the battery box as I noticed some corrosion and rust when I removed the batteries last week. I uninstalled one of the trays but the other tray had its bolts replaced with phillips-head screws on one side...and they are locked-up hard. Normally for something like this I would use an impact driver but inside the battery box I have no room to swing a hammer and very limited leverage due to the confines of the box (see photo)

So I attached a wire brush to my drill and cleaned-up all I could: the one stuck battery tray, the tray I was able to remove, and the walls of the battery box. After sanding I cleaned out the trash and shot it with a coat of primer. Tomorrow I'll hit it with a coat of paint and it'll be ready for storage use or, ifI don't like the relocated batteries, it'll be ready to hold batteries again.


IMG_8682.jpg
IMG_8683.jpg
IMG_8684.JPG

completed installation:
IMG_8685.JPG

screwdriver access inside battery box:
IMG_8690.JPG

sanding and painting:
IMG_8689.JPG
IMG_8693.JPG
IMG_8694.JPG
IMG_8695.JPG
 

Maverick1701

Well-known member
1,438
195
63
Location
Lubbock, TX
Today I had a few hours to work in the shop.
First I reinstalled the battery tray (the one I was able to remove) and threw in some recovery equipment

IMG_8797.JPG

IMG_8798.JPG

Second I started working on my PTO.
I have a Koenig 41 which I'm going to sell since it's for a wagon/truck and I obviously can't use it on theM38A1. I photographed it and am going to list it on ebay along with some IH locking hubs I have in the parts stash. Possibly one of my winches will follow suit. I have a koenig 100 and a ramsey MX200R. I'll probably use the Ramsey on my M38A1 since it looks like it'll be easier to fabricate a mount vs the higher a-frame Koenig 100.

I began working on my Koenig 51 PTO which is the unit I'll be using on my M38A1.
I have a chain heading this way along with a replacement seal.
I split the case and began cleaning out the housing. The last owner sealed the unit and used grease as a lubricant....it left a nasty mess.
Between ample applications of simple green and constant scraping I was able to clean out a fair amount of trash....so it's good enough. It doesn't need to be perfect. I'll probably be refilling it with either JD cornhead grease or some other type of less viscious grease.

When I split the case the bearing unit (shaft/two bearings/sprocket) stuck to the wrong side of the housing. Using some prybars and plenty of force I was able to pop it free and get it mostly cleaned-up along with all the bearing races. I finally reached a stopping point since amazon delayed my replacement chain delivery....they claim it'll be here tomorrow but we shall see.
I finished the afternoon by cleaning up the mating surface between the two housings and then sanding/painting some odds-ends like handles, etc


IMG_8801.jpg

IMG_8803.JPG

USA made bearings were stil rolling well
IMG_8804.JPG

Case with significantly less grease in the case
IMG_8808.JPG

IMG_8809.jpg

Replacement chain should be here tomorrow. then I can reassemble except for the seal which I Can install after I get everything else re-assembled.
IMG_8811.JPG
 
Last edited:

Maverick1701

Well-known member
1,438
195
63
Location
Lubbock, TX
Yesterday I had some more time in the shop to continue my PTO/winch endevour. Since I was stuck waiting on UPS to deliver my chain, I reinstalled the bearing/sprocket pack into the housing. I also installed the painted handle, knob, and cover plates. It's beginning to look like a PTO Again.

Then I started fitting the pto output shaft to the dive-shaft coupler/u-joint setup. At first I cleaned up the surfaces from all the rust but it still needs some material removed to properly fit. I sanded for a while but it needs even more to fit properly.

UPS finally delivered my replacement chain at 8pm so I wasn't able to get to it....it'll have to wait until next week. Once I get the chain cut to length and installed, the PTO will be done. I just need to instal it with the 5 bolts.

I also cleaned-out the bolt holes which the M38A1 has on the frame horns for winch mounting. So those are ready to go now.
Next step is to cut and drill some thick angle iron to make some mounts for the winch.
 

Attachments

Top
AdBlock Detected

We get it, advertisements are annoying!

Sure, ad-blocking software does a great job at blocking ads, but it also blocks useful features of our website like our supporting vendors. Their ads help keep Steel Soldiers going. Please consider disabling your ad blockers for the site. Thanks!

I've Disabled AdBlock
No Thanks