• Steel Soldiers now has a few new forums, read more about it at: New Munitions Forums!

  • Microsoft MSN, Live, Hotmail, Outlook email users may not be receiving emails. We are working to resolve this issue. Please add support@steelsoldiers.com to your trusted contacts.

All 5-tons: Heavy Duty Torque Rod Ends

Glenngineer

Active member
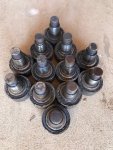
I think mine are 6” OD, 1/2” center hole, 1/4” thick flat plate steel, found somebody on eBay to water jet them out for super cheap, like 25 cents per.
I would not suggest my way for a new bushing install , but in my case I have good bushings and did not want to remove the dogbones
You don’t need the angle iron. I used 1 by wood pieces and a wood splitting wedge. Fell right apart.

I did not want to apply heat to the rubber bushing of welding pieces on. I did bolt on because what if I need to press it apart again from that direction?
 

vvwilkins

Active member
106
117
43
Location
Riverside CA
Ugh. Trying to do this job while the pandemic is on, will be a giant PITA.

I can order the dog bones online. I found an affordable striking wrench online, no problems there. I'll probably need to go to a store to find that angle iron and nuts to make the compression plate to pop the torque rod end out of the mounting. Not happy about that part.

For those of you who made retaining discs for your bushings- What is the diameter and thickness of the disc? Did you buy them or make them?
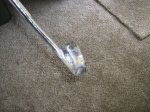
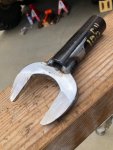
Regarding the "compression plate"; while it helped, the tool I had the most success with was the home-made pickle fork. It successfully removed 6 of the 12 bushings. I fab'd it from a 2 1/8" crows foot wrench and 1 1/4" (?) diameter DOM pipe. Several solid wacks on the business end did the trick. picture attached. You'll need to grind a taper with either a bench grinder or 4 1/2" hand grinder. I did try using a pair of chisels before fab'ing the pickle fork - was tough keeping them both in place while striking one or the other. Pickle fork was way easier to manage.

the Crows foot is a Sunex 97754A I bought from amazon for about $21
 

Attachments

vvwilkins

Active member
106
117
43
Location
Riverside CA
UPDATE: All 12 torque rod bushings have been successfully replaced and installed in THOR. This task has been (for me at least) the single most challenging so far. The fabrication & acquisition of various tools (some successful, others not so much) and physicality needed at times tested my capabilities. I now have a new standard for what a REAL BFH means. For those who can accomplish this feat in a weekend - I promise a 12-pack of your favorite beer when our paths cross - You Rock! And THANK YOU to the SS Forums and Contributors from which I gained a wealth of knowledge and useful (critical) insights on how to safely accomplish this task.

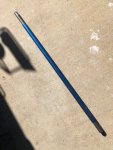
After struggling with the upper torque rod center bushings I fabricated a 30lb "slide hammer" from 1.5" Hot Rolled steel bar and an aluminum sleeve with a 1.5" I.D. (pictures attached). 5 feet of 1.5" steel bar weighs a bit over 30lbs, cut the outer aluminum sleeve to about 4' ... 3-4 solid whacks with the slide hammer on the bushing threaded end (with the castle nut partially backed out) and mission accomplished. I just couldn't single handedly get enough momentum and accuracy with a 6lb sledge striking a 3' drift bar. The slide hammer provided the stability, accuracy and most importantly - shear impact force required to pound the bushing rod ends free from the suspension mount (without removing the spring u-bolts and cap : which was "Plan-B")

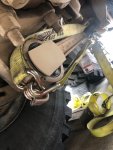
I also used a 2" ratchet strap to facilitate alignment of the torque ams back into the suspension mounts. New vulcanized rubber bushings are stiff - I used a ratchet strap to pull one end of the new bushing inward to compensate for the acute angle of the torque rod during installation (pic attached). I also used a tie-strap to help pull the torque rod ends into alignment with the suspension mounts. Insert one end of the torque rod into one suspension mount and secure with a castle nut (only a couple threads just to keep it in place) - then use the second ratchet strap to pull the other end out, and then into alignment with the second suspension mount taper. Well, that's what worked for me ...

Road Test: I put 60 hwy miles on the truck this afternoon: Truck feels much more stable at 55mph. The rear wheel bounce I was experiencing at hwy speeds is now gone (I'm running 16.00R-20's). Now its time for new front shocks... going to try the Monroe 65116's mentioned in another thread...(thank you Wes)
 

Attachments

Last edited:

74M35A2

Well-known member
4,145
330
83
Location
Livonia, MI
UPDATE: All 12 torque rod bushings have been successfully replaced and installed in THOR. This task has been (for me at least) the single most challenging so far. The fabrication & acquisition of various tools (some successful, others not so much) and physicality needed at times tested my capabilities. I now have a new standard for what a REAL BFH means. For those who can accomplish this feat in a weekend - I promise a 12-pack of your favorite beer when our paths cross - You Rock! And THANK YOU to the SS Forums and Contributors from which I gained a wealth of knowledge and useful (critical) insights on how to safely accomplish this task.

After struggling with the upper torque rod center bushings I fabricated a 30lb "slide hammer" from 1.5" Hot Rolled steel bar and an aluminum sleeve with a 1.5" I.D. (pictures attached). 5 feet of 1.5" steel bar weighs a bit over 30lbs, cut the outer aluminum sleeve to about 4' ... 3-4 solid whacks with the slide hammer on the bushing threaded end (with the castle nut partially backed out) and mission accomplished. I just couldn't single handedly get enough momentum and accuracy with a 6lb sledge striking a 3' drift bar. The slide hammer provided the stability, accuracy and most importantly - shear impact force required to pound the bushing rod ends free from the suspension mount (without removing the spring u-bolts and cap : which was "Plan-B")

I also used a 2" ratchet strap to facilitate alignment of the torque ams back into the suspension mounts. New vulcanized rubber bushings are stiff - I used a ratchet strap to pull one end of the new bushing inward to compensate for the acute angle of the torque rod during installation (pic attached). I also used a tie-strap to help pull the torque rod ends into alignment with the suspension mounts. Insert one end of the torque rod into one suspension mount and secure with a castle nut (only a couple threads just to keep it in place) - then use the second ratchet strap to pull the other end out, and then into alignment with the second suspension mount taper. Well, that's what worked for me ...

Road Test: I put 60 hwy miles on the truck this afternoon: Truck feels much more stable at 55mph. The rear wheel bounce I was experiencing at hwy speeds is now gone (I'm running 16.00R-20's). Now its time for new front shocks... going to try the Monroe 65116's mentioned in another thread...(thank you Wes)
Congrats. Feels good knowing a safety is now in place.
 

Ajax MD

Well-known member
1,569
1,414
113
Location
Mayo, MD
I managed to score an offset striking wrench for only $60 last week. I figured by the time I paid shipping and a courtesy deposit to borrow a wrench I'd be into it for almost the same amount so I just bought my own.

@vvwilkins @74M35A2 Using a 20-ton press, how many tons of pressure did it take to pop your bushings out of the dogbone?

I don't have a press and I don't have any friends that do. I'm trying to decide if i want to trust any of the ham-fisted, local shops to do this or just buy complete dogbone assemblies from Erik's.
 

Glenngineer

Active member
UPDATE: All 12 torque rod bushings have been successfully replaced and installed in THOR. This task has been (for me at least) the single most challenging so far. The fabrication & acquisition of various tools (some successful, others not so much) and physicality needed at times tested my capabilities. I now have a new standard for what a REAL BFH means. For those who can accomplish this feat in a weekend - I promise a 12-pack of your favorite beer when our paths cross - You Rock! And THANK YOU to the SS Forums and Contributors from which I gained a wealth of knowledge and useful (critical) insights on how to safely accomplish this task.

After struggling with the upper torque rod center bushings I fabricated a 30lb "slide hammer" from 1.5" Hot Rolled steel bar and an aluminum sleeve with a 1.5" I.D. (pictures attached). 5 feet of 1.5" steel bar weighs a bit over 30lbs, cut the outer aluminum sleeve to about 4' ... 3-4 solid whacks with the slide hammer on the bushing threaded end (with the castle nut partially backed out) and mission accomplished. I just couldn't single handedly get enough momentum and accuracy with a 6lb sledge striking a 3' drift bar. The slide hammer provided the stability, accuracy and most importantly - shear impact force required to pound the bushing rod ends free from the suspension mount (without removing the spring u-bolts and cap : which was "Plan-B")

I also used a 2" ratchet strap to facilitate alignment of the torque ams back into the suspension mounts. New vulcanized rubber bushings are stiff - I used a ratchet strap to pull one end of the new bushing inward to compensate for the acute angle of the torque rod during installation (pic attached). I also used a tie-strap to help pull the torque rod ends into alignment with the suspension mounts. Insert one end of the torque rod into one suspension mount and secure with a castle nut (only a couple threads just to keep it in place) - then use the second ratchet strap to pull the other end out, and then into alignment with the second suspension mount taper. Well, that's what worked for me ...

Road Test: I put 60 hwy miles on the truck this afternoon: Truck feels much more stable at 55mph. The rear wheel bounce I was experiencing at hwy speeds is now gone (I'm running 16.00R-20's). Now its time for new front shocks... going to try the Monroe 65116's mentioned in another thread...(thank you Wes)
I was looking at the same thread re: shocks and for me it crossed to a Gabrial 85329 which has comparable compresion specs but has twice the extension resistance 1500lbs hopeing it will take some of the bounce out of my front end.
 

simp5782

Feo, Fuerte y Formal
Supporting Vendor
12,125
9,384
113
Location
Mason, TN
I was looking at the same thread re: shocks and for me it crossed to a Gabrial 85329 which has comparable compresion specs but has twice the extension resistance 1500lbs hopeing it will take some of the bounce out of my front end.
They will keep the bounce down. I have them on my 915 and they ride much better than the adjustable gabriel.
 

silverstate55

Unemployable
2,075
872
113
Location
UT
I don't have a press and I don't have any friends that do. I'm trying to decide if i want to trust any of the ham-fisted, local shops to do this or just buy complete dogbone assemblies from Erik's.
I would highly recommend checking Harbor Freight for a 20% off coupon and get a 20-ton press from them; it’s not that much $$$ really for the use you’ll get out of it....works great for pressing out wheel studs as well!
 

Ajax MD

Well-known member
1,569
1,414
113
Location
Mayo, MD
I would highly recommend checking Harbor Freight for a 20% off coupon and get a 20-ton press from them; it’s not that much $$$ really for the use you’ll get out of it....works great for pressing out wheel studs as well!
Unfortunately, space is becoming an issue as well. I may be able to clean up and eliminate one of the work benches and put a press there...
 

Ajax MD

Well-known member
1,569
1,414
113
Location
Mayo, MD
So I took "Sluggo" my new, 2-1/4" slug wrench down to the truck just to test access to all the torque rod bolts.

There are some fit issues with the upper torque rods near the leaf spring assemblies. If I recall, did some people grind down brand new slug wrenches to achieve the necessary clearance? Or am I just doing it wrong?

Also, there is NO amount of grinding that will allow the wrench to slip over the nut that is adjacent to the axle pinion assembly. What did I miss here? Did you all just use an ordinary, open face wrench for these?
 

Ajax MD

Well-known member
1,569
1,414
113
Location
Mayo, MD
In process now. All 6 rods off and 12 link ends pressed out. Offest striking wrench worked, no spring pack disassembly. Put it on and pulled it rearward with the forklift and strap. 2-1/4” end wrench pushed up by a floor jack. This job will make a man out of you, but it is going well with no issue.

View attachment 728074View attachment 728073View attachment 728075View attachment 728077View attachment 728076
Ah, here it is. How much material did you remove from the slug wrench? You used a chop saw?!? What kind of blade? I have a chop saw but I can't conceive of a blade that could handle that.

Edit- ...and nevermind. I found what I needed. Just had to re-read the entire thread.
Ok, so I need to order an ordinary 2-1/4" wrench for the other nuts and slim down this slug wrench for the two, upper/outer nuts.
Use a strap and a HMMWV to break the nuts free.
Shock the dog bone mounts with a sledge and use a pickle fork to pop them out.
 
Last edited:

vvwilkins

Active member
106
117
43
Location
Riverside CA
Ah, here it is. How much material did you remove from the slug wrench? You used a chop saw?!? What kind of blade? I have a chop saw but I can't conceive of a blade that could handle that.

Edit- ...and nevermind. I found what I needed. Just had to re-read the entire thread.
Ok, so I need to order an ordinary 2-1/4" wrench for the other nuts and slim down this slug wrench for the two, upper/outer nuts.
Use a strap and a HMMWV to break the nuts free.
Shock the dog bone mounts with a sledge and use a pickle fork to pop them out.
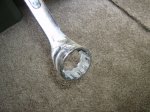
I went to HF and bought the 4pc Jumbo SAE wrench set which includes a 2-1/4" open end / box. In hindsight, I should've bought a 2-1/4" crows foot which can be used for both removal and install/torquing on the outer ends of the uppers and lowers. On the plus side, the HF 2-1/4" box end was helpful on the upper/Inner nuts - that and an air-hammer chisel tip - ratcheting the now slightly deformed nuts off after smacking the crap out of the uppers :)
 

Ajax MD

Well-known member
1,569
1,414
113
Location
Mayo, MD
@Brutacus Did you shave down your slug wrench the way @74M35A2 did to make it fit? Your photo shows it at full strength.
Were you able to get it full seated on the nuts near the spring pack?
 

Brutacus

Active member
Steel Soldiers Supporter
242
208
43
Location
Marion, AR.
@Brutacus Did you shave down your slug wrench the way @74M35A2 did to make it fit? Your photo shows it at full strength.
Were you able to get it full seated on the nuts near the spring pack?

I never shaved the slug wrench down. After looking at the way he shaved his, it can be done with 4.5" angle grinder, and some thin cut off disc. I plan on using the slug wrench on the lowers, so no need to shave it down for that. To get behind the spring pack I ended up modifying a 2" wrench and a 2-1/4" socket. I was able to get my modified wrench fully seated behind the springs. I don't have an angle finder, but there is an angle that works to get behind there. I did this mod with an 4.5" angle grinder, a 5" bench vise, and a cheap Harbor Freight stick welder. The welds are ugly, but it works. My truck is an M818 and it has angle iron riveted to the frame that sticks out about 1-3/4" from the top of the frame to mount the 5th wheel. My wrench clears the 5th wheel mounting frame as well as the springs, and shackle mount on top of the springs. I don't think shaving the slug wrench down fit in my case. What model truck are you working on?
modified wrench 1.JPG
modified wrench 2.JPG

modified wrench 6.JPG
 

Ajax MD

Well-known member
1,569
1,414
113
Location
Mayo, MD
@Brutacus I'm working on an M813. Sorry, so many names and photos. I forgot you were the one that custom welded a wrench. So, you used the custom wrench for the uppers and you're using a full slug wrench for other spots.
 

Brutacus

Active member
Steel Soldiers Supporter
242
208
43
Location
Marion, AR.
@Brutacus I'm working on an M813. Sorry, so many names and photos. I forgot you were the one that custom welded a wrench. So, you used the custom wrench for the uppers and you're using a full slug wrench for other spots.

Correct, the slug wrench used on the lowers, (plenty of room down there), and the modified wrench on the uppers. Keep in mind I also used some air hammers and chisel bits to break the nuts lose on the upper dogbones. I won't need to do that on the lowers. Plenty of room to swing a hammer down there.
 

Ajax MD

Well-known member
1,569
1,414
113
Location
Mayo, MD
Correct, the slug wrench used on the lowers, (plenty of room down there), and the modified wrench on the uppers. Keep in mind I also used some air hammers and chisel bits to break the nuts lose on the upper dogbones. I won't need to do that on the lowers. Plenty of room to swing a hammer down there.
I do have an air hammer. Not sure if it's strong enough, but we'll see.
 

Brutacus

Active member
Steel Soldiers Supporter
242
208
43
Location
Marion, AR.
If you have a small air hammer,
I do have an air hammer. Not sure if it's strong enough, but we'll see.

If you have a small air hammer, .401 shank, then you can use some chisel bits to split the nuts and knock them loose. That's what I did on 3 out of 4 on the uppers.
 
Top
AdBlock Detected

We get it, advertisements are annoying!

Sure, ad-blocking software does a great job at blocking ads, but it also blocks useful features of our website like our supporting vendors. Their ads help keep Steel Soldiers going. Please consider disabling your ad blockers for the site. Thanks!

I've Disabled AdBlock
No Thanks