• Steel Soldiers now has a few new forums, read more about it at: New Munitions Forums!

  • Microsoft MSN, Live, Hotmail, Outlook email users may not be receiving emails. We are working to resolve this issue. Please add support@steelsoldiers.com to your trusted contacts.

FLU419 SEE HMMH HME Owners group

rtrask

Well-known member
342
251
63
Location
San Luis Valley, Colorado
I have had two frustrating days trying to remove the pistons from both of the stabilizers. The pins that attach the rod to the foot are seized on both sides, and nothing I have tried has budged them. Any ideas would be greatly appreciated. i will detail what I have done so far.


These are the steps I have taken:
  1. On the right side, I removed the forward facing snap ring and tried to drive it back. It would not budge and the end started to mushroom so I removed the snap ring on the rear and tried to drive it forward. It moved about an eighth inch and I couldn't get it to budge either forward or back.
  2. I switched to the left side, removed the back side snap ring and attempted to drive it forward. it moved maybe a half inch and I could not get it to move forward or back. The pin started to mushroom.
  3. I went from a 5 lb sledge to an 8 lb sledge and tried it on both pins the only change was that it started mushrooming faster.
  4. I decided to focus on the left side since that seemed to have the most movement. I took a cold chisel and drove it between the rod eye, and rear mount
  5. I started liberally spraying penetrating oil and pounding the eye on the left side back and forth I would file down the ends to remove the mushrooming.
  6. Then I took a hydraulic jack and chain to put pressure on the pin and began smacking on top to try and shock it. Nothing (see attached picture) 20220620_163045.jpg

Day 2.

At this point I decided I should replace the pins as they had both taken a real beating. I ordered two on Amazon so no point in trying to save them.

  1. Sticking with the left side I used my angle grinder and 7" cut off wheel and cut the pin on each side of the rod eye. I was able to pull the piston on the left side and drive the stub of the center portion out of the eye, but the outside portions are still unmovable.
  2. I don't have an acetylene torch, but I put 2 propane torches on the left rear mount for about an hour, and it made little to no difference in moving the stub on that side.
  3. I moved back to the right side, I wanted to use the chisel to get some space between the eye and rear mount, but no amount of beating on it would give me any separation to saw the pin on that side.
  4. I thought that possibly the cylinder being at an angle was putting a bind on the rod eye, so I disconnected the lines on that side, and drove the top pin out, but the cylinder will not move.
  5. I put a hi lift jack on the cylinder next to the mount, and jacked it out of the mount. It took a lot of pressure to do that, enough that I was really afraid of damaging the cylinder.
20220626_173655.jpg

I can't understand how it could be so stiff. I never would have thought a rust weld on a working joint could be so strong.

Any ideas of what to do next?
 

Mullaney

Well-known member
Steel Soldiers Supporter
Supporting Vendor
7,783
19,917
113
Location
Charlotte NC
I have had two frustrating days trying to remove the pistons from both of the stabilizers. The pins that attach the rod to the foot are seized on both sides, and nothing I have tried has budged them. Any ideas would be greatly appreciated. i will detail what I have done so far.


These are the steps I have taken:
  1. On the right side, I removed the forward facing snap ring and tried to drive it back. It would not budge and the end started to mushroom so I removed the snap ring on the rear and tried to drive it forward. It moved about an eighth inch and I couldn't get it to budge either forward or back.
  2. I switched to the left side, removed the back side snap ring and attempted to drive it forward. it moved maybe a half inch and I could not get it to move forward or back. The pin started to mushroom.
  3. I went from a 5 lb sledge to an 8 lb sledge and tried it on both pins the only change was that it started mushrooming faster.
  4. I decided to focus on the left side since that seemed to have the most movement. I took a cold chisel and drove it between the rod eye, and rear mount
  5. I started liberally spraying penetrating oil and pounding the eye on the left side back and forth I would file down the ends to remove the mushrooming.
  6. Then I took a hydraulic jack and chain to put pressure on the pin and began smacking on top to try and shock it. Nothing (see attached picture) View attachment 871598

Day 2.

At this point I decided I should replace the pins as they had both taken a real beating. I ordered two on Amazon so no point in trying to save them.

  1. Sticking with the left side I used my angle grinder and 7" cut off wheel and cut the pin on each side of the rod eye. I was able to pull the piston on the left side and drive the stub of the center portion out of the eye, but the outside portions are still unmovable.
  2. I don't have an acetylene torch, but I put 2 propane torches on the left rear mount for about an hour, and it made little to no difference in moving the stub on that side.
  3. I moved back to the right side, I wanted to use the chisel to get some space between the eye and rear mount, but no amount of beating on it would give me any separation to saw the pin on that side.
  4. I thought that possibly the cylinder being at an angle was putting a bind on the rod eye, so I disconnected the lines on that side, and drove the top pin out, but the cylinder will not move.
  5. I put a hi lift jack on the cylinder next to the mount, and jacked it out of the mount. It took a lot of pressure to do that, enough that I was really afraid of damaging the cylinder.
View attachment 871608

I can't understand how it could be so stiff. I never would have thought a rust weld on a working joint could be so strong.

Any ideas of what to do next?
.
Your idea of cutting the pin into three pieces is the best plan.

Heat. It's not really going to work with propane. You don't get enough heat fast enough to swell the eye without swelling the pin at the same time. Having an acetylene torch with a rosebud tip will cause the "eye" to swell much faster. Swell it, then pop it with a punch and hammer.

Chances are that pin never got greased and it seized and the pin and eyes have grown together... :-(
 

rtrask

Well-known member
342
251
63
Location
San Luis Valley, Colorado
.
Your idea of cutting the pin into three pieces is the best plan.

Heat. It's not really going to work with propane. You don't get enough heat fast enough to swell the eye without swelling the pin at the same time. Having an acetylene torch with a rosebud tip will cause the "eye" to swell much faster. Swell it, then pop it with a punch and hammer.

Chances are that pin never got greased and it seized and the pin and eyes have grown together... :-(
I think the pins were toast before I got started , and they definitely are now. When I get them out I will definitely lube them with anti-seize before putting the new ones in. My dad worked in the weld shop at the CF&I Steel Mill in Pueblo, he would have just cut them out with a torch but he has been gone since 1999. I am confident I can get it out of the eye of the rod. The remnants in the foot may be more of a challenge.
 

The FLU farm

Well-known member
Steel Soldiers Supporter
3,351
1,345
113
Location
The actual midwest, NM.
I fought a pin on the backhoe bucket much like your situation. I think the trials and tribulations were documented in the owner's thread.

Anyway, I never resorted to heating anything, but did apply 50/50 ATF and acetone over a few days. Also, to avoid mushrooming the pin, and to create a way to apply rotational force, I welded a leftover lug nut from the Pete to one end of the pin.

In your case, I'd start the 50/50 treatment, then make a simple spreader tool from a coupling nut and two bolts. At this point I'd guess that the remnants of the pin will have to be pushed out, not in.

Still chasing the issue with an outrigger that won't retract after having run the backhoe for a while. Hoping to isolate the problem by hooking up a different cylinder later today.

If it turns out that it's the cylinder (I sure hope so) and not the valve, I'll be taking that one off soon. Maybe I should start soaking the pins now, even though they look loose.
 

rtrask

Well-known member
342
251
63
Location
San Luis Valley, Colorado
I fought a pin on the backhoe bucket much like your situation. I think the trials and tribulations were documented in the owner's thread.

Anyway, I never resorted to heating anything, but did apply 50/50 ATF and acetone over a few days. Also, to avoid mushrooming the pin, and to create a way to apply rotational force, I welded a leftover lug nut from the Pete to one end of the pin.

In your case, I'd start the 50/50 treatment, then make a simple spreader tool from a coupling nut and two bolts. At this point I'd guess that the remnants of the pin will have to be pushed out, not in.

Still chasing the issue with an outrigger that won't retract after having run the backhoe for a while. Hoping to isolate the problem by hooking up a different cylinder later today.

If it turns out that it's the cylinder (I sure hope so) and not the valve, I'll be taking that one off soon. Maybe I should start soaking the pins now, even though they look loose.
I like the idea of using the coupling nut and two bolts. I had thought something like that would help. The only issue I see would be that one side of the pin might stay stuck and the other push out and I would be left trying to get the other half out. For that, maybe I can use some 1/2 in plate scrap to go over the hole of the one that got pushed out. Thanks FLU farm!
 

The FLU farm

Well-known member
Steel Soldiers Supporter
3,351
1,345
113
Location
The actual midwest, NM.
Once you get one of them out it's easy enough to drive the other one out with a drift. Just don't use a large one and risk mushrooming the inside, too. And the outrigger must obviously be well supported for the hammer blows to be effective.

Worst case, start drilling through the remains and get the piece out that way.
 

rtrask

Well-known member
342
251
63
Location
San Luis Valley, Colorado
It was an extended battle, but I finally got the stabilizer cylinders separated from the rest of the FLU. I cut the pins on both sides, then some friends with a cutting torch and a smaller diameter pin showed up to help. We heated it to red hot and took turns hitting it with a 16# sledge. We eventually got both stubs out of one side. On the other side, we got the stub out of one side, but no amount of heating it up and hitting it with a 16# sledge would move it. Then my friend cut the center out of the stub that would not budge which was a lot easier than hitting it with a 16# sledge. Then for good measure we cut the stub out of the eye of the remaining rod. Done and dusted.

I will liberally coat the replacement pins with anti-seize when I put it back together. I am tempted to install some grease certs, but I doubt it will help that much. I think that my dry climate and liberal use of anti-seize will do the trick. Any thoughts?
 

The FLU farm

Well-known member
Steel Soldiers Supporter
3,351
1,345
113
Location
The actual midwest, NM.
I would leave them dry, as intended. Whatever you put on there is likely to attract dirt, and it's doubtful that you'll have to remove those pins again anyway.

If anything, machine them down a few thousands in diameter if they're a tight press fit. Slop doesn't matter in that application.

On a related note, I finally got the valve for the stubborn outrigger working again. It's amazing how little silt it takes to prevent the spool from going down in the valve and opening the circuit.
 

rtrask

Well-known member
342
251
63
Location
San Luis Valley, Colorado
I am looking at buying a Stanley impact wrench to use with my FLU. Looking back through the thread it looks like the 3/4" version (Stanley IW12 ?) I have a 40 gallon air compressor but it is not up to the job for some higher torque nuts/bolts. What is you all's opinion is it worth the cost.
 

glcaines

Well-known member
3,917
2,608
113
Location
Hiawassee, Georgia
That would definitely be a neat tool to have, but they go for too high a price for me. Even the used ones are very expensive. Plus, you are tied to using it with the FLU hydraulics. I purchased a 3/4" Chicago Pneumatic impact wrench years ago. I run it off the pneumatic system on my M35A3 as well as my 40 gallon air compressor using a 3/4" ID hose. It removes and tightens the nuts on my FLU419, my M35A3 and my trailers without difficulty, although it is a big air hog. I pull the trigger a couple of times and then wait for the pressure to build up again. Interestingly, it seems to perform better on the deuce air supply than my 40 gallon compressor. My Chicago Pneumatic 1/2" impact wrench had no hope of removing the nuts. I haven't looked at the specs on the Stanley hydraulic impact wrench, but I suspect they are very high.
 

The FLU farm

Well-known member
Steel Soldiers Supporter
3,351
1,345
113
Location
The actual midwest, NM.
I liked my 3/4-inch version enough to also buy a 1-inch.

The 3/4 was NOS and quite affordable, but the 1-incher was bought used. Either one is great, but I wouldn't use the heavy and cumbersome 1-inch if the 3/4 would do the job.

Either way, your 40 gallon tank is likely not the issue. A good 3/4-inch air impact will do a lot, if fed through large enough hoses. It won't do it for as long if the tank is small, though.

EDIT: quick check on eBay and there is a new 3/4-inch for $700. Much more than I paid a few years ago, but things have changed. Worth it.
 

rtrask

Well-known member
342
251
63
Location
San Luis Valley, Colorado
I liked my 3/4-inch version enough to also buy a 1-inch.

The 3/4 was NOS and quite affordable, but the 1-incher was bought used. Either one is great, but I wouldn't use the heavy and cumbersome 1-inch if the 3/4 would do the job.

Either way, your 40 gallon tank is likely not the issue. A good 3/4-inch air impact will do a lot, if fed through large enough hoses. It won't do it for as long if the tank is small, though.

EDIT: quick check on eBay and there is a new 3/4-inch for $700. Much more than I paid a few years ago, but things have changed. Worth it.
I can go up to a 1/2 inch on my tank, and I think I will get a pressure switch etc. to do that. Part of the reason I want to go with hydraulic is that I am off grid running off solar. (I have 30 kWatts of battery but constantly running that compressor to only get a few licks on a stubborn bolt doesn't seem prudent) I will not often need that much torque, but when I do options are limited.

FLU farm, I thought you said in an earlier post that the front hydraulics were not quite sufficient for your 1" hydraulic impact wrench. It might be worth the extra $$ to get a 1" if the FLU hydraulics will support it. I can use the pneumatic for most work.

How hard is it to find the fittings to attach a Stanley impact wrench?
 
Last edited:

The FLU farm

Well-known member
Steel Soldiers Supporter
3,351
1,345
113
Location
The actual midwest, NM.
I ran a 3/4-inch impact off the wet tank on the Pete, maybe five gallons worth. No, I couldn't do all 10 lug nuts in quick succession, but it worked well enough. Hose size and compressor output seems more important than tank size. Also, not all pneumatic impacts are created the same.

Can't recall having any issues running the 1-inch off the FLU. But maybe I did at some point and forgot? But if the specs for the impact matches the output of the pump, it should work. Again, I don't remember the specs for either.

Also don't remember where I bought the QD couplers. Sorry. Took the numbers off the ones on the FLU, then poked around on the web until I found reasonably priced ones. Oh, and do not forget to get whip hoses.
 

glcaines

Well-known member
3,917
2,608
113
Location
Hiawassee, Georgia
I found new stainless steel Parker couplers on Ebay for a very reasonable price. Identical models to what was on the FLU. I replaced both hose couplers on the FLU, which were severely corroded, and added both couplers to the hydraulic breaker, which were missing. My Stanley breaker was brand new and still orange and only had the whips, with no couplers.
 

rtrask

Well-known member
342
251
63
Location
San Luis Valley, Colorado
I replaced the hoses to the bucket cylinder, and then decided I needed to solve every hydraulic leak while I was at it. The Stabilizer cylinders were the worst offenders but at least one of the swing cylinders was bad too. So now I have all new seals. I think I may need to replace a hose or two yet. Anyway, I have been doing a lot of field repair lately. Over the weekend I fired it up with the PTO engaged for the rear hydraulics and after it warmed up the engine started racing, and would not respond to the hand throttle. I finally got the dog house off and with a bit of prying got it shut down. Just before it started racing I heard a pop, and I assumed that one of the return springs had come off. Yet another task on my expanding list of to-do's. I couldn't find a spring that was off, but found one I thought might be the issue. Fired it up again and thought the issue was resolved, until it started running fast again. "What the heck" I crawled under it looking around and did not see anything obvious. Then the thought struck me and I went around, and sure enough the high / low switch was set to high. About 20 heart beats after I set it to low it magically went back to normal. The thing is that switch has never worked before, and now it and the raise / lower front end switch works like a charm.

All of that pounding to get the pins out of the stabilizers must have jarred something loose.

There are a couple of quick connections on the bucket cylinder hose between the brackets mount the hoses to the backhoe arm. In the parts manual it shows metal tubes in there. Does anyone know what the part number is for the quick connect?
 

The FLU farm

Well-known member
Steel Soldiers Supporter
3,351
1,345
113
Location
The actual midwest, NM.
That's funny, Ron. I knew exactly what was going on with the high rpm before reading through your post.
I was not so funny when it happened to me when starting the first one on the trailer when it got here, since I had no clue how these things work.

Also, you may want to leave the outrigger cylinders alone for a while. Mine started leaking after having dipped both deep into mud, and working them quite a bit while still in that mud (I was stuck).

So I eventually got the correct tools to take them apart and replace the seals, but the one valve that wouldn't let me retract one of them became more important. Once I had the valve working again (which was a relatively easy fix), both cylinders pretty much stopped leaking.

And I've had other cylinders self heal somehow. These days I let them leak a bit, even if it's for years. But the ones that spring a real leak obviously must be fixed in order to actually use the machine.
 

rtrask

Well-known member
342
251
63
Location
San Luis Valley, Colorado
That's funny, Ron. I knew exactly what was going on with the high rpm before reading through your post.
I was not so funny when it happened to me when starting the first one on the trailer when it got here, since I had no clue how these things work.

Also, you may want to leave the outrigger cylinders alone for a while. Mine started leaking after having dipped both deep into mud, and working them quite a bit while still in that mud (I was stuck).

So I eventually got the correct tools to take them apart and replace the seals, but the one valve that wouldn't let me retract one of them became more important. Once I had the valve working again (which was a relatively easy fix), both cylinders pretty much stopped leaking.

And I've had other cylinders self heal somehow. These days I let them leak a bit, even if it's for years. But the ones that spring a real leak obviously must be fixed in order to actually use the machine.
I have already replaced all the seals in the main cylinders at this point, and replaced the rod on the bucket cylinder because there was a big chunk of chrome missing. It started with one of the boom cylinders when I first started playing with it right after I got it. But of course as soon as you change one of the boom cylinders, you have to change the other. The other boom cylinder started leaking real bad right after I replaced the seals on the first, so I did that one. I probably did not need to mess with the bucket cylinder when I did, but the bad patch of chrome kept nagging at me.

Then I got it down here where I really started using it, and the dipper cylinder started spewing. That was when I discovered the water in the hydraulic fluid. I replaced the seals on it and tried to press on. I tried to ignore the stabilizer on the left size when it started leaking but it just kept getting worse, and then it started leaking on the right side. I was having a hard time keeping hydraulic fluid in the tank. It was also leaking on the left rotator so I decided that while I had it apart I might as well replace those as well.

The only cylinders that I have not replaced the seals on are the ones that lock the backhoe in the upright position, and the one that tips the platform. At this point I have gotten pretty good at replacing the seals. I think I may have messed something up on the first one on the boom cylinder but the others are all solid, and the one I messed up on barely weeps. I think I may have to replace a hose or two but I am determined to stop the leaks, and keep the tank full.
 

glcaines

Well-known member
3,917
2,608
113
Location
Hiawassee, Georgia
I need to adjust the slave cylinder on my FLU419. The TM says to tilt the cab, which I don't necessarily want to do. I haven't actually looked at the SEE yet to make a determination because of other non-related issues. Can the slave cylinder be adjusted without tilting the cab? I've performed a lot of other maintenance on the SEE without having to tilt the cab although the TM said to tilt it.
 
Last edited:

glcaines

Well-known member
3,917
2,608
113
Location
Hiawassee, Georgia
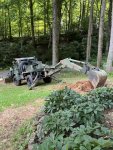
Need to lay ~150 feet or so of 6-inch drainage pipe from my house. The FLU419 backhoe is making the job very easy. Buying my SEE was one of my better ideas. I don't talk about my not-so-good ideas. I live on a gravel road over 1/2 mile from pavement. There is a large rock, about 3 X 4 feet with a 10 X 10 inch chunk that sticks up in the middle of the rock about 10 inches, located in the middle of the road. What I can see is only the tip of a very large rock. A large JD skid-steer couldn't dig it up, as it was way too large. I'm going to use the jackhammer from my SEE to break the rock up before someone trashes their oil pan. If the jackhammer doesn't work because the rock is extremely hard, I'll drill some holes and use dynamite.
IMG_0222.jpg
 
Top
AdBlock Detected

We get it, advertisements are annoying!

Sure, ad-blocking software does a great job at blocking ads, but it also blocks useful features of our website like our supporting vendors. Their ads help keep Steel Soldiers going. Please consider disabling your ad blockers for the site. Thanks!

I've Disabled AdBlock
No Thanks