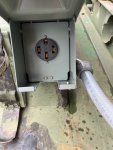
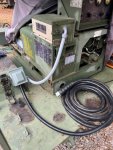
- 17,491
- 25,872
- 113
- Location
- Burgkunstadt, Germany
I might have an adapter here.
Steel Soldiers now has a few new forums, read more about it at: New Munitions Forums!

The one in the TMWhat NSN did you use?
All ground straps are in place and in great shape.Unless I'm missing it, the TM's seem to be terrible as far as showing the battery and slave port cable routings, but without looking at one of mine, I believe the slave port negative goes to the back of the ground stud on the frame just behind and left of the slave port.
Then another separat wire runs from that same stud over to the negative on the starter where the battery negative attaches.
The slave port positive runs right to the starter.
As far as the negative goes you can attach it anywhere to the chassis, engine, whatever and you should have a good path back to battery negative, assuming all your other wires and ground straps are in place.
If in doubt, attach it to the block somewhere since the starter will be your biggest current draw.
If you attach it to the frame and your ground strap across the motor mount is missing or broken and the ground from starter - to the frame is missing you will have cranking issues trying to start it from the slave port.
OkYes, it is supposed to go to the back side of the ground stud. I thought long and hard about it all day. Then wire # P55Y2N runs to the starter, I think.
Exactly that.Just out of curiosity... is the plan to use the MEP-002's slave port with your CUCV? If so, do you need to use a 2 pin to 1 pin Nato adaptor to use Nato slave jumper cable?
I'm considering buying a Nato slave cable to enable jumping one genset off the other if the need arises. However, that would require me to purchase (2) 2 to 1 pin adaptors plus a ~12ft Nato slave jumper cable as well. Alternative I guess... is to buy a long set of automotive jumper cables which would be significantly less expen$ive.

Appreciate that!I might have an adapter here.
If the positive cable goes to the starter, a flag terminal probably works better for stacking the wires on the stud.View attachment 902203
Funny how the shorter ground cable has a red ring terminal on it.
The positive cable has just a plain flag terminal with no shrink sleeve.
It does not.That slave port assembly looks correct just based off the pic. Ground cable looks to be about the right length...
Out of curiosity did the one on the machine look like someone had modified it to make the ground reach to the starter?
That’s exactly why the flag terminal is used.If the positive cable goes to the starter, a flag terminal probably works better for stacking the wires on the stud.
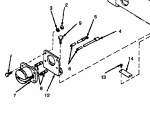
Here is what I see.
GROUP 16 SKID BASE ASSEMBLY
(Figure #) 56 - AOOOO AOO AFFFF SLAVE RECEPTACLE ASSEMBLY EA 1 1
(Part #) 72-5984 30554
The only thing here important is 72-5984
This is the first entry to the Slave Recpt. information. It has the figure # 56, but no Item number. That tells me its the prime number, for the whole Recpt.
The picture shows an arrow to item #7.
(Figure #)56, (Item #) 7 PAOZZ PAOZZ PAFZZ (NSN): 5935-00-295-6403 CONNECTOR, RECEPTACLE. EA 1 1
ELECTRICAL
(Part #) MS75058-1
(Part #) 323-0337
This number is JUST for the connector, nothing else.
View attachment 902232
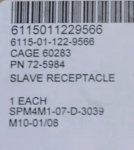
According to my book, the compleat recpt for the MEP-002A should be NSN 6115-01-122-9566, Part # 72-5984
The same info is for the MEP-003A.
Is this what numbers you used?
Thanks for the tip!Then you have what is supposed to be there. Just hook the neg to the back side of the ground stud. Do not over tighten the ground stud. They are soft and you will have two parts in your hand before you know it.
We always used a load terminal from a 3KW DC set, with the 002A and 003A sets, as a ground terminal. You have to drill out the mounting hole a bit, but since the load terminal is so much bigger, it never broke off again.
