• Steel Soldiers now has a few new forums, read more about it at: New Munitions Forums!

  • Microsoft MSN, Live, Hotmail, Outlook email users may not be receiving emails. We are working to resolve this issue. Please add support@steelsoldiers.com to your trusted contacts.

MEP-803A No power at the panel

Light in the Dark

Well-known member
Steel Soldiers Supporter
3,829
5,941
113
Location
MA
Did you undertake all of the steps called out in the TM testing procedure, to arrive here? I would not lop that plug off and move backwards with butt connectors. Its got a locater on it, get it lined up and twist the collar to retighten.
 

chilbun28

Active member
70
113
33
Location
Deep South
I just cleaned and tested the plug. The male prong that comes down from the male side of the plug appears to be weak, corroded and about to break off. Yhe female side of the plug cleaned up fairly well but still some corrosion in the female port coming from the dead crank switch. I tested voltage at the female side of the plug and I have 25 volts there. Power is not getting through that plug to the E-Stop switch. I've been at it about an hour now working very delicately with it. Worked nights so I'm about to turn in. What are my options with this bad plug? And thanks everyone for getting me to this point. I really appreciate yalls help.
 

kloppk

Well-known member
Steel Soldiers Supporter
2,145
3,526
113
Location
Pepperell, Massachusetts
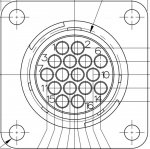
On P7 J7 pin location 16 is un-used.
I'd suggest buying a male and female pin for that connector, cutting the wires going to pin 14 off as close to the connectors as possible, attaching the two new pins to the wires, snapping the new contacts into position 16. Fixed.
The pins are about $1.50 each.
 
Last edited:

loosegravel

Just a retired mechanic who's having fun!
504
892
93
Location
Enumclaw, Washington
I just cleaned and tested the plug. The male prong that comes down from the male side of the plug appears to be weak, corroded and about to break off. Yhe female side of the plug cleaned up fairly well but still some corrosion in the female port coming from the dead crank switch. I tested voltage at the female side of the plug and I have 25 volts there. Power is not getting through that plug to the E-Stop switch. I've been at it about an hour now working very delicately with it. Worked nights so I'm about to turn in. What are my options with this bad plug? And thanks everyone for getting me to this point. I really appreciate yalls help.
I believe like the others…the last resort would be to bypass that connector. I have purchased the pins that Klopp is referring to, both male and female. I didn’t have the correct crimping tool to secure the pins to the wires. So I carefully used a small needle nose pliers to crimp them, then I carefully used a little bit of solder on each of the pins. It’s so much less problematic to keep them stock. But, we often follow the path of lease resistance. If you do decide to bypass one or more of the wires in this J7/P7 connector, don’t use butt connectors. Use solder and heat shrink tubing. You will definitely have less trouble later on.
 

chilbun28

Active member
70
113
33
Location
Deep South
Would it be an overkill if I ordered a new cannon plug and all new pin connectors and change the entire thing out? Also, that wire is discolored and it looks like it has a good bit of corrosion in the end of it. If I cut the wire back to get good clean wire and shoulder in what I need does anyone know what gauge and grade wire thus is?
 

loosegravel

Just a retired mechanic who's having fun!
504
892
93
Location
Enumclaw, Washington
Would it be an overkill if I ordered a new cannon plug and all new pin connectors and change the entire thing out? Also, that wire is discolored and it looks like it has a good bit of corrosion in the end of it. If I cut the wire back to get good clean wire and shoulder in what I need does anyone know what gauge and grade wire thus is?
There’s usually a little bit of slack on each side of the J7/P7 connectors from what I’ve seen. So even after cutting off the original pins, you shouldn’t have any problem with having enough wire to repin and reinstall into the connectors. You may need to cut some of the zip-ties to pull the slack up on the wire that you’re working with. The wire size is 18 AWG or 16 AWG. I honestly can’t remember which.
 

chilbun28

Active member
70
113
33
Location
Deep South
I haven't found any content on the plug P7/J7 as far as all the wires which go through that plug. I'm curious what wires go to what component. The best I can make the wires out their numbers are:
1338
1010
118B
101C
143B
119E
132B
131B
1170
178B
141B
115M
129B
128B
143B

Does anyone have information or know what TM I could find this information if I have issues with rewiring this plug. I'm hoping to get on the job this weekend or Monday, Thanks -Chuck
 

chilbun28

Active member
70
113
33
Location
Deep South
Did you undertake all of the steps called out in the TM testing procedure, to arrive here? I would not lop that plug off and move backwards with butt connectors. Its got a locater on it, get it lined up and twist the collar to retighten.
Could you please give me more information on the locater which is in the plug? My plug is kind of jacked up and probably will require me replacing the entire plug if I don't bypass it and solder connect all the wires bypassing it. Thanks
 

loosegravel

Just a retired mechanic who's having fun!
504
892
93
Location
Enumclaw, Washington
Patience and tolerance are both good virtues as they say. What makes this a great forum IMO is the level of both which exist here. I know that I've had my share of learning experiences with these power making machines. And the members here have walked me through all of those scenarios with patience and tolerance to no end. Chilbun, just ask the questions here and you'll be led in the right direction. And, there's no such thing as a stupid question! Thanks Klopp for pointing this person in the right direction.
 

loosegravel

Just a retired mechanic who's having fun!
504
892
93
Location
Enumclaw, Washington
Chilbun, as you've already gathered, the general consensus here is to not by-pass the P7/J7 connector or jump around any of the perspective pins in that connector. But we're not there with you looking at your particular unit. If that 16-pin cannon plug is damaged beyond repair as you say it is, the next step would be to replace it or the individual pins that need replacement. The parts are all available on-line. It will require a couple of tools. One for removing the individual pins from the connector. Another for crimping the replacement pins to the wires. It will also require some patience as mentioned above. Use the information that has been provided in this thread to locate the wires into the correct place. These cannon plugs have little locating notches in them. When the notches are lined up, the connectors can be pushed together and the ring can be rotated to secure both halves of the connectors together. (See the diagram above to see the notches)
 

chilbun28

Active member
70
113
33
Location
Deep South
I'm looking for the part numbers for P7 and J7. I willborder new plugs and pins and go from there but I'm not seeing them. Dies anyone have the part numbers to the plugs or know a place that probably sells them?
 

kloppk

Well-known member
Steel Soldiers Supporter
2,145
3,526
113
Location
Pepperell, Massachusetts
J7 is Tyco Part Number 206036-1
Available here for $5.70 ----> J7

P7 is Tyco Part Number 206037-1
Available here for $7.67 ---> P7

It's the same place that has the pins that I posted in an earlier post. Shipping for all the parts should be $4.99 USPS First Class

I buy tons of parts from them each year.
 
Top
AdBlock Detected

We get it, advertisements are annoying!

Sure, ad-blocking software does a great job at blocking ads, but it also blocks useful features of our website like our supporting vendors. Their ads help keep Steel Soldiers going. Please consider disabling your ad blockers for the site. Thanks!

I've Disabled AdBlock
No Thanks