• Steel Soldiers now has a few new forums, read more about it at: New Munitions Forums!

  • Microsoft MSN, Live, Hotmail, Outlook email users may not be receiving emails. We are working to resolve this issue. Please add support@steelsoldiers.com to your trusted contacts.

MEP-803A Will no longer start seems to be fuel issue not sure how.

Light in the Dark

Well-known member
Steel Soldiers Supporter
3,743
5,649
113
Location
MA
I'm going to have to see if I can even break the loose the bolt. At this point using a 15/16 wrench using the box and and a pipe I only get a very small amount of movement not enough to actually break it loose and I'm not sure that I can get a impact tool in there without removing the radiator. Unfortunately I don't have a breaker bar. And I don't have a shallow impact socket. So it looks like removing the end might be the best solution although if I get a shallow socket and a breaker bar maybe I can at least get her loosened up. The dash 24 TM says that that hole is on there at 225 ft pounds of torque. And if the water separator is any indication King Kong probably put that thing in there and that's probably more like 350 or 400 lbs.
Don't forget the crank pulley is a LH thread!
 

Ray70

Well-known member
2,483
5,520
113
Location
West greenwich/RI
At this point you really should just pull the entire radiator housing off.
I've done it several times and takes less than 20 minutes but will give you full access to everything you need to see and you can use an impact to remove the crank bolt with no need to wedge the flywheel or anything!
Plus if you need to remove the rack to check for straightness, you'll still have to remove the radiator and housing to get it out!
I know everyone else has said this and I'll say it too.... the 20 minutes worth of effort will save you countless hours of trying to see inside the block to figure out what's wrong!
And L.I.T.D is correct that the crank bolt is a left hand thread, which you have now got on there good and tight!
 

Toolslinger

Member
37
79
18
Location
PA
I am quite sure the advise to pull the housing is spot on. That said, you're not going to get it done in 20 minutes, because you haven't done it before. After you do it a time or ten, I'm guessing 20 minutes is probably right. Plan on an hour so you can do it carefully. Having had to loosen the housing on my 802a, I imagine I'd be in the 30-40 minute range to take it completely off now.

You're going to drop/loose some of the nuts, and likely bolts from the enclosure. Get a small stash of them, because it isn't going to be the last time you pull panels, and loose the hardware in to the abyss.

Seperatly, get a 1/2" breaker bar. Just because. Don't get some POS. Get a ligit brand that isn't going to fail under the abuse breaker bars see. Having a warranty like Horror Freight isn't important when you're bleeding because the head snapped under load, and you ended up in to some sharp edge. Get one that will never need the warranty.
 

Guyfang

Moderator
Staff member
Moderator
16,418
23,363
113
Location
Burgkunstadt, Germany
It also gives you a chance to clean stuff up, adjust stuff that is loose and................... Find interesting things. Like nuts, bolts, washers and maybe even tools. Also, take the tank out and clean it. Make sure nothing is under the tank that might wear a hole in it.

So, if you do take it off, before putting it back together, say something here. Then we will chime in to tell you how to get it back together RIGHT. So all the holes align up right. Another simple, but if done uninformed, become a "major adventure". Or can be.
 

deherenman

New member
29
11
3
Location
Texas
Okay sorry for the long hiatus. Had to get the unit into the garage then I had to get some proper tools sockets impact wrench etc to proceed to take apart the unit.


So after removing the urine cover I do see where the fuel shut off lever the little tip does engage The rack block for lack of a better words. But then it slips off when you turn it too far so I would say you get about a third of the way forwards towards the front of the engine and it'll slip off and not hold the rack forward anymore preventing the engine from stopping. Now I do not have any IPS in the unit at this time so it might make a difference. So I probably need to put all my IPS in reshoot the videos and see if my IPS caused the rack to bind or if I just have the slipping off issue. I will attach photographs and video videos will be on YouTube. Any advice would be greatly appreciated as always.

Part one video

Part 2 video

Part 3 video

Part 4 video
 

Attachments

Light in the Dark

Well-known member
Steel Soldiers Supporter
3,743
5,649
113
Location
MA
I wonder if your fuel rack is bent slightly, causing it to hold position fully out (and the sound that you hear). That could account for the change in position of the block on the rack, that the rotating armature of the fuel stop lever needs to hit. Does the curved part of that shutoff look worn down? I just took a photo of one I pulled from a parts machine before... does the profile on the 'business end' look identical in yours?

2024-09-09-08-54-38-907.jpg
2024-09-09-08-54-49-235.jpg
 

deherenman

New member
29
11
3
Location
Texas
It looks very similar. I have not taken it out of the machine as of yet. Maybe I'll get to that tonight or tomorrow and see what exactly it looks like I'll try to get pictures of it as well. The only time it makes that slight grinding sound is when the rack is all the way pulled out and I'm not even sure that in reality it could go that far if the IPS were in because they can't turn that far it's only a few manually manipulate it that far forward with the gear and cover off.

If I do have to remove the rack is there a bolt holding it in at the rear of the engine as well closest to the generator head or is it just resting on a guide?

I didn't see anyway that was held in they are at the generator head of the engine side of the rack and before I pull it out of there I want to be able to get it back in.
 

deherenman

New member
29
11
3
Location
Texas
Is the little piece on the shut off lever that's on the inside of the engine that actually touches the flat part of the rack to manipulate the rack forwards is that piece supposed to be slightly wobbly or almost like it's spring-loaded it's got a little play in it. It's it's not stiff like a solid piece of metal it probably has an eighth of an inch maybe slightly more of play forwards and backwards and you can sort of see that in the video.
 

Light in the Dark

Well-known member
Steel Soldiers Supporter
3,743
5,649
113
Location
MA
No it goes into a cavity. There is a bushing at the far end. Here is what the 803 rack looks like (blatantly stolen from an ebay listing):

s-l1600 (1).jpg
 

deherenman

New member
29
11
3
Location
Texas
It doesn't feel like it's popped out of the bushing there at the end. I will have to take a look at that. Should that rack slide right out?

Is that a relatively easy process it looks like maybe just one bolt and then that should just pop right out slide forward? I'm perfectly willing to make the attempt of removing the rack and seeing if it's bent or how to kill her in some way. Just looking for a Way Forward.
 

Guyfang

Moderator
Staff member
Moderator
16,418
23,363
113
Location
Burgkunstadt, Germany
In days long gone by, the bent rack was a huge problem. Lister Peter fixed it, (How I do not know) and everyone was once again smiling. Its been a long time since I heard of one being bent. Great pictures. Keep that up. I am interested about this failure.
 

deherenman

New member
29
11
3
Location
Texas
My unit is a 1999 it does have a rebuild sticker it does not have a date I'm pretty sure there's some sort of a serial number lookup on it. It has 6,400 hours. So I'm assuming that's $6,400 hours after the rebuilt. I will definitely keep it posted whatever I discovered because the forms been such a invaluable resource.
 

deherenman

New member
29
11
3
Location
Texas
Thank you Colt and others I definitely checked out the video. I do see the gap. The issue I seem to have as soon as I put in an IP how that the thing is moving free at binds up.


I don't see an easy way to remove just the thin part of the metal rack do you have to take the whole bracket piece off the front of the engine that is holding the rack? Looks like maybe there's three screws and that picture above? I'm very cautious because this is such a finicky / delicate part. I just don't want to mess it up.
 

deherenman

New member
29
11
3
Location
Texas
I'm looking for the best way to remove the fuel rack. It looks like you wouldn't have to completely remove that cast iron piece that's in the front holding the rack on it looks like there's maybe two little pins that hold that in but I was able to stick an allen which all the way through so maybe those are press fit only?


Has anybody removed a rack recently and has the proper procedure and what all needs to be removed?

It looks like the bolts in the front holding that cast iron piece on the direct slides between the two fingers those bolts don't seem to be something I can get a wrench on they seem to be just rounded like they're pressed on like a pin. I'll try to provide as best pictures as possible but I'm open to suggestions.
 

Attachments

Ray70

Well-known member
2,483
5,520
113
Location
West greenwich/RI
Every time I've ever taken a rack out I removed the whole thing by taking out the pivot pins ( held in by little spring clips ) never had much luck trying to get the dowel pins out by themselves.
If you end up in a mess, I've got a couple 803 racks in my parts stash, send me a PM if you end up needing a new rack.
 

deherenman

New member
29
11
3
Location
Texas
@Ray70 Thanks I will keep that in mind if this doesn't workout.

Current status.
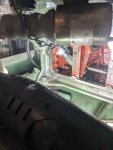
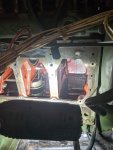
Front of machine removed / radiator housing / fuel tank cleaned. Upgraded well nuts / seals from @CallMeColt .
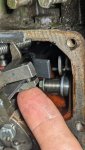
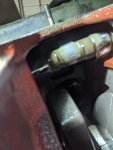
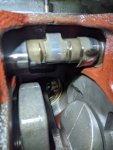
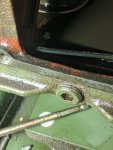
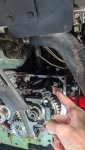
Gear end cover removed.
I had all the IP's removed. Rack was moving freely. So I didn't remove it. Made sure it wasn't over extending and coming out of the guide at the other end with gear end cover setting in place..

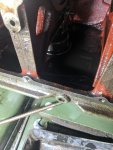
I put IP's in place starting with the IP closes to the generator head using a allen wrench to line up the rack. This works well but make sure you don't drop it down into the block.

I was able to get 3 of the 4 IP's in with out issue rack was moving freely was using USB camera to verify long the way. As well has the fuel shut off lever.
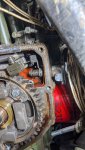
The 4th IP's would install 2nd back from fan. Would install and bind up the rack this was with the IP clamp in place and tightened down. I thought.

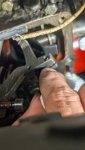
I took a box end wrench and pressed down on the IP and hear the rack release (spring back in to place). So pressing down with the wrench and tightening the clamp down seems to of done the trick. Now the rack is moving freely with the fuel shut off.

Not sure I could of seen the issue with out the gear end cover off. Having the cover off did help. You could see much easier if the rack was bound up. it would sort of move side ways and to the right.

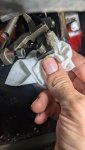
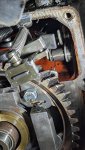
So after I got all the IP's in I decided not to remove the rack. Replacing the IP's was a last ditch effort to not remove the rack. As I was not having much luck in getting it out and I wanted to be able to get everything back together.

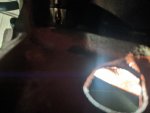
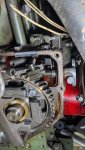
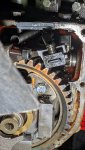
As a side note I did drop the allen wrench down into the block and had to remove the crank case cover. I didn't have a strong enough magnet to pick it up. I got lucky in the fact that it was the IP above the oil fill port.

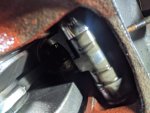
Question is there anything I should do well I have the crank case cover off?

Inside the block it's self seems vary clean no sludge / metal shavings.
 

deherenman

New member
29
11
3
Location
Texas
Pictures related to the above post internals of engine with crankcase cover removed.
 

Attachments

Top
AdBlock Detected

We get it, advertisements are annoying!

Sure, ad-blocking software does a great job at blocking ads, but it also blocks useful features of our website like our supporting vendors. Their ads help keep Steel Soldiers going. Please consider disabling your ad blockers for the site. Thanks!

I've Disabled AdBlock
No Thanks