• Steel Soldiers now has a few new forums, read more about it at: New Munitions Forums!

  • Microsoft MSN, Live, Hotmail, Outlook email users may not be receiving emails. We are working to resolve this issue. Please add support@steelsoldiers.com to your trusted contacts.

M925a2 Power Surge

74M35A2

Well-known member
4,145
330
83
Location
Livonia, MI
You can have it for free bud. Will send it to you once I have the new engine in and everything working correctly. Reminder, it is 12v, but I can include a 12/24 relay, or just send 12v to it. Either way easy to do.

They will love it at the oyster bar.
 

74M35A2

Well-known member
4,145
330
83
Location
Livonia, MI
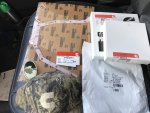
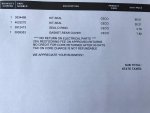
OK, these are supposedly the stock size front and rear crank seals. Had to grab a knarly hat while there. Yes, $86 for a rear main. WTF. Oh well, that is the one you definently don't want leaking, so I went original equipment.

IMG_4052.jpgIMG_4053.jpg

Will jamb these in, swap the oil pan, then stick the trans on the back. Going to strip the accessories off when doing so, then put them back on after it is in the truck.
 
Last edited:

74M35A2

Well-known member
4,145
330
83
Location
Livonia, MI
The RV ISL engine came equipped with an exhaust brake (butterfly valve on turbo outlet). I also just won an eBay auction for a Jake brake (compression brake, Cummins "C" brake) setup for this engine.

Can't use both at the same time, but could select between one or another. The Jake is two stage since it has two actuators, can turn the engine into a 3 or 6 cylinder air compressor upon braking. Provides up to 252hp of braking energy.

Probably not installing it until after the engine is in the truck. I have to study the install manual and probably collect the needed parts it did not include.

http://www.jacobsvehiclesystems.com/technology/compression-release-brakes/

http://www.jacobsvehiclesystems.com/files/support/docs-pdfs/26302d.pdf

http://www.jacobsvehiclesystems.com/files/support/docs-pdfs/26301D.pdf

https://cumminsengines.com/powerspec-isl-engine-brake
 

smoke

Active member
214
89
28
Location
oxford,pa
make sure you leave the rear seal housing a little loose when installing the seal in the housing. If the housing is tight to block you can crack the seal housing when pressing in the seal. Plus it lets the seal self center on the crank.I use a little bead of high temp rtv between housing and block just in case there is any imperfection on the housing. Know leak spot is where oil pan, rear seal housing ,and block met so on bead across that area helps a lot.
 

74M35A2

Well-known member
4,145
330
83
Location
Livonia, MI
Thanks. Was going to press the seal into the carrier first, then bolt the carrier to the block. Going to do this at the same time as the oil pan swap so it can all be happy and seal together.
 

smoke

Active member
214
89
28
Location
oxford,pa
when the cummins tech came to our shop to train us so we could get warranty on our rebuilds. He showed and told us to put the housing on the block. Bolts finger tight where housing could to shifted around just alittle then press the seal in. If a seal with quick sleeve center the seal on the sleeve first before press it in the housing that way seal is not at the very end of the sleeve. tighten housing to 89 inlbs.
 
Last edited:

74M35A2

Well-known member
4,145
330
83
Location
Livonia, MI
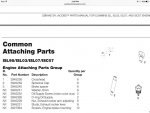
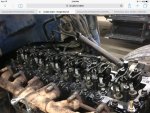
Jake brake install takes all sorts of parts. Most sellers just sell the used Jake housings themselves. Full installations requires different lower and upper valve covers, 2 hollowed intake rocker studs (oil supply), 6 top threaded hole exhaust rockers studs (housing mount), 6 tall threaded spacers (housing mount), and 6 tall exhaust rocker adjusting nuts. All Jake specific. Ugh! Will go broke if need to buy this stuff all new. Really hope seller cooperates, offering extra $.

Attached is parts list list and photo of such installed, prior to installing the actuator housings (not my engine):

IMG_2558.jpgIMG_2559.jpg
 
Last edited:

Rmtaunton

Well-known member
1,510
31
48
Location
Smyrna, ga
No he is building a green piece of awesomeness :) just watching you to save me ( sorry about that ) but already have my eye on a super 10 for next to nothing , I hate that auto , show us the way


Sent from my iPhone using Tapatalk
 

Rmtaunton

Well-known member
1,510
31
48
Location
Smyrna, ga
And thank you for that ! And swamp and simp I know you both so I can make fun of you two


Sent from my iPhone using Tapatalk
 

74M35A2

Well-known member
4,145
330
83
Location
Livonia, MI
No big updates yet. Hope to get the oil pan changed today on my lunch break, and will do rear seal at same time so they can all settle in happily together. Did front seal this morning (this time with correctly sized stock one), and waiting on 8 rib compressor clutch to arrive, removed 10 rib pulley while waiting. A/C compressor is a 40,000 BTU Valeo unit from an MRAP, 24V clutch coil (model TM-21 HD). Both alternator and compressor are 4 bolt direct pad mount to the one piece accessory bracket. The 12v starter, alternator, and A/C compressor got dumped at the scrap yard yesterday. Also waiting for smaller diameter alternator pulley to arrive to kick up idle output and alternator cooling. The 8 rib alternator pulley I had in stock for test is larger diameter than what I typically ship out to customers, but I was out at the moment. Alternator choices were more limited being that my company does not offer 24v 4 bolt pad mount alternators in the US. Will see if I can bring one back on my next trip to Japan in October. Doubt it.
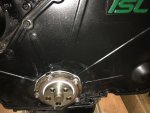
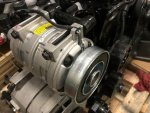
Front Seal.jpgComp.jpg

Once the oil pan and rear seal have been changed, I can mount up the engine side flywheel housing, flywheel, and clutch, for good. Then reseal trans input shaft, bolt clutch housing onto trans and then mate trans to engine. Then swap will be nearly ready to occur. I hope to get the clutch pedal installed in the cab prior to the swap so it is plug-and-play.

This engine was/is available in up to 450hp trim level. I am going to remove the ECM and have that calibration flashed into it if available. Currently, the engine ID tag says ISL-350, but it supposedly already has a factory 400hp calibration in it from when the RV was ordered new as that was an option and was done just via a reflash. RPM will likely still be limited to 2200rpm, but the 13 speed is OD, so we should be fine if wanting to go faster (tire rating limited). Power figures are listed as 1250ft-lb and 450hp for the top spec cal (fire trucks). 400hp and 1250ft-lb if I just leave it as-is.

Spec.jpg
 
Last edited:

Jbulach

Well-known member
Steel Soldiers Supporter
2,654
2,170
113
Location
Sunman Indiana
Just a thought before you start tearing things apart, are you going to get us some good, scientific, before and after swap performance data?
 

74M35A2

Well-known member
4,145
330
83
Location
Livonia, MI
I could, but I'll be standing in the back of the line at the local truck driving school to figure out how to drive this thing. The first days will be like accelerate - air puff - neutral - swear - coast back to zero, try again. Accelerate - grind - accelerate again in next gear - high five myself - neutral - swear - coast to zero.

So in summary, the truck will be way faster stock, at least at first. Another local member 20 minutes away has the same truck/engine also in good running shape, so that will be a good benchmark. Tedcat in Ann Arbor, MI. Going to be very hard to resist not pushing the clutch pedal to the floor once moving, after decades of doing so normally.

What I really want to do is to shift gears in reverse. Then we'll have something cool to play with. Guess I'll fix the air line routing to the T case so it works correctly, then I can double my confusion in both directions. Jake brakes in reverse, a total crowd pleaser.

gears.jpg
 
Last edited:
Top