• Steel Soldiers now has a few new forums, read more about it at: New Munitions Forums!

  • Microsoft MSN, Live, Hotmail, Outlook email users may not be receiving emails. We are working to resolve this issue. Please add support@steelsoldiers.com to your trusted contacts.

My new 1992 M998 Avenger

springer1981

Well-known member
844
1,150
93
Location
Maine
While looking over the truck today I came across a tag on the interior back cabin wall. Thought I would post it to confirm it is an Avenger. Although I covered a couple numbers they are matching Serial Numbers.

Avenger2.jpgAvenger3.jpg
 

TOBASH

Father, Surgeon, Cantankerous Grouch
Steel Soldiers Supporter
Supporting Vendor
3,582
3,490
113
Location
Brooklyn, NY
Awesome piece of history, awesome truck, awesome post.

Very cool!

T
 

Crapgame

Well-known member
635
329
63
Location
Navarre, FL
I was joking with a buddy of mine, I said we need to build a truck cap with a mock Avenger missile launcher on it. PVC missiles that launch out like the old fake guns that had a flag that said "Bang" on them. Put "Bang", "Pow" and "Boom" on them. It was a fleeting though after I thought about how many police I would likely get to meet for driving it around my town LOL.
We built a quad 20mm Flak-Vierling to mount on a 1941 Ford 1,5t truck for reenacting. The Stinger launchers don't even look threatening, just rectangular boxes with 4 holes in the ends, cops and the public wouldn't even know what they are looking at. Use known components like the toothed ring for M1151 turret, the turret traverse motor with gear and the joystick. The rest is just sheetmetal boxes and a plexiglass weathershield. I think we used a chevy wheel bearing and hub as our Flak-Vierling bearing, with a Chevy flywheel and starter gear for traversing. We scaled up measurements from 1:6 and 1:35 scale models and used museum photos as references.

Start looking for an Italeri 6387 Hummer Avenger 1/35 scale model kit to start with. Looks like there is an M3 50cal below the right missile pod.
 
Last edited:

springer1981

Well-known member
844
1,150
93
Location
Maine
We built a quad 20mm Flak-Vierling to mount on a 1941 Ford 1,5t truck for reenacting. The Stinger launchers don't even look threatening, just rectangular boxes with 4 holes in the ends, cops and the public wouldn't even know what they are looking at. Use known components like the toothed ring for M1151 turret, the turret traverse motor with gear and the joystick. The rest is just sheetmetal boxes and a plexiglass weathershield. I think we used a chevy wheel bearing and hub as our Flak-Vierling bearing, with a Chevy flywheel and starter gear for traversing. We scaled up measurements from 1:6 and 1:35 scale models and used museum photos as references.

Start looking for an Italeri 6387 Hummer Avenger 1/35 scale model kit to start with. Looks like there is an M3 50cal below the right missile pod.
Thanks for the suggestion but I actually bought this to use as a truck. Hopefully replacing my 97 F350. When I was looking they all seemed to be soft tops and I really wasn't looking forward to a soft top in the winter plowing my driveway. I came across a hard top the guy called an Avenger. It looked like it needed some help. I kept looking and found 2 more. This was the nicest one of the 3 IMO so I went with it. Now the fun begins trying to make it a functional truck.
 

Postman515

Active member
Steel Soldiers Supporter
487
44
28
Location
Clayton, Illinois
I've owned 3 Avenger Trucks myself. 2 were M998 with the 8660 Gvw Mod. The Other was a Heavy Variant M1097A1 10.3k Truck. They made even less of the M1097A1 Avengers. Actually tracked down the last soldier it was assigned too.
 

springer1981

Well-known member
844
1,150
93
Location
Maine
I found a complete set of nos lights on the auction for less than $200 shipped. I thought that was a pretty reasonable deal considering mine were mostly original and rusted and corroded inside. Since this is my first (hopefully my last) Humvee and I am not real familiar with the electrical system it was a learning experience replacing the lights.

I found that there are 2 separate grounds on the lights. The rears had a strap between the mounting bolts making it a common ground. The front didn't have a strap. I am guessing it was suppose to have one as well. The front light previously worked only as directionals. After changing them out one had a running light while the other was only a directional. After an hour of troubleshooting I figured out that I used a different grounding stud on each side. Since the the blackout lights are unimportant to me I don't care if they work. I moved the ground wire to the other post and all the worked.

The rears has some hack previously work on them so I had to fix the butt connectors and electrical tape. In the end it was a complete success and the lights now work better than they have in a long time. I have some LED replacement bulbs coming and that will be another project.

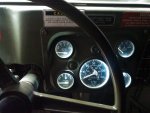
I also addressed the dim green dash lights. At night you couldn't see any of the gauges. I took the dash light covers off and found the deformed due to heat. I used a sawzall and cut the ends off the covers and put a little silicone on them to hole them on. Now I have white light gauges you can actually see at night. I have new clear covers coming as well as LED's and will fix them permanently when they come in.

Some of the original waterproof connectors are old and deteriorating. I used some Dielectric grease on all the connections and that should take care of any weather issues since I have no intention of submerging it any time soon.

Next on the list I bought some NOS surplus Trucklight LED headlights so I will be changing them next week. My goal is to not have to worry about light for a long time.

At this point the only thing I am missing is reverse lights. If I get ambitious, I'm thinking about machining out the rear blackout section of the light and fitting a clear lens to it. Then putting backup lights in the stock housing.
 
Last edited:

springer1981

Well-known member
844
1,150
93
Location
Maine
I also got a chance to examine the entire steering system today looking for my 3" side to side play. I check all the universals in the steering column and they looked good (expected that). I crawled under the truck and the idler arm is all new and solid. The tie rods ends seem solid also. Since I was alone and didn't have anyone to steer for me it was a bit of a challenge to check it all. I was able to move the steering wheel while hanging under it with a flash light and watching. Pitman arm ball joint is toast.

So I need a new Pitman arm. Anything I should know when I am looking for a replacement? Updated or maybe a later model that is better? Any help or recommendations would be appreciated.
 
Last edited:

tourus

Member
197
2
18
Location
madison me.
Are you around the capital area ?? just a guess using Fastenal . I as well live in ME. about 40 mile from Augusta. just wondering. so can look for you around the town as for work, I am there a lot in the Augusta area.
 

springer1981

Well-known member
844
1,150
93
Location
Maine
Are you around the capital area ?? just a guess using Fastenal . I as well live in ME. about 40 mile from Augusta. just wondering. so can look for you around the town as for work, I am there a lot in the Augusta area.
Yes, I live in Augusta.
 

springer1981

Well-known member
844
1,150
93
Location
Maine
When I was messing with all the lights and troubleshooting I noticed a box hanging under the dash. I didn't bother with it much yesterday since it wasn't what I was working on. This morning I decided to check it out and it was a solid state flasher unit. I went looking for it's original location and found there was one already in place. Unscrewed the hanging one to test the mounted one and it works perfectly. Cleaned that up nicely and look like I have a spare now.

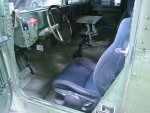
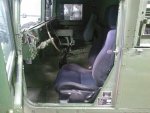
Also spent some time trying to figure out what to do with the stock seat. The passenger side has a higher back and more comfortable "commander" seat? The driver side has the metal frame spring seat. The big issue that I see is with the Avenger hard top and back there is little room for improvement. Behind the seat and crossing the entire width of the cab is a self of sorts. It limits the already limited travel by about 2 inches. The stock seat does have full range of movement but I'd like to get it back a few more inches if possible. Or better yet replace the both with something a little more comfortable. I would probably have to cut the self section out that extends behind the seat. Or I would have to lose weight, the truck is designed for fit army men!
 

DREDnot

Well-known member
723
443
63
Location
Phoenix, AZ
Also spent some time trying to figure out what to do with the stock seat.
I picked up a High Back conversion kit. It gives you a pair of the nicer high backs and a better mount for the drivers side that has more adjustment and travel. you have to drill out the rivets that hold the drivers seat contraptions and remove all that bull****.
highbacks.jpg
 
Last edited:

springer1981

Well-known member
844
1,150
93
Location
Maine
I picked up a High Back conversion kit. It gives you a pair of the nicer high backs and a better mount for the drivers side that has more adjustment and travel. you have to drill out the rivets that hold the drivers seat contraptions and remove all that bull****.
I believe that is what I already have for a passenger seat. In looking at those seats they seem to be very expensive. I found 2 Subaru seats locally for about $100. I'm not really interested in the authenticity of the seats. If It was $100, I'd give it a try. For $500+ I'm going to pass.
 

springer1981

Well-known member
844
1,150
93
Location
Maine
I picked up a pair of Subaru seats today. I think they are heated seats so that might be a bonus in the winter. I also ordered a heavy duty pitman arm. Should be here tomorrow. I think there is going to be a rear window in the cab in my near future.
 

springer1981

Well-known member
844
1,150
93
Location
Maine
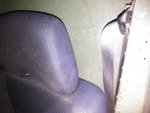
Tonight I test fitted the drivers seat. I like the way it came out. It's still a tight fit for me but not much worse than the original seat. Overall once in there is a little more room than the original. The back of the seat is all the way against the cab and the shelf behind the seat doesn't interfere like the original. Essentially the only way I can get more room is to cut out the back of the cab and move the back wall 4-5" back. I don't want to do that.

I received my clear lens' for the dash and installed LED lights.


Seat1.jpgSeat2.jpgSeat3.jpglights1.jpg
 

springer1981

Well-known member
844
1,150
93
Location
Maine
Today the project was to change the pitman arm.

First remove the two nuts, the castle nut on the pitman arm to steering link ball joint and the pitman arm to steering box. That was easy.

Next, using a puller separate the pitman arm ball joint from the steering link. No way, no how. I have a bucket full of pullers. I have 3 finger, 2 finger, large, small, pulley pullers, harmonic balancer pullers. Nothing would touch the ball joint.

Forget about the ball joint, pull the pitman arm from the steering box. Can't get a puller on it because the sway bar is in the way. Remove the sway bar mounts and drop it down out of the way. No problem, done. Use the 2 finger puller and pop the pitman arm off the steering box splines. Done.

Now with everything loose back to the ball joint. Break out the pickle fork. I have 2 types, the first uses a hammer to split the tapper. I pounded and pounded and the only thing I managed to split was my thumb. It @#$%^& hurts. Time to switch to the air hammer pickle fork. Not happening no how. This is just not going to come apart. Went and got some PB Blaster and sprayed the tapper hoping it would penetrate the tapper and loosen it some. Again No dice, not happening.

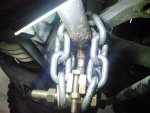
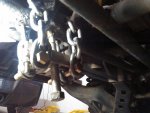
Now 6 hours into this project and no torches to apply heat and a smashed thumb I need a new plan. Here is what I came up with. I built a chain puller. I went to Tractor supply and bought 2 - 1 foot section of heavy chain. Also bought 2 4"x1/2" grade 8 bolts and nuts. I used a harmonic balancer puller at the core. I also drilled the end of the ball joint threads to give a centering hole for the puller. I wrapped the chain around the each side of the steering link and put the 1/2" bolts through. I used a couple of 5/16-18 bolts in the puller slots to prevent the chain from sliding off.

I got it all setup and put the impact to it. At first I didn't think it was going to come off. I stopped and took a picture of the setup (attached below). Then I put the impact to it some more. BANG the tapper gave way and the pitman arm launched. It was pretty loud. With the thumb throbbing and the pitman arm on the floor I closed up shop and went to dinner.

Tomorrow the new pitman arm goes in.

pitman2.jpgpitman1.jpg
 

springer1981

Well-known member
844
1,150
93
Location
Maine
I completed the LED conversion. I replaced all bulbs with LED's in the Turn, Marker, Stop and Running lights. I think the regular incandescent bulbs are brighter in general but not enough to matter. I feel the benefits of the LED's outweigh the brightness.

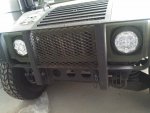
I also changed the headlights to LED. They are MUCH brighter. I purchased a pair of OEM military Trucklight's still in the box from the auction site for $300+ 50 shipping. They are "Bolt In" replacements originals. Here is what I noticed. Even though they are considered direct replacement they are not. They 99% the same however where the back of the bulb housing protrudes into the engine compartment area there is a radius that is slightly larger than the originals. This prevents the rubber isolation mount studs from fully seating with the hood. The nuts only grab about 2 or 3 threads. Although I think this would hold well enough since I am not going to use it as a military truck I have to fix it better. For now it is fine. When I fix it I will get pictures and explain better. I would recommend these lights overall.
 

springer1981

Well-known member
844
1,150
93
Location
Maine
I picked up a High Back conversion kit. It gives you a pair of the nicer high backs and a better mount for the drivers side that has more adjustment and travel. you have to drill out the rivets that hold the drivers seat contraptions and remove all that bull****.
View attachment 755145
I came across a local company/guy that has some of these seats NOS, identical to the kit in your picture. The price was reasonable compared to the $1000 + shipping regularly found on the auction site. So I bought a set today and started the install. Total of 43 rivets drilled out and the new mounting brackets are almost installed. I'll complete the install tomorrow and get some pictures. I'll have to cut and modify the shelf behind the seat in order to get it to go back as far as possible.

I also picked up a set of sun visors, it desperately needs them. However with the hardtop there are some additional mounts on the windshield frame where the visor mounts go. It will be my next challenge.
 

springer1981

Well-known member
844
1,150
93
Location
Maine
In a prior post I mentioned that I replaced my headlights with OEM Military LED Trucklights. When I mounted them the studs were too short. There are 2 reasons for this. The first is simply the stud length is shorter than the original standard headlights. Also the housing design has a slightly different radius and I found that was hitting the headlight bucket on the hood. These two things compounded the problem. I took some picture to help explain the issue.

In the first picture you can see the radius and stud length difference.
Lights1.jpg

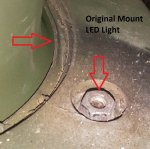
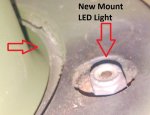
The next 2 pictures show the nut engagement with the original mount. The arrow points to where the headlight housing contacts the hood in the first picture and where it clears in the second picture. The other arrows show the thread engagement. Note the second picture I used a nylock nut and they are taller compared to the original hut.
Lights2.jpg Lights3.jpg

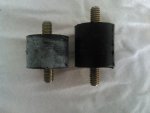
Here is a comparison of the original mount and the new longer mount. The original mount is 1" diameter and 3/4" long. The stud length is 3/8" at each end. The stud threads are 1/4-28.
Lights4.jpg

The new mount is 1" diameter and 1" long. The stud length is 1/2" on each end. The stud threads are 1/4-20. The stud extends slightly further into the headlight housing than the original but doesn't interfere with anything.

With the original mount you could clearly feel there was no movement in the headlight after it was bolted in. With the new mounts you can feel the slight movement the isolation mounts should have. Now nothing is hitting and it is bolted in securely with full thread engagement with the nuts.

Lights5.jpg

The mounts are available on the auction site. I paid $10 for a set of 7 but they average about $2.50 each. In my opinion I wouldn't mount these headlights without changing the rubber isolation mounts.
 

springer1981

Well-known member
844
1,150
93
Location
Maine
Since there doesn't seem to be much interest in this thread it will probably be my last update.

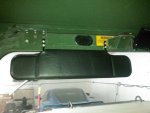
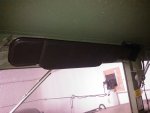
I mentioned in a previous post that I purchased some visors and they wouldn't fit because of the extra hard top brackets. Today I started looking at how to mount them. It actually was pretty easy, I used one of the existing bolts for the hardtop mount. I will still have to make some small spacers but that is easy. I used washers for now. That ties up this loose end.

visor.jpg visor1.jpg
 
Top
AdBlock Detected

We get it, advertisements are annoying!

Sure, ad-blocking software does a great job at blocking ads, but it also blocks useful features of our website like our supporting vendors. Their ads help keep Steel Soldiers going. Please consider disabling your ad blockers for the site. Thanks!

I've Disabled AdBlock
No Thanks