- 1,735
- 2,362
- 113
- Location
- Rosamond, CA
DIY alignments
When I got my rig squared up it was time to work in an alignment. To pay for one, no problem. I use my allowance LOL for parts not procedures. As it goes, it a hobby rig and a learning platform AND it keeps me out of the way for honey doo's. (someone thinks it's a money pit)
No guarantees here, but it worked for me. Thousand miles later, spot on. Balanced tire wear, no cupping, hopping, steering tracks nice, no wiggle / wobbles, no out of pocket $$. Simple tools, square, some string, good tape measure, protractor, straight edge (12 foot angle iron) patience and some band-aids. Well it is a HumV LOL. For the REAL breakdown see the TM's
Since my needs are reliability, highway safe, better than parade ready, camping, desert off road travel, trailer to the dump, weekend kick' it... and who loads them up to payload capacity? It was time to get to it.
Shims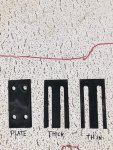 Piano keys.
Rear shims placement is easy (per wheel) to set camber. All the nuts and bolt can be a pain.
The way I did it was to pull all the shims, (wheel at a time, as I work alone) replace cup bolts with standard nuts (easier to spin with me fingers for test) Put truck back on the ground.
Then with a prying tool, wedge, flat blade, etc. working it between cup and frame. You can easily open or close the gap / spacing to get the desired shims thickness needed. If your tires are new, one thin shim will change the stance. You can see the results in real time. Measure the gap, size up the shims, slap them in, replace nuts to top locks and torque. Know there are thick and thin ones.
They hang on the top bolts and if lucky can be slipped in and out. There may be a thick one (backing plate) that is held in place by the bolt which needs to be backed out to remove, Guess they could fall out??
Front a bit harder with interaction with camber / castor, but basically the same. If you look at the upper control arm and mounting location of shim placement will shift the pivot-line (castor) between the ball joints. Between the two shim positions, front and rear (likely not the same) you should be able to walk thru a range of camber /castor setting, hitting the specification. measure the gap, replace with = shims (unless something is wack)
Toe-out on the rear another simple measurement. It can get a bit squirrel-ly if the wheels aren't squared / parallel to the thrust lines (down the center full time HumV) to start with. If not, excessive tire wear when trying to head straight, rear end crabbing left or right. Think four wheel steering.
Toe-in on the front is a bit tricky, as to which way is straight ahead. Steering box left to right to the stops, find the center and lock steering wheel down. Are wheels really tracking straight ahead?? DO NOT allow steering wheel to turn from this point on or you will be chasing your tail. Any loose joints or sloppy steering box is a deal breaker. Keep those tie rod clamp nuts and bolts near the wheels on the forward side of the wheel when done.
The big deal here (TM) is that tie rods pivot ends have about the same thread count left / right wheels. Make your measurements, adjusting to keep the balance of tie rods lengths and heading true straight, see above DO NOT.
As an added bonus... the steering wheel spoke should be pointed straight down (TM). It's an indexing thing, don't worry, most never are. Personal preference up, down, sideways, somewhere in between ?? Easy fix (note: it's not at the wheel)
Watch after removing shims that you have enough threads to pull it all together to torque specs. If you pull the backing plate with four holes to get spec. (rare) put it on the inside of frame and note something is wack.
Refresher > https://www.tirerack.com/tires/tiretech/techpage.jsp?techid=4 <
Work safety and hydrate. UPS just show up with the T-case seals. Back to playing.
Hobby HUMMWV alignment. In the driveway, at home. Save money too, CAMO
When I got my rig squared up it was time to work in an alignment. To pay for one, no problem. I use my allowance LOL for parts not procedures. As it goes, it a hobby rig and a learning platform AND it keeps me out of the way for honey doo's. (someone thinks it's a money pit)
No guarantees here, but it worked for me. Thousand miles later, spot on. Balanced tire wear, no cupping, hopping, steering tracks nice, no wiggle / wobbles, no out of pocket $$. Simple tools, square, some string, good tape measure, protractor, straight edge (12 foot angle iron) patience and some band-aids. Well it is a HumV LOL. For the REAL breakdown see the TM's
Since my needs are reliability, highway safe, better than parade ready, camping, desert off road travel, trailer to the dump, weekend kick' it... and who loads them up to payload capacity? It was time to get to it.
Shims
 Piano keys.
Rear shims placement is easy (per wheel) to set camber. All the nuts and bolt can be a pain.
The way I did it was to pull all the shims, (wheel at a time, as I work alone) replace cup bolts with standard nuts (easier to spin with me fingers for test) Put truck back on the ground.
Then with a prying tool, wedge, flat blade, etc. working it between cup and frame. You can easily open or close the gap / spacing to get the desired shims thickness needed. If your tires are new, one thin shim will change the stance. You can see the results in real time. Measure the gap, size up the shims, slap them in, replace nuts to top locks and torque. Know there are thick and thin ones.
They hang on the top bolts and if lucky can be slipped in and out. There may be a thick one (backing plate) that is held in place by the bolt which needs to be backed out to remove, Guess they could fall out??
Front a bit harder with interaction with camber / castor, but basically the same. If you look at the upper control arm and mounting location of shim placement will shift the pivot-line (castor) between the ball joints. Between the two shim positions, front and rear (likely not the same) you should be able to walk thru a range of camber /castor setting, hitting the specification. measure the gap, replace with = shims (unless something is wack)
Toe-out on the rear another simple measurement. It can get a bit squirrel-ly if the wheels aren't squared / parallel to the thrust lines (down the center full time HumV) to start with. If not, excessive tire wear when trying to head straight, rear end crabbing left or right. Think four wheel steering.
Toe-in on the front is a bit tricky, as to which way is straight ahead. Steering box left to right to the stops, find the center and lock steering wheel down. Are wheels really tracking straight ahead?? DO NOT allow steering wheel to turn from this point on or you will be chasing your tail. Any loose joints or sloppy steering box is a deal breaker. Keep those tie rod clamp nuts and bolts near the wheels on the forward side of the wheel when done.
The big deal here (TM) is that tie rods pivot ends have about the same thread count left / right wheels. Make your measurements, adjusting to keep the balance of tie rods lengths and heading true straight, see above DO NOT.
As an added bonus... the steering wheel spoke should be pointed straight down (TM). It's an indexing thing, don't worry, most never are. Personal preference up, down, sideways, somewhere in between ?? Easy fix (note: it's not at the wheel)
Watch after removing shims that you have enough threads to pull it all together to torque specs. If you pull the backing plate with four holes to get spec. (rare) put it on the inside of frame and note something is wack.
Refresher > https://www.tirerack.com/tires/tiretech/techpage.jsp?techid=4 <
Work safety and hydrate. UPS just show up with the T-case seals. Back to playing.
Hobby HUMMWV alignment. In the driveway, at home. Save money too, CAMO
Last edited:


