• Steel Soldiers now has a few new forums, read more about it at: New Munitions Forums!

  • Microsoft MSN, Live, Hotmail, Outlook email users may not be receiving emails. We are working to resolve this issue. Please add support@steelsoldiers.com to your trusted contacts.

Picked up 6 MEP-802A gensets and will be documenting making them all runners here

Ray70

Well-known member
2,595
5,914
113
Location
West greenwich/RI
On the fuel level sensor you are correct, polarity doesn't matter. I usually connect black to what used to be the ground and the sense wire to the red / brown lead, but really doesn't matter and really no point in attaching to one of the mounting screws, I usually just connect with adhesive lined heat shrink butt connectors.
 

Guyfang

Moderator
Staff member
Moderator
16,768
24,103
113
Location
Burgkunstadt, Germany
The parts for the secondary fuel filter finally showed up today, so I was able to go back to working on the 2006 unit. I know I need to pop the head on the 2007, but I'll save that work for a rainy day. :)

After getting the filter installed, I tried priming, but the fuel pump (old square style), just made a faint humming sound. Undid the suction side and tried blowing into the line going to the tank. Was completely clogged. Using compressed air, I cleared the blockage. While I had the line off, I dripped a little diesel into the inlet of the pump. It still just gave a faint hum. Tapped on the side of it, and little by little it got louder until all of a sudden it started pumping. (This is a very well know problem. You have not fixed it. Just prolonged it to the day the lights go out. Get a new pump. )

I then reconnected the line from the tank and let it run for 5+ minutes to get the fuel circulate real good. I then tried to crank it. Nothing. I heard a click coming from the control box, but the main solenoid on the starter never engaged. Put a voltmeter on the solenoid and it never goes to 24V when trying to crank. Same deal using the dead crank switch.

So I guess the relay that controls the starter solenoid needs to have its contacts cleaned? Need to study the starter circuit diagram to diagnose further.
( Apply 24VDC to wire # 114C on the S10-1. That goes right to the K2-X1. If the motor will not turn over, time to look at K2. Remove X1 & X2 wires from the K2 and apply 24VDC to those terminals. That way you have both + & -. )

Also also got in some fuel senders today. The 5.5" ones. Am I correct that it doesn't matter how I connect the red and black wires since it is just a resistor and the whole thing is floating being a plastic fuel tank? Or should I slip the one eyelet under one of the screws and tie the black wire from the sensor to it?
Open to read comments. Your hot tonight Ray!
 

pclausen

Well-known member
Steel Soldiers Supporter
452
281
63
Location
Afton, VA
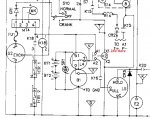
I took a look at the circuitry around the starter solenoid and dead crank switch. I do get 24V at the X1 terminal of the K2 relay when applying the dead crank switch or moving the main switch to START.

starter circuit.jpg

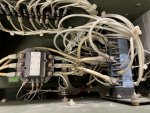
So I pulled out the K2 relay. Its buried in there below all those main power wires:

IMG_0491.JPG

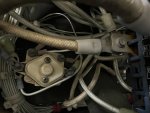
After removing those, I was able to get to it:

IMG_0492.JPG

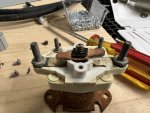
The coil measured about 120 ohms, so that's not the problem. Removed the "hat":

IMG_0493.JPG

And separated the coil and plunger from the top piece:

IMG_0494.JPG

Plunger is rusted solid to the bushing piece or whatever it is.

I'm not having too much luck Googling/eBay'ing an Eaton FSCM 81640 relay.

Any good leads on where to pick one up? Maybe a replacement unit with similar specs?

I checked the Filters & Parts thread, but didn't see anything about the K2 relay.
 

pclausen

Well-known member
Steel Soldiers Supporter
452
281
63
Location
Afton, VA
I guess $60 shipped is fair. For right now, however, I'm going to steal the K2 relay from my parts 802 set. I also went ahead and dropped that rusted K2 in a cup of Evapo-Rust. You never know...
 
Last edited by a moderator:

DieselAddict

Well-known member
Steel Soldiers Supporter
2,532
2,059
113
Location
Efland, NC
That looks like it. Does the relay you have indicate it’s 50 amp or 100 amp? When I look at the part number the references I see indicate 100 amp.
 

pclausen

Well-known member
Steel Soldiers Supporter
452
281
63
Location
Afton, VA

Guyfang

Moderator
Staff member
Moderator
16,768
24,103
113
Location
Burgkunstadt, Germany
OVERALL LENGTH2 3/4 INCHES MAXIMUM
CENTER TO CENTER DISTANCE BETWEEN MOUNTING FACILITIES PARALLEL TO LENGTH2 9/50 INCHES NOMINAL SINGLE MOUNTING FACILITY
OVERALL HEIGHT2 5/8 INCHES MAXIMUM
OVERALL WIDTH2 1/8 INCHES MAXIMUM
UNTHREADED MOUNTING HOLE DIAMETER0 219/1000 INCHES NOMINAL SINGLE MOUNTING FACILITY
WINDING QUANTITY1
COIL QUANTITY1
WINDING DC RESISTANCE RATING94 OHMS NOMINAL SINGLE WINDING
DUTY TYPECONTINUOUS
MOUNTING FACILITY TYPE AND QUANTITY2 UNTHREADED HOLE SINGLE MOUNTING FACILITY
MOUNTING FACILITY PATTERNIN-LINE SINGLE MOUNTING FACILITY
NONPILE-UP MAIN CONTACT ARRANGEMENT1 POLE, SINGLE THROW, NORMALLY OPEN, DOUBLE MAKE, MOMENTARY ACTION
OPERATING VOLTAGE RATING AND TYPE AT SPECIFIED TEMP28 VOLTS DC 25 DEG CELSIUS SINGLE WINDING
MAIN CONTACT LOAD CURRENT RATING AT MAXIMUM RATED VOLTAGE50 AMPERES DC RESISTIVE LOAD
MAIN CONTACT MAXIMUM VOLTAGE RATING IN VOLTS28 DC
TERMINAL TYPE AND QUANTITY4 SCREW ALL FUNCTIONS

This part is in a million different pieces of equipment.
 

pclausen

Well-known member
Steel Soldiers Supporter
452
281
63
Location
Afton, VA
Thanks for the info and links!

I did steal the K2 relay from the parts set and installed it in the 2006 unit. That did the trick and I was able to crank it over. On the 2nd attempt it started to fire, but I shut it down right away since I haven't added any coolant yet, but that's next!
 

pclausen

Well-known member
Steel Soldiers Supporter
452
281
63
Location
Afton, VA
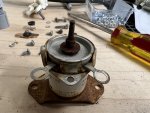
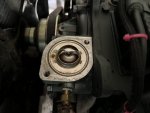
I filled the coolant system with water and I had a leak at the thermostat housing using the OEM gasket. Drained the system, removed the intake and muffler and upper radiator hose and took the housing apart. I then cleaned it up as best I could:

IMG_0500.JPG

The new water pump was machined pretty rough, so my guess is what's why it leaked.

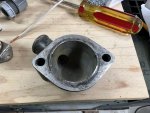
Housing:

IMG_0501.JPG

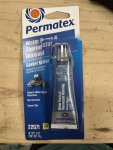
I'm trying this stuff this time:

IMG_0502.JPG

Laid down a bead and put things together finger tight. Came back an hour later and torqued down to spec and will let it sit 24 hours per the directions.

I ended up just soldering and heat shrinking the new fuel sensor:

IMG_0503.JPG

Figure that sensor will last many thousand of hours before failing.
 

pclausen

Well-known member
Steel Soldiers Supporter
452
281
63
Location
Afton, VA
Refilled the cooling system on the 2006 with water and I have no leaks. So I proceeded to crank and start it. Here's a video from that initial start:


Something seems "off". I think the RPMs are too high, but my instrument panel is completely dead, so I'm flying blind. I let it run for about 10 minutes until both the upper and lower radiator hoses were warm to the touch. You will notice in the video how the whole set seems to be swaying a little side to side.

I let it sit for a few minutes, reduced the RPMs a bit via the frequency adjuster and started it again:


With the reduced RPMs, the swaying seems to be gone, but it still seems off balance. It is almost as if its running on one cylinder.

I'll see if I can find my infrared thermometer and shoot both the front and back of the exhaust manifold to see if there is a significant temperature difference.
 

pclausen

Well-known member
Steel Soldiers Supporter
452
281
63
Location
Afton, VA
Thanks for that. Definitely starts a lot smoother than mine. Kind of hard to make out the rpms from the audio alone, but I think mine is in the ballpark.

I started checking voltages on the "I" terminals on my engine gauges. They are all around 7.8 volts instead of 24 volts. So I'll chase that down first. Probably a loose/bad ground somewhere.
 

pclausen

Well-known member
Steel Soldiers Supporter
452
281
63
Location
Afton, VA
They are indeed! After a 7 year hiatus.

So I got the low voltage at the "I" terminals sorted out. The 24V feeder from #3 on the S1 master switch was wired to the S terminal on M5 (fuel level indicator) and that was pulling down the voltages on the other "I" terminals, since they are all wired together.

Unfortunately, all 3 engine indicators are shot, so those will need to be replaced. I kind of knew this already since I had tested them before, but now that the engine is alive, I need to do something about it. I have several dead ones in some of the other sets, but I do have 2 working sets I believe. Not too worried about that right now. I want to get the frequency meter going first so that I can set the engine to 1,800 rpm.

Need to look into testing all four of the remaining indicators I suppose. I'll research the process for that next, or just follow the troubleshooting steps in the TM, and go through table 2.6 in 9-6115-641-24, one line item at a time.

Unfortunately the wife made it very clear that I'm not to start the generator again in the garage tonight (garage is attached to the house and in close proximity to the kitchen.) I will admit starting it for the first time inside the garage was not the best idea. There is now a nice crunching sound walking on the floor from all the tiny rust particles that were blown out of the muffler on that first start. :D

Hopefully spring is right around the corner and I can move my operation back down to the shop building where it belongs. The 1.5 car garage is pretty cramped to work in, especially with 3 sets sitting on the floor.
 

Guyfang

Moderator
Staff member
Moderator
16,768
24,103
113
Location
Burgkunstadt, Germany
Thanks for that. Definitely starts a lot smoother than mine. Kind of hard to make out the rpms from the audio alone, but I think mine is in the ballpark.

I started checking voltages on the "I" terminals on my engine gauges. They are all around 7.8 volts instead of 24 volts. So I'll chase that down first. Probably a loose/bad ground somewhere.

Lets keep things in prospective here. The 802A is a shaker, from the get go. Much rougher then the 803A. It is a 2 jug machine. You have it torn apart, denying it any chance to not sway, and shake even more then it normally will. If you run it long and hard in this condition, do not act surprised if something falls off. Give it a break. If it walks across the floor, you need to look into that. But from what I saw, its not all that bad.
 
Top
AdBlock Detected

We get it, advertisements are annoying!

Sure, ad-blocking software does a great job at blocking ads, but it also blocks useful features of our website like our supporting vendors. Their ads help keep Steel Soldiers going. Please consider disabling your ad blockers for the site. Thanks!

I've Disabled AdBlock
No Thanks