• Steel Soldiers now has a few new forums, read more about it at: New Munitions Forums!

  • Microsoft MSN, Live, Hotmail, Outlook email users may not be receiving emails. We are working to resolve this issue. Please add support@steelsoldiers.com to your trusted contacts.

Third's Build Discussion

Third From Texas

Well-known member
2,766
6,498
113
Location
Corpus Christi Texas
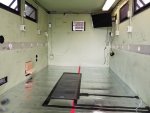
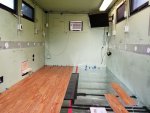
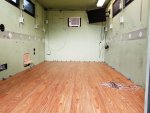
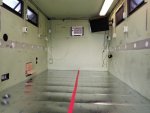
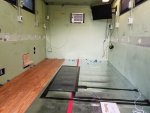
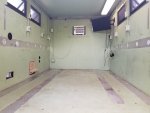
Floor and radiant heater element are in. I'm still not convinced that this "click" flooring is going to stay in place. It's dependent on gravity to hold it in place. Even with the perimeter secured, one good bump and it's "JINGA". I think I'm going to have to use some contact cement if I want it to stay down and in one piece. I suspect that gluing it to the underlayment will do the trick and hold it all together.


20220824_121209.jpg

20220824_133203.jpg


20220824_150838.jpg

20220824_163740.jpg
 

Attachments

Last edited:

Rhino 5/4

Well-known member
518
1,902
93
Location
Waco, Tx
Floor and radiant heater element are in. I'm still not convinced that this "click" flooring is going to stay in place. Even with the perimeter secured, one good bump and it's "JINGA". I think I'm going to have to use some contact cement if I want it to stay down and in one piece.View attachment 877205

View attachment 877207


View attachment 877209

View attachment 877210
Couple fathoes in the middle will keep the floor from bucklin and springs compressed and be a ballast to keep the swayin down while toy time is goin on.... problem solved 😌 il_794xN.2169742923_ccg8.jpg
 

Mullaney

Well-known member
Steel Soldiers Supporter
Supporting Vendor
7,716
19,766
113
Location
Charlotte NC
Floor and radiant heater element are in. I'm still not convinced that this "click" flooring is going to stay in place. It's dependent on gravity to hold it in place. Even with the perimeter secured, one good bump and it's "JINGA". I think I'm going to have to use some contact cement if I want it to stay down and in one piece. I suspect that gluing it to the underlayment will do the trick and hold it all together.


View attachment 877205

View attachment 877207


View attachment 877209

View attachment 877210
.
Sure looks neat. Yeah, I have no idea what holds it down... Wonder if the snap lock is at a slight angle and that helps keep it pressed in a downward direction? Still, seems like some sort of shoe molding would be required around the edges.
 

Third From Texas

Well-known member
2,766
6,498
113
Location
Corpus Christi Texas
.
Sure looks neat. Yeah, I have no idea what holds it down... Wonder if the snap lock is at a slight angle and that helps keep it pressed in a downward direction? Still, seems like some sort of shoe molding would be required around the edges.
There are several types of "click" flooring. Some snaps together at angles, some is just tongue-n-groove, some (like what I have) also uses a small lip on the edges. I'd maybe be less concerned if it were heavier 8mm flooring, but his is just 4mm vinyl.

Yes, I'll have the perimeter secured (extremely well, actually). The base of the bed pedestal traverses all the planks (which will help hold things in place). As well as my shower base frame, the closet frame, and the kitchen counter frame.

I just don't know if that will be enough. Only the center is of concern. All it would take is one corner in the middle to bounce up and pop the whole floor loose.
 
Last edited:

Mullaney

Well-known member
Steel Soldiers Supporter
Supporting Vendor
7,716
19,766
113
Location
Charlotte NC
There are several types of "click" flooring. Some snaps together at angles, some is just tongue-n-groove, some (like what I have) also uses a small lip on the edges. I'd maybe be less concerned if it were heavier 8mm flooring, but his is just 4mm vinyl.

Yes, I'll have the perimeter secured (extremely well, actually). The base of the bed pedestal traverses all the planks (which will help hold things in place). As well as my shower base frame, the closet frame, and the kitchen counter frame.

I just don't know if that will be enough. Only the center is of concern. All it would take is one corner to bounce up and pop the whole floor loose.
.
Yeah. Son put some of that stuff in his house.
It has been there for several years and it still looks as good as the day he installed it.
On the other hand - his house doesn't move or bounce or twist...
 

Third From Texas

Well-known member
2,766
6,498
113
Location
Corpus Christi Texas
So I secured the perimeter of the flooring with 2x2 and drove around town for a couple days. I technically live in northern Mexico and the streets here have more potholes than the Bagdad highway after an airstrike. I bounced the crap outta things. No issues with any part of the floor popping up so far and I suspect that once the remaining items are bolted in place it's not going anywhere.

Moving on...

This week I'm going to start tearing out the Hunter arctic heater on the passenger side and the useless intake fan on the driver side. The heater is just such overkill (I may re-task it to heat my garage) and should require hearing protection when used in the habitat (90db with just the fan running). So I'll gut both boxes. Not sure if I'll go ahead and build/insulate the compartments or if I'll just seal them up for now until I know what I'll use them for (I intend to leave the upper section of the front wall paneling removeable for the time being). The existing heater box may end up with a little Chinese diesel heater (there is an entire community dedicated to those little heaters and the vanlife hippies swear by them). The other may become drone storage/hangar. :)


I've developed an issue with my window unit a/c. The controller board is bad (at three years old about right on time for a window unit to crap out down here, but it's typically mechanical failure due to corrosion). I'm just gonna stuff another $100 Walmart a/c in the hole and never look back (that's exactly why I chose to use an inexpensive window unit).

So my goal this week is the entire front wall getting a makeover. I'm still sorting out the spots that I can drive rivnuts and where I need to tap into the sub frame to secure the 2x2 wall.
 

Third From Texas

Well-known member
2,766
6,498
113
Location
Corpus Christi Texas
I plan on a tool box kitchen as well.

Are you assuming the truck will be level or are you leveling the kitchen some how?
I don't intend to ever run my fridge on propane, and that's the only "leveling" issue I'm aware of. I don't think the fridge is as picky about it while on electric. But I'm pretty good about reading the cab level indicator and the hab follows suit. Even on the beach you have to find just the right spot to be both elevated and level. I do carry some wooden blocks for ballast but I've never had to place one under a tire.

As I said up thread I'm still looking at stabilizer jacks as well (more to keep the hab from rocking). But if need be I can always incorporate a leveling aspect into it. I've kept my build pretty simple where possible, but I'm adding to it as little features crop up.
 

chucky

Well-known member
Steel Soldiers Supporter
6,622
18,965
113
Location
TN .
I don't intend to ever run my fridge on propane, and that's the only "leveling" issue I'm aware of. I don't think the fridge is as picky about it while on electric. But I'm pretty good about reading the cab level indicator and the hab follows suit. Even on the beach you have to find just the right spot to be both elevated and level. I do carry some wooden blocks for ballast but I've never had to place one under a tire.

As I said up thread I'm still looking at stabilizer jacks as well (more to keep the hab from rocking). But if need be I can always incorporate a leveling aspect into it. I've kept my build pretty simple where possible, but I'm adding to it as little features crop up.
Oh it will get to the point every time you lay down your brain will be flooded with ideas and how too's will just appear out of nowhere ! i would just awake with all this new data like i had read it out of a book .
 

Third From Texas

Well-known member
2,766
6,498
113
Location
Corpus Christi Texas
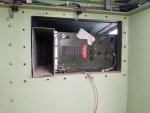
Hunter heater is almost out. Took me awhile to figure out how they got it in there. Had to take off all the brackets and the vent section), I can't tell what the two ss fuel lines are sealed with where they come thru the one frame member. Looks like maybe some sort of epoxy, so I don't think they'll be salvageable.

Kinda hate deleting a working item, but it's just not viable for this build. I even studied ways to do some sound deadening. If I could convert the unit to 24v I'd keep it. But if I have to pull that many amps to run this blower, it's more efficient to just run a little electric heater in the hab.

Not sure if I'll keep it. 60k btu will heat the garage, LOL

This is smaller than my 60k "Batmobile turbine engine" heater (but not nearly as fun to play with).

20220828_151631.jpg


Third From Texas

Well-known member
2,766
6,498
113
Location
Corpus Christi Texas
One of the most laughable design aspects of the M1079 is the silly intake fan in the hab.

This is the 4"x4" hole the Army made for air to come in:
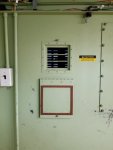
20220828_180337.jpg

This is the 9"x9" fan in the 12"x12" box that the Army made to push air in the 4"x4" hole:
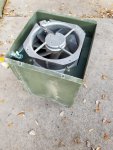
20220828_180054.jpg

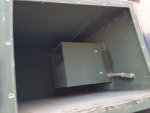
This is the 10,000 cu/in box the Army made to hold the 12"x12" box that holds the 9"x9" fan that blows air in the 4"x4" hole:
20220828_164718_001.jpg


The problem is, the whole thing doesn't work. The fan is mounted in such a way that it's so close to the 4" hole that only the center hub (that doesn't turn and blocks air) is exposed. Thus less than 25% of the fan's potential air flow is available. And it's such a waste of space.

The Hunter heater (opposite side of the truck) fits tight in it's nook with no wasted space. Very efficient. I get that.

The center section is pretty much wide open so as to allow a number of large A/C systems. I get that.

But what in the name of FJB were they thinking when they designed the intake fan system? So much wasted space and a critical item that basically doesn't work.

Anyway, it's all in my scrap pile now...

I'm not sure what all I will do with the space. I've seen the two cubbies made into stowage in various floorplans. But in my case it's over the bed, so not exactly easy-access stowage. I'd move the a/c to where the heater was but the TV pretty much blocks that space so I'm not certain that's the best idea (no worse than having the heater blowing on the TV, though).

The BIG box that the tiny fan came out of would make for a good external storage spot. Lots of room. too. But that my become my drone hangar.

I'll re-task the 8" 120v fan to push air into the generator enclosure when it's running.
 
Last edited:

Third From Texas

Well-known member
2,766
6,498
113
Location
Corpus Christi Texas
OK, the front wall is pretty much prepped for now. I'm going to seal it all up for the time being, insulate the crap out of the outside faces, hang my frames, and panel the front wall shut (until such time that I figure out what to do with the overhead boxed spaces).

So the next couple days involve adding five new electrical drops with outlets. These are "under the counter" 120v power sources for the fridge, microwave, air fryer, and water filtration pump. A fifth landing will need to be run for the thermal flooring. I have never used grey pvc conduit (old school metal bender guy here). Looking forward to trying to do some bends with the heat gun.

I'm also deleting two of the existing drops and converting the remaining phone drop into a 12v LED dimmer switch.

I need to get the giant monolith breaker box torn out and replaced with the lunch pale-sized box I picked up. I've had it out before when I converted the 120/240/208 to all 120. The OEM Siemens panel and breakers are worth something so I'm sure that I can sell it on Craigs List.

And I need to pull the remaining 120v light fixture off the ceiling. They are LED converted and I need to get them all mounted in my garage (the lighting is horrid in there).

Then I want finish up my wire deletes in the hab and get ready to prep the ceiling and wire track for paint.

I *think* that I have most of my 2x2 frame mounting locations resolved. As soon as all the electrical is done, I'll get the rest of the wall frames hung.

My goal is to have all the electrical and walls done in two weeks time. Then back to painting and moving in the modules for assembly.
 
Last edited:

Guyfang

Moderator
Staff member
Moderator
16,768
24,103
113
Location
Burgkunstadt, Germany
Not wanting to appear to be Hijacking a thread here, but we in Germany use a lot of PVC in Elektro installation. About 95%. We mostly use prefab bends, as it saves time. But when we use heat, we found that packing the PVC tube with dry sand, and using low, even heat, gives the best looking bends. Take your time, low, even heat. Get in a hurry, and it looks like crap, and or will collapse. Also, I would maybe buy a little extra PVC, and try it out 3-4 times before you do it for real.
 

chucky

Well-known member
Steel Soldiers Supporter
6,622
18,965
113
Location
TN .
OK, the front wall is pretty much prepped for now. I'm going to seal it all up for the time being, insulate the crap out of the outside faces, hang my frames, and panel the front wall shut (until such time that I figure out what to do with the overhead boxed spaces).

So the next couple days involve adding five new electrical drops with outlets. These are "under the counter" 120v power sources for the fridge, microwave, air fryer, and water filtration pump. A fifth landing will need to be run for the thermal flooring. I have never used grey pvc conduit (old school metal bender guy here). Looking forward to trying to do some bends with the heat gun.

I'm also deleting two of the existing drops and converting the remaining phone drop into a 12v LED dimmer switch.

I need to get the giant monolith breaker box torn out and replaced with the lunch pale-sized box I picked up. I've had it out before when I converted the 120/240/208 to all 120. The OEM Siemens panel and breakers are worth something so I'm sure that I can sell it on Craigs List.

And I need to pull the remaining 120v light fixture off the ceiling. They are LED converted and I need to get them all mounted in my garage (the lighting is horrid in there).

Then I want finish up my wire deletes in the hab and get ready to prep the ceiling and wire track for paint.

I *think* that I have most of my 2x2 frame mounting locations resolved. As soon as all the electrical is done, I'll get the rest of the wall frames hung.

My goal is to have all the electrical and walls done in two weeks time. Then back to painting and moving in the modules for assembly.
Are you going to use single #12 solid or 12/2 romex on your runs from your panel to your outlets ? For the sake of ease if you seperate you 110 boxs to say everything 110 drivers side on 1 15 amp breaker and same for passenger side on another breaker .

Shop around and find you a hundred ft of 10/3 stranded SO cable cut into 2 50ft pieces tie one end to its own breaker in the panel pop a hole in the floor and drop the other end outside and put a male plug on it and build the other 50 ft like an extension chord so if you can reach a 110 outlet where ever your at on the first 50 ft great but you have a total of 100 ft shore chord or to plug to a remote generator

So in the panel you just keep that breaker off till you need to bring in outside power from where ever and to power the panel when your not getting 110 anywhere else by just flipping the shore breaker. Then do the solar/inverter the same way on a seperate breaker !
 
Top
AdBlock Detected

We get it, advertisements are annoying!

Sure, ad-blocking software does a great job at blocking ads, but it also blocks useful features of our website like our supporting vendors. Their ads help keep Steel Soldiers going. Please consider disabling your ad blockers for the site. Thanks!

I've Disabled AdBlock
No Thanks